Brother International PC-420PRW Users Manual - English - Page 120
Combining patterns, Repeat steps
 |
View all Brother International PC-420PRW manuals
Add to My Manuals
Save this manual to your list of manuals |
Page 120 highlights
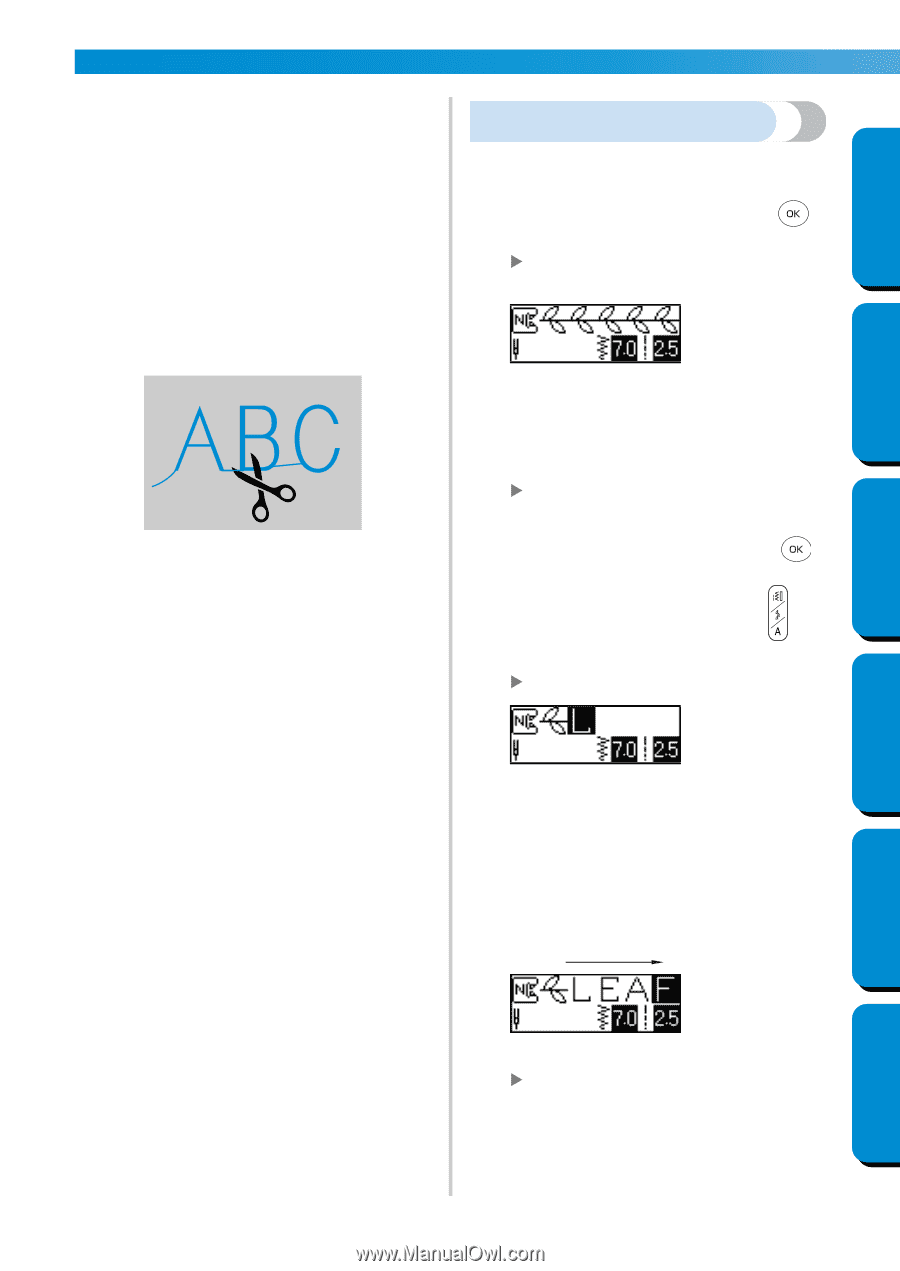
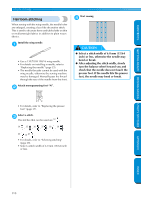
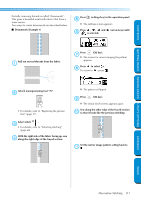
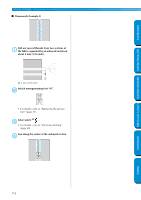
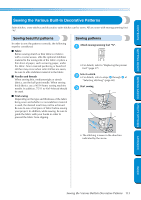
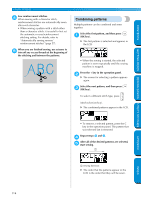
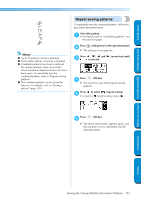
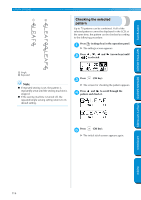
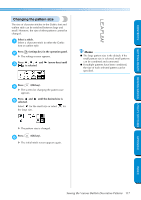
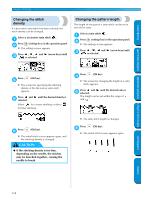
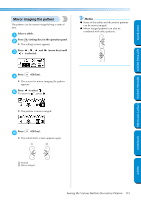
GETTING READY SEWING BASICS UTILITY STITCHES UTILITY STITCHES CONTENTS Sew reinforcement stitches. 4 When sewing with a character stitch, reinforcement stitches are automatically sewn after each character. • When sewing a pattern with a stitch other than a character stitch, it is useful to first set the automatic reverse/reinforcement stitching setting. For details, refer to "Automatically sewing reverse/ reinforcement stitches" (page 57). When you are finished sewing, use scissors to 5 trim off any excess threads at the beginning of the stitching and between the patterns. Combining patterns Multiple patterns can be combined and sewn together. Select the first pattern, and then press 1 (OK key). X The first pattern is selected and appears in the LCD. • When the sewing is started, the selected pattern is sewn repeatedly until the sewing machine is stopped. Press the + key in the operation panel. 2 X The screen for selecting a pattern appears again. Select the next pattern, and then press 3 (OK key). To select a different stitch type, press (stitch selection key). X The combined patterns appear in the LCD. APPENDIX • To remove a selected pattern, press the C key in the operation panel. The pattern that was selected last is removed. Repeat steps 2 and 3. 4 After all of the desired patterns are selected, 5 start sewing. 1 1 Sewing direction X The order that the patterns appear in the LCD is the order that they will be sewn. INDEX 114
-
 1
1 -
2
-
3
-
4
-
5
-
6
-
7
-
8
-
9
-
10
-
11
-
12
-
13
-
14
-
15
-
16
-
17
-
18
-
19
-
20
-
21
-
22
-
23
-
24
-
25
-
26
-
27
-
28
-
29
-
30
-
31
-
32
-
33
-
34
-
35
-
36
-
37
-
38
-
39
-
40
-
41
-
42
-
43
-
44
-
45
-
46
-
47
-
48
-
49
-
50
-
51
-
52
-
53
-
54
-
55
-
56
-
57
-
58
-
59
-
60
-
61
-
62
-
63
-
64
-
65
-
66
-
67
-
68
-
69
-
70
-
71
-
72
-
73
-
74
-
75
-
76
-
77
-
78
-
79
-
80
-
81
-
82
-
83
-
84
-
85
-
86
-
87
-
88
-
89
-
90
-
91
-
92
-
93
-
94
-
95
-
96
-
97
-
98
-
99
-
100
-
101
-
102
-
103
-
104
-
105
-
106
-
107
-
108
-
109
-
110
-
111
-
112
-
113
-
114
-
 115
115 -
 116
116 -
 117
117 -
 118
118 -
 119
119 -
 120
120 -
 121
121 -
 122
122 -
 123
123 -
 124
124 -
 125
125 -
126
-
127
-
128
-
129
-
130
-
131
-
132
-
133
-
134
-
135
-
136
-
137
-
138
-
139
-
140
-
141
-
142
-
143
-
144
-
145
-
146
-
147
-
148
-
149
-
150
-
151
-
152
-
153
 |
 |