Brother International ULT-2001 Users Manual - English - Page 230
Embroidery Applications, Abc
 |
View all Brother International ULT-2001 manuals
Add to My Manuals
Save this manual to your list of manuals |
Page 230 highlights
EMBROIDERY APPLICATIONS Aligning the Left Side of a Pattern and Sewing 1. Mark the embroidery start position on the fabric, as shown. CONTENTS 1 - 2 - 2. Press so it appears as . The needle position moves to the bottom left corner of the pattern (the embroidery frame moves so that the needle is positioned correctly). 3 - 4 - ABC 5 - 3. Use to align the needle and the mark on the fabric, and begin embroidering the pattern. CAUTION Do not lower the needle while the embroidery frame is moving. Otherwise, injury may result. 6 - 7 - 4. View of the finished pattern. 8 - 9 - ?! Embroidery 5-55 Index
-
 1
1 -
2
-
3
-
4
-
5
-
6
-
7
-
8
-
9
-
10
-
11
-
12
-
13
-
14
-
15
-
16
-
17
-
18
-
19
-
20
-
21
-
22
-
23
-
24
-
25
-
26
-
27
-
28
-
29
-
30
-
31
-
32
-
33
-
34
-
35
-
36
-
37
-
38
-
39
-
40
-
41
-
42
-
43
-
44
-
45
-
46
-
47
-
48
-
49
-
50
-
51
-
52
-
53
-
54
-
55
-
56
-
57
-
58
-
59
-
60
-
61
-
62
-
63
-
64
-
65
-
66
-
67
-
68
-
69
-
70
-
71
-
72
-
73
-
74
-
75
-
76
-
77
-
78
-
79
-
80
-
81
-
82
-
83
-
84
-
85
-
86
-
87
-
88
-
89
-
90
-
91
-
92
-
93
-
94
-
95
-
96
-
97
-
98
-
99
-
100
-
101
-
102
-
103
-
104
-
105
-
106
-
107
-
108
-
109
-
110
-
111
-
112
-
113
-
114
-
115
-
116
-
117
-
118
-
119
-
120
-
121
-
122
-
123
-
124
-
125
-
126
-
127
-
128
-
129
-
130
-
131
-
132
-
133
-
134
-
135
-
136
-
137
-
138
-
139
-
140
-
141
-
142
-
143
-
144
-
145
-
146
-
147
-
148
-
149
-
150
-
151
-
152
-
153
-
154
-
155
-
156
-
157
-
158
-
159
-
160
-
161
-
162
-
163
-
164
-
165
-
166
-
167
-
168
-
169
-
170
-
171
-
172
-
173
-
174
-
175
-
176
-
177
-
178
-
179
-
180
-
181
-
182
-
183
-
184
-
185
-
186
-
187
-
188
-
189
-
190
-
191
-
192
-
193
-
194
-
195
-
196
-
197
-
198
-
199
-
200
-
201
-
202
-
203
-
204
-
205
-
206
-
207
-
208
-
209
-
210
-
211
-
212
-
213
-
214
-
215
-
216
-
217
-
218
-
219
-
220
-
221
-
222
-
223
-
224
-
 225
225 -
 226
226 -
 227
227 -
 228
228 -
 229
229 -
 230
230 -
 231
231 -
 232
232 -
 233
233 -
 234
234 -
 235
235 -
236
-
237
-
238
-
239
-
240
-
241
-
242
-
243
-
244
-
245
-
246
-
247
-
248
-
249
-
250
-
251
-
252
-
253
-
254
-
255
-
256
-
257
-
258
-
259
-
260
-
261
-
262
-
263
-
264
-
265
-
266
-
267
-
268
-
269
-
270
-
271
-
272
-
273
-
274
-
275
-
276
-
277
-
278
-
279
-
280
-
281
-
282
-
283
-
284
-
285
-
286
-
287
-
288
-
289
-
290
-
291
-
292
-
293
-
294
-
295
-
296
-
297
-
298
-
299
-
300
-
301
-
302
-
303
-
304
-
305
-
306
-
307
-
308
-
309
-
310
-
311
-
312
-
313
-
314
-
315
-
316
-
317
-
318
-
319
 |
 |

Embroidery
5-55
1 —
2 —
3 —
4 —
5 —
6 —
7 —
8 —
?
!
9 —
CONTENTS
Index
ABC
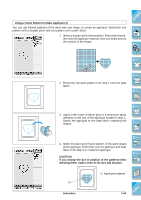
EMBROIDERY APPLICATIONS
Aligning the Left Side of a Pattern and Sewing
1.
Mark the embroidery start position on the fabric, as
shown.
2. Press
so it appears as
.
The needle position moves to the bottom left corner of
the pattern (the embroidery frame moves so that the
needle is positioned correctly).
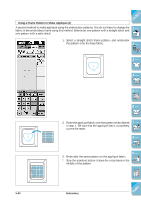
3. Use
to align the needle and the mark on the
fabric, and begin embroidering the pattern.
CAUTION
Do not lower the needle while the embroidery
frame is moving. Otherwise, injury may result.
4.
View of the finished pattern.