Brother International ULT-2001 Users Manual - English - Page 302
bump it during sewing., the area where the frame may
 |
View all Brother International ULT-2001 manuals
Add to My Manuals
Save this manual to your list of manuals |
Page 302 highlights
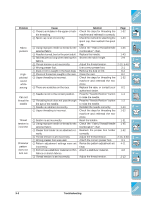
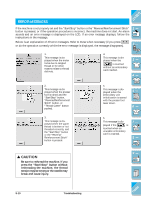
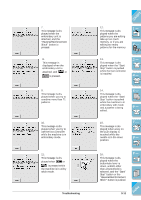
Problem Embroidery pattern does not sew out correctly Cause 1 Thread is twisted. 2 Fabric was not inserted into the frame correctly ( fabric was loose, etc.). 3 Stabilizing material was not attached. 4 There was an object placed near the machine, and the carriage or embroidery frame hit the object during sewing. 5 Fabric outside the frame edges interferes with the sewing arm, so the embroidery unit can not move. 6 Fabric is too heavy, so the embroidery unit can not move freely. 7 Fabric is hanging off the table. 8 Fabric is snagged or caught on something. 9 Embroidery frame was removed during sewing (for example, to reset the bobbin). The presser foot was bumped or moved while removing or attaching the embroidery frame, or the embroidery unit was moved. Solution Use scissors, etc., to cut the twisted thread and remove it from the race, etc. If the fabric is not stretched tight in the frame, the pattern may turn out poorly or there may be shrinkage of the pattern. Set the fabric into the frame correctly. Always use stabilizing material, especially with stretch fabrics, lightweight fabrics, fabrics with a coarse weave, or fabrics that often cause pattern shrinkage. See your authorized dealer for the proper stabilizer. If the frame bumps something during sewing, the pattern will turn out poorly. Do not place anything in the area where the frame may bump it during sewing. Reinsert the fabric in the embroidery frame so that the excess fabric is away from the sewing arm, and rotate the pattern 180 degrees. Place a large thick book or similar object under the arm head to lightly lift the heavy side and keep it level. If the fabric is hanging off the table during embroidery, the embroidery unit will not move freely. Place the fabric so that it does not hang off the table (or, hold fabric to keep from dragging). Stop the machine and place the fabric so that it does not get caught or snagged. If the presser foot is bumped or the embroidery unit is moved during sewing, the pattern will not turn out. Be careful when removing or reattaching the embroidery frame during sewing. Page 7-2 5-21 5-20 5-29 5-46 - 5-29 - 5-35 CONTENTS 1 - 2 - 3 - 4 - 5 - 6 - 7 - 8 - 9 - ?! Troubleshooting 9-7 Index
-
 1
1 -
2
-
3
-
4
-
5
-
6
-
7
-
8
-
9
-
10
-
11
-
12
-
13
-
14
-
15
-
16
-
17
-
18
-
19
-
20
-
21
-
22
-
23
-
24
-
25
-
26
-
27
-
28
-
29
-
30
-
31
-
32
-
33
-
34
-
35
-
36
-
37
-
38
-
39
-
40
-
41
-
42
-
43
-
44
-
45
-
46
-
47
-
48
-
49
-
50
-
51
-
52
-
53
-
54
-
55
-
56
-
57
-
58
-
59
-
60
-
61
-
62
-
63
-
64
-
65
-
66
-
67
-
68
-
69
-
70
-
71
-
72
-
73
-
74
-
75
-
76
-
77
-
78
-
79
-
80
-
81
-
82
-
83
-
84
-
85
-
86
-
87
-
88
-
89
-
90
-
91
-
92
-
93
-
94
-
95
-
96
-
97
-
98
-
99
-
100
-
101
-
102
-
103
-
104
-
105
-
106
-
107
-
108
-
109
-
110
-
111
-
112
-
113
-
114
-
115
-
116
-
117
-
118
-
119
-
120
-
121
-
122
-
123
-
124
-
125
-
126
-
127
-
128
-
129
-
130
-
131
-
132
-
133
-
134
-
135
-
136
-
137
-
138
-
139
-
140
-
141
-
142
-
143
-
144
-
145
-
146
-
147
-
148
-
149
-
150
-
151
-
152
-
153
-
154
-
155
-
156
-
157
-
158
-
159
-
160
-
161
-
162
-
163
-
164
-
165
-
166
-
167
-
168
-
169
-
170
-
171
-
172
-
173
-
174
-
175
-
176
-
177
-
178
-
179
-
180
-
181
-
182
-
183
-
184
-
185
-
186
-
187
-
188
-
189
-
190
-
191
-
192
-
193
-
194
-
195
-
196
-
197
-
198
-
199
-
200
-
201
-
202
-
203
-
204
-
205
-
206
-
207
-
208
-
209
-
210
-
211
-
212
-
213
-
214
-
215
-
216
-
217
-
218
-
219
-
220
-
221
-
222
-
223
-
224
-
225
-
226
-
227
-
228
-
229
-
230
-
231
-
232
-
233
-
234
-
235
-
236
-
237
-
238
-
239
-
240
-
241
-
242
-
243
-
244
-
245
-
246
-
247
-
248
-
249
-
250
-
251
-
252
-
253
-
254
-
255
-
256
-
257
-
258
-
259
-
260
-
261
-
262
-
263
-
264
-
265
-
266
-
267
-
268
-
269
-
270
-
271
-
272
-
273
-
274
-
275
-
276
-
277
-
278
-
279
-
280
-
281
-
282
-
283
-
284
-
285
-
286
-
287
-
288
-
289
-
290
-
291
-
292
-
293
-
294
-
295
-
296
-
 297
297 -
 298
298 -
 299
299 -
 300
300 -
 301
301 -
 302
302 -
 303
303 -
 304
304 -
 305
305 -
 306
306 -
 307
307 -
308
-
309
-
310
-
311
-
312
-
313
-
314
-
315
-
316
-
317
-
318
-
319
 |
 |
