Brother International ULT-2001 Users Manual - English - Page 91
Changing the Needle Position Left Needle Position Patterns Only
 |
View all Brother International ULT-2001 manuals
Add to My Manuals
Save this manual to your list of manuals |
Page 91 highlights
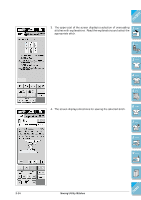
CONTENTS s Changing the Needle Position (Left Needle Position Patterns Only) When you select left needle position stitch patterns, you 1 5 can use and in the Stitch Width display to change 6 the position of the needle. Match the distance from the right edge of the presser foot to the needle with the stitch width, then align the edge of the presser foot with the edge of the fabric during sewing for an attractive finish. 1 - 2 - 1 Stitch width 3 - § § § § J § J J § J 4 - 15 25 35 J 1 12.0 mm (1/2 inch) 8.5 mm (11/32 inch) 5 - 6.5 mm (1/4 inch) 5.0 mm (3/16 inch) 6 - For standard 16 mm (5/8 inch) seam allowance, set on LCD. 7 - 1 16 mm (5/8 inch) 8 - 9 - ?! 3-18 Sewing Utility Stitches Index
-
 1
1 -
2
-
3
-
4
-
5
-
6
-
7
-
8
-
9
-
10
-
11
-
12
-
13
-
14
-
15
-
16
-
17
-
18
-
19
-
20
-
21
-
22
-
23
-
24
-
25
-
26
-
27
-
28
-
29
-
30
-
31
-
32
-
33
-
34
-
35
-
36
-
37
-
38
-
39
-
40
-
41
-
42
-
43
-
44
-
45
-
46
-
47
-
48
-
49
-
50
-
51
-
52
-
53
-
54
-
55
-
56
-
57
-
58
-
59
-
60
-
61
-
62
-
63
-
64
-
65
-
66
-
67
-
68
-
69
-
70
-
71
-
72
-
73
-
74
-
75
-
76
-
77
-
78
-
79
-
80
-
81
-
82
-
83
-
84
-
85
-
 86
86 -
 87
87 -
 88
88 -
 89
89 -
 90
90 -
 91
91 -
 92
92 -
 93
93 -
 94
94 -
 95
95 -
 96
96 -
97
-
98
-
99
-
100
-
101
-
102
-
103
-
104
-
105
-
106
-
107
-
108
-
109
-
110
-
111
-
112
-
113
-
114
-
115
-
116
-
117
-
118
-
119
-
120
-
121
-
122
-
123
-
124
-
125
-
126
-
127
-
128
-
129
-
130
-
131
-
132
-
133
-
134
-
135
-
136
-
137
-
138
-
139
-
140
-
141
-
142
-
143
-
144
-
145
-
146
-
147
-
148
-
149
-
150
-
151
-
152
-
153
-
154
-
155
-
156
-
157
-
158
-
159
-
160
-
161
-
162
-
163
-
164
-
165
-
166
-
167
-
168
-
169
-
170
-
171
-
172
-
173
-
174
-
175
-
176
-
177
-
178
-
179
-
180
-
181
-
182
-
183
-
184
-
185
-
186
-
187
-
188
-
189
-
190
-
191
-
192
-
193
-
194
-
195
-
196
-
197
-
198
-
199
-
200
-
201
-
202
-
203
-
204
-
205
-
206
-
207
-
208
-
209
-
210
-
211
-
212
-
213
-
214
-
215
-
216
-
217
-
218
-
219
-
220
-
221
-
222
-
223
-
224
-
225
-
226
-
227
-
228
-
229
-
230
-
231
-
232
-
233
-
234
-
235
-
236
-
237
-
238
-
239
-
240
-
241
-
242
-
243
-
244
-
245
-
246
-
247
-
248
-
249
-
250
-
251
-
252
-
253
-
254
-
255
-
256
-
257
-
258
-
259
-
260
-
261
-
262
-
263
-
264
-
265
-
266
-
267
-
268
-
269
-
270
-
271
-
272
-
273
-
274
-
275
-
276
-
277
-
278
-
279
-
280
-
281
-
282
-
283
-
284
-
285
-
286
-
287
-
288
-
289
-
290
-
291
-
292
-
293
-
294
-
295
-
296
-
297
-
298
-
299
-
300
-
301
-
302
-
303
-
304
-
305
-
306
-
307
-
308
-
309
-
310
-
311
-
312
-
313
-
314
-
315
-
316
-
317
-
318
-
319
 |
 |

3-18
Sewing Utility Stitches
1 —
2 —
3 —
4 —
5 —
6 —
7 —
8 —
?
!
9 —
CONTENTS
Index
6
5
1
J
15
25
35
12.0 mm
(1/2 inch)
8.5 mm
(11/32
inch)
5.0 mm
(3/16 inch)
J
J
J
J
6.5 mm
(1/4 inch)
1
■
Changing the Needle Position (Left Needle Position Patterns Only)
When you select left needle position stitch patterns, you
can use
and
in the Stitch Width display to change
the position of the needle. Match the distance from the
right
edge of the presser foot to the needle with the stitch
width, then align the edge of the presser foot with the edge
of the fabric during sewing for an attractive finish.
1
Stitch width
For standard 16 mm (5/8 inch) seam allowance, set
on LCD.
1
16 mm (5/8 inch)