Canon 3543B001AA ZR Instruction Manual - Page 21
Connections for Playback on a TV Screen
 |
UPC - 013803108521
View all Canon 3543B001AA manuals
Add to My Manuals
Save this manual to your list of manuals |
Page 21 highlights
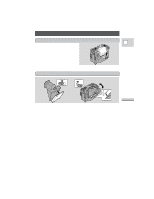
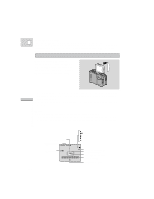
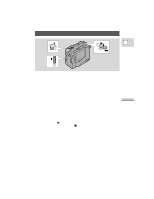
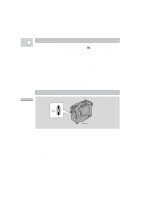
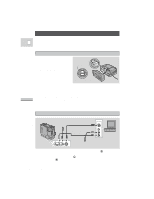
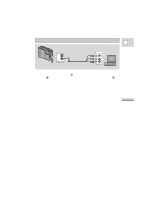
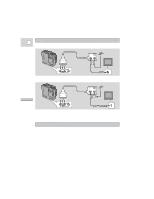
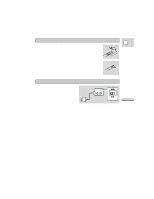
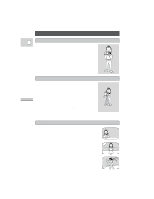
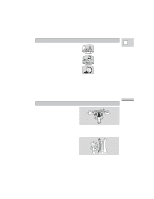
Connections for Playback on a TV Screen You can connect the camera to a TV or VCR in order to play back your E recordings. See your TV or VCR instruction manual for further details. You will need to attach a power source to the camera (see p. 8), and for S-video or to use an RF Unit, attach the DU-100 Docking Unit. Attaching the DU-100 Docking Unit The Docking Unit is fitted with video, audio, microphone and editing terminals. Connect it to the base of the ZR via the MULTI-CONNECTOR. SETSCREW MULTI-CONECTOR MULTI-CONECTOR Mastering the Basics LOOSEN TIGHTEN 1. Make sure that the ZR is switched off. 2. Lift the MULTI-CONNECTOR cover and align the multi-connectors of the docking unit and the camera. 3. Push the docking unit onto the camera and turn the locking button clockwise to fix it securely onto the base. • To remove, turn the locking button counter-clockwise and pull the docking unit from the base of the camera. Close the cover. • You cannot attach/remove a power source while the Docking Unit is attached. If your TV (or VCR) has an S-video input terminal S-150 S-video Cable STV-150 Stereo Video Cable INPUT S-VIDEO VIDEO AUDIO L R V L R S • Use the S-150 S-video Cable to connect the S-video terminal d. Use the STV150 Stereo Video Cable, to connect the AUDIO terminals. Connect the white plug to the white AUDIO terminal 7 (left). Connect the red plug to the red AUDIO terminal 9 (right). Do not connect the yellow plug. • Set the TV/VIDEO selector on the television to VIDEO. • If you are connecting the camera to a VCR, set the input selector on the VCR to 22 LINE.
-
 1
1 -
2
-
3
-
4
-
5
-
6
-
7
-
8
-
9
-
10
-
11
-
12
-
13
-
14
-
15
-
 16
16 -
 17
17 -
 18
18 -
 19
19 -
 20
20 -
 21
21 -
 22
22 -
 23
23 -
 24
24 -
 25
25 -
 26
26 -
27
-
28
-
29
-
30
-
31
-
32
-
33
-
34
-
35
-
36
-
37
-
38
-
39
-
40
-
41
-
42
-
43
-
44
-
45
-
46
-
47
-
48
-
49
-
50
-
51
-
52
-
53
-
54
-
55
-
56
-
57
-
58
-
59
-
60
-
61
-
62
-
63
-
64
-
65
-
66
-
67
-
68
-
69
-
70
-
71
-
72
-
73
-
74
-
75
-
76
-
77
-
78
-
79
-
80
-
81
-
82
-
83
-
84
-
85
 |
 |
