Canon FS10 FS10/FS11/FS100 Instruction Manual - Page 27
First Time Settings, Setting the Date and Time
 |
UPC - 013803092523
View all Canon FS10 manuals
Add to My Manuals
Save this manual to your list of manuals |
Page 27 highlights
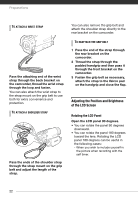
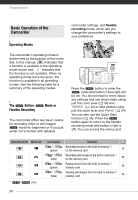
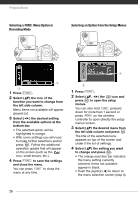
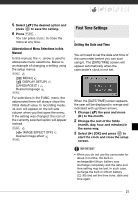
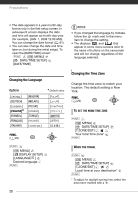
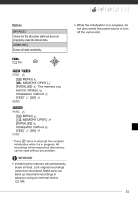
5 Select ( ) the desired option and press to save the setting. 6 Press FUNC. . You can press FUNC. to close the menu at any time. Abbreviation of Menu Selections in this Manual In this manual, the arrow is used to abbreviate menu selections. Below is an example of changing a setting using the setup menus. FUNC. [ MENU] [ DISPLAY SETUP] [LANGUAGE ] Desired language FUNC. For selections in the FUNC. menu, the abbreviated form will always show the initial default value. In recording mode, its icon will appear on the left side column when you first open the menu. If the setting was changed, the icon of the currently selected option will appear instead. FUNC. [ IMAGE EFFECT OFF] Desired image effect FUNC. First Time Settings Setting the Date and Time You will need to set the date and time of the camcorder before you can start using it. The [DATE/TIME] screen will appear automatically when the camcorder's clock is not set. When the [DATE/TIME] screen appears, the year will be displayed in orange and indicated with up/down arrows. 1 Change ( ) the year and move ( ) to the month. 2 Change the rest of the fields (month, day, hour and minutes) in the same way. 3 Select ( ) [OK] and press to start the clock and close the setup screen. IMPORTANT • When you do not use the camcorder for about 3 months, the built-in rechargeable lithium battery may discharge completely and the date and time setting may be lost. In such case, recharge the built-in lithium battery ( 95) and set the time zone, date and time again. 27
-
 1
1 -
2
-
3
-
4
-
5
-
6
-
7
-
8
-
9
-
10
-
11
-
12
-
13
-
14
-
15
-
16
-
17
-
18
-
19
-
20
-
21
-
 22
22 -
 23
23 -
 24
24 -
 25
25 -
 26
26 -
 27
27 -
 28
28 -
 29
29 -
 30
30 -
 31
31 -
 32
32 -
33
-
34
-
35
-
36
-
37
-
38
-
39
-
40
-
41
-
42
-
43
-
44
-
45
-
46
-
47
-
48
-
49
-
50
-
51
-
52
-
53
-
54
-
55
-
56
-
57
-
58
-
59
-
60
-
61
-
62
-
63
-
64
-
65
-
66
-
67
-
68
-
69
-
70
-
71
-
72
-
73
-
74
-
75
-
76
-
77
-
78
-
79
-
80
-
81
-
82
-
83
-
84
-
85
-
86
-
87
-
88
-
89
-
90
-
91
-
92
-
93
-
94
-
95
-
96
-
97
-
98
-
99
-
100
-
101
-
102
-
103
-
104
-
105
-
106
-
107
-
108
-
109
-
110
 |
 |