Canon FS10 FS10/FS11/FS100 Instruction Manual - Page 50
Using an External Microphone, Connecting a Microphone
 |
UPC - 013803092523
View all Canon FS10 manuals
Add to My Manuals
Save this manual to your list of manuals |
Page 50 highlights
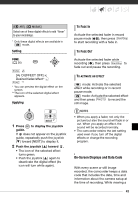
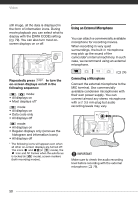
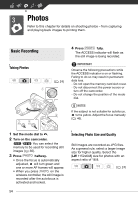
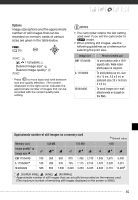
Video still image, all the data is displayed in the form of information icons. During movie playback you can select what to display with the [DATA CODE] setting ( 79). You can also turn most onscreen displays on or off. Repeatedly press DISP. to turn the on-screen displays on/off in the following sequence: , mode: • All displays on • Most displays off* mode: • All displays on • Data code only • All displays off mode: • All displays on • Regular displays only (removes the histogram and information icons) • All displays off * The following icons will appear even when all other on-screen displays are turned off: The icons and (in mode), the icon and AF frames when the autofocus is locked (in mode), screen markers (both recording modes). Using an External Microphone You can attach a commercially available microphone for recording movies. When recording in very quiet surroundings, the built-in microphone may pick up the sound of the camcorder's internal machinery. In such case, we recommend using an external microphone. ( 24) Connecting a Microphone Connect the external microphone to the MIC terminal. Use commercially available condenser microphones with their own power supply. You can connect almost any stereo microphone with a ∅ 3.5 mm plug but audio recording levels may vary. IMPORTANT Make sure to check the audio recording level before recording with the external microphone ( 79). 50
-
 1
1 -
2
-
3
-
4
-
5
-
6
-
7
-
8
-
9
-
10
-
11
-
12
-
13
-
14
-
15
-
16
-
17
-
18
-
19
-
20
-
21
-
22
-
23
-
24
-
25
-
26
-
27
-
28
-
29
-
30
-
31
-
32
-
33
-
34
-
35
-
36
-
37
-
38
-
39
-
40
-
41
-
42
-
43
-
44
-
 45
45 -
 46
46 -
 47
47 -
 48
48 -
 49
49 -
 50
50 -
 51
51 -
 52
52 -
 53
53 -
 54
54 -
 55
55 -
56
-
57
-
58
-
59
-
60
-
61
-
62
-
63
-
64
-
65
-
66
-
67
-
68
-
69
-
70
-
71
-
72
-
73
-
74
-
75
-
76
-
77
-
78
-
79
-
80
-
81
-
82
-
83
-
84
-
85
-
86
-
87
-
88
-
89
-
90
-
91
-
92
-
93
-
94
-
95
-
96
-
97
-
98
-
99
-
100
-
101
-
102
-
103
-
104
-
105
-
106
-
107
-
108
-
109
-
110
 |
 |
