Canon FS10 FS10/FS11/FS100 Instruction Manual - Page 60
Histogram Display, Protecting Photos, activate the autofocus and then fully
 |
UPC - 013803092523
View all Canon FS10 manuals
Add to My Manuals
Save this manual to your list of manuals |
Page 60 highlights
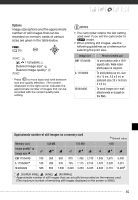
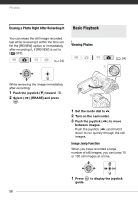
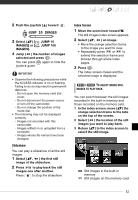
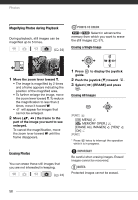
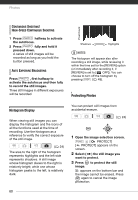
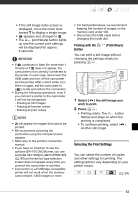
Photos CONTINUOUS SHOOTING/ HIGH-SPEED CONTINUOUS SHOOTING 1 Press PHOTO halfway to activate the autofocus. 2 Press PHOTO fully and hold it pressed down. A series of still images will be recorded as long as you hold the button pressed. AUTO EXPOSURE BRACKETING Press PHOTO , first halfway to activate the autofocus and then fully to record the still images. Three still images in different exposures will be recorded. Pixel Count Shadows Highlights NOTES The histogram will appear also after recording a still image, while reviewing it within the time set for the [REVIEW] option (or immediately after recording it, if [REVIEW] is set to [ OFF]). You can choose to turn off the histogram by pressing DISP. ( 49). Protecting Photos Histogram Display When viewing still images you can display the histogram and the icons of all the functions used at the time of recording. Use the histogram as a reference to verify the correct exposure of the still image. ( 24) The area to the right of the histogram represents highlights and the left side represents shadows. A still image whose histogram skews to the right is relatively bright; while one whose histogram peaks to the left, is relatively dark. You can protect still images from accidental erasure. ( 24) 1 Open the image selection screen. FUNC. [ PROTECT] [ PROTECT] appears on the screen. 2 Select ( ) the still image you want to protect. 3 Press to protect the still image. appears on the bottom bar and the image cannot be erased. Press again to cancel the image protection. 60
-
 1
1 -
2
-
3
-
4
-
5
-
6
-
7
-
8
-
9
-
10
-
11
-
12
-
13
-
14
-
15
-
16
-
17
-
18
-
19
-
20
-
21
-
22
-
23
-
24
-
25
-
26
-
27
-
28
-
29
-
30
-
31
-
32
-
33
-
34
-
35
-
36
-
37
-
38
-
39
-
40
-
41
-
42
-
43
-
44
-
45
-
46
-
47
-
48
-
49
-
50
-
51
-
52
-
53
-
54
-
 55
55 -
 56
56 -
 57
57 -
 58
58 -
 59
59 -
 60
60 -
 61
61 -
 62
62 -
 63
63 -
 64
64 -
 65
65 -
66
-
67
-
68
-
69
-
70
-
71
-
72
-
73
-
74
-
75
-
76
-
77
-
78
-
79
-
80
-
81
-
82
-
83
-
84
-
85
-
86
-
87
-
88
-
89
-
90
-
91
-
92
-
93
-
94
-
95
-
96
-
97
-
98
-
99
-
100
-
101
-
102
-
103
-
104
-
105
-
106
-
107
-
108
-
109
-
110
 |
 |
