Canon FS10 FS10/FS11/FS100 Instruction Manual - Page 79
Display Setup (LCD Brightness, Language, etc.), BRIGHTNESS], AUDIO LEVEL], TV SCREEN], DATA CODE]
 |
UPC - 013803092523
View all Canon FS10 manuals
Add to My Manuals
Save this manual to your list of manuals |
Page 79 highlights
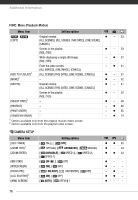
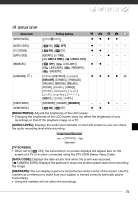
Display Setup (LCD Brightness, Language, etc.) DISPLAY SETUP Menu item [BRIGHTNESS] Setting options zzzz - [AUDIO LEVEL] [TV SCREEN] [DATA CODE] [MARKERS] [LANGUAGE ] [START WEEK] [DEMO MODE] [ ON], [ OFF] z- - - - [ ON], [ OFF] zz - - - [ DATE], [ TIME], - -z- - [ DATE & TIME], [ CAMERA DATA] [ OFF], [ LEVEL(WHT)], zz - - - [ LEVEL(GRY)], [ GRID(WHT)], [ GRID(GRY)] [ ],[DEUTSCH], [ ] [ENGLISH], [ESPAÑOL], [FRANÇAIS], [ITALIANO], [MAGYAR], [MELAYU], [POLSKI], [ ], [TÜRKÇE], [ ], [ ], [ ], [ ], [ ], [ ], [ ], [ ], [ ] z z z z 28 [SATURDAY], [SUNDAY], [MONDAY] - -z- - [ ON], [ OFF] zz - - - [BRIGHTNESS]: Adjusts the brightness of the LCD screen. • Changing the brightness of the LCD screen does not affect the brightness of your recordings or that of the playback image on a TV. [AUDIO LEVEL]: Displays the audio level indicator on the LCD screen so you can check the audio recording level while recording. Low High Audio level [TV SCREEN] • When set to [ ON], the camcorder's on-screen displays will appear also on the screen of a TV or monitor connected using the STV-250N Stereo Video Cable. [DATA CODE]: Displays the date and/or time when the scene was recorded. [ CAMERA DATA]: Displays the aperture (f-stop) and shutter speed used when recording the image. [MARKERS]: You can display a grid or a horizontal line at the center of the screen. Use the markers as a reference to make sure your subject is framed correctly (vertically and/or horizontally). • Using the markers will not affect the recordings. 79
-
 1
1 -
2
-
3
-
4
-
5
-
6
-
7
-
8
-
9
-
10
-
11
-
12
-
13
-
14
-
15
-
16
-
17
-
18
-
19
-
20
-
21
-
22
-
23
-
24
-
25
-
26
-
27
-
28
-
29
-
30
-
31
-
32
-
33
-
34
-
35
-
36
-
37
-
38
-
39
-
40
-
41
-
42
-
43
-
44
-
45
-
46
-
47
-
48
-
49
-
50
-
51
-
52
-
53
-
54
-
55
-
56
-
57
-
58
-
59
-
60
-
61
-
62
-
63
-
64
-
65
-
66
-
67
-
68
-
69
-
70
-
71
-
72
-
73
-
 74
74 -
 75
75 -
 76
76 -
 77
77 -
 78
78 -
 79
79 -
 80
80 -
 81
81 -
 82
82 -
 83
83 -
 84
84 -
85
-
86
-
87
-
88
-
89
-
90
-
91
-
92
-
93
-
94
-
95
-
96
-
97
-
98
-
99
-
100
-
101
-
102
-
103
-
104
-
105
-
106
-
107
-
108
-
109
-
110
 |
 |
