Canon PowerShot SX160 IS User Guide - Page 135
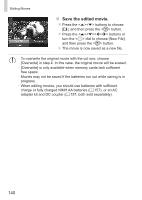
Adjust the cropping area., Save as a new image and, review., frame, turn the <
 |
View all Canon PowerShot SX160 IS manuals
Add to My Manuals
Save this manual to your list of manuals |
Page 135 highlights
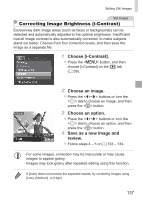
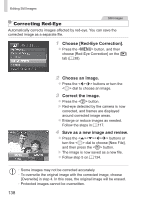
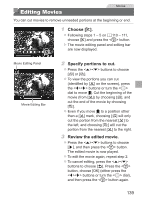
Editing Still Images Cropping Area 3 Adjust the cropping area. XXA frame is displayed around the portion of the image to be cropped. XXThe original image is shown in the upper left, and a preview of the image as cropped is shown in the lower right. zzTo resize the frame, move the zoom lever. Preview of Image After Cropping Resolution After Cropping zzTo move the frame, press the buttons. zzTo change the frame orientation, press the button. zzFaces detected in the image are enclosed in gray frames in the upper-left image. To crop the image based on this frame, turn the dial to switch to the other frame. zzPress the button. 4 Save as a new image and review. zzFollow steps 4 - 5 on =133 - 134. • Editing is not possible for images shot at a resolution of [ ] (=55) or resized to [ ] (=133). • Images supported for cropping will have the same aspect ratio after cropping. • Cropped images will have a smaller resolution than uncropped images. 135
-
 1
1 -
2
-
3
-
4
-
5
-
6
-
7
-
8
-
9
-
10
-
11
-
12
-
13
-
14
-
15
-
16
-
17
-
18
-
19
-
20
-
21
-
22
-
23
-
24
-
25
-
26
-
27
-
28
-
29
-
30
-
31
-
32
-
33
-
34
-
35
-
36
-
37
-
38
-
39
-
40
-
41
-
42
-
43
-
44
-
45
-
46
-
47
-
48
-
49
-
50
-
51
-
52
-
53
-
54
-
55
-
56
-
57
-
58
-
59
-
60
-
61
-
62
-
63
-
64
-
65
-
66
-
67
-
68
-
69
-
70
-
71
-
72
-
73
-
74
-
75
-
76
-
77
-
78
-
79
-
80
-
81
-
82
-
83
-
84
-
85
-
86
-
87
-
88
-
89
-
90
-
91
-
92
-
93
-
94
-
95
-
96
-
97
-
98
-
99
-
100
-
101
-
102
-
103
-
104
-
105
-
106
-
107
-
108
-
109
-
110
-
111
-
112
-
113
-
114
-
115
-
116
-
117
-
118
-
119
-
120
-
121
-
122
-
123
-
124
-
125
-
126
-
127
-
128
-
129
-
 130
130 -
 131
131 -
 132
132 -
 133
133 -
 134
134 -
 135
135 -
 136
136 -
 137
137 -
 138
138 -
 139
139 -
 140
140 -
141
-
142
-
143
-
144
-
145
-
146
-
147
-
148
-
149
-
150
-
151
-
152
-
153
-
154
-
155
-
156
-
157
-
158
-
159
-
160
-
161
-
162
-
163
-
164
-
165
-
166
-
167
-
168
-
169
-
170
-
171
-
172
-
173
-
174
-
175
-
176
-
177
-
178
-
179
-
180
-
181
-
182
-
183
-
184
-
185
-
186
-
187
-
188
-
189
-
190
-
191
-
192
-
193
-
194
-
195
-
196
-
197
-
198
-
199
-
200
-
201
-
202
-
203
-
204
-
205
-
206
-
207
-
208
-
209
-
210
-
211
-
212
-
213
-
214
 |
 |