Canon imageCLASS MF4450 imageCLASS MF4570dn/MF4450 Basic Operation Guide - Page 148
The Toner Does Not Fix onto the Paper Well, The Printed Paper Has Vertical Streaks, Solution
 |
View all Canon imageCLASS MF4450 manuals
Add to My Manuals
Save this manual to your list of manuals |
Page 148 highlights
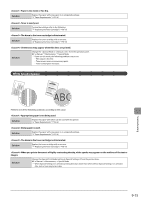
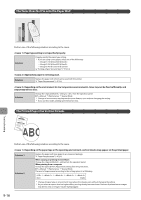
The Toner Does Not Fix onto the Paper Well Troubleshooting Perform one of the following solutions according to the cause. Paper type setting is not specified properly. Solution Properly specify the paper type setting. * If you are using coarse paper, select one of the followings. • • • "Setting a Paper Size and Type" (ˠP.2-14) Appropriate paper is not being used. Solution Replace the paper with which can be used with this printer. "Paper Requirements" (ˠP.2-6) Depending on the environment (in low temperature environments), toner may not be fixed sufficiently, and output may be less clear. Solution Change the setting to from the operation panel. e-Manual ˠ Maintenance ˠ Special Mode * Change of environment may improve the toner fixation, even without changing the setting. * If you use this mode, printing speed becomes slow. The Printed Paper Has Vertical Streaks Perform one of the following solutions according to the cause. Depending on the paper type or the operating environment, vertical streaks may appear on the printed paper. Solution 1 Solution 2 Replace the paper with new paper in an unopened package. "Paper Requirements" (ˠP.2-6) When copying or printing received faxes Change the setting from the operation panel. When printing from a computer Change the [Special Print Adjustment] setting from the print driver. e-Manual ˠ Maintenance ˠ Special Mode The level of improvement according to the setting option is as following. ˠ ˠ ˠ ˠ (low) (high) * Change of paper type or environment may reduce the streaks, even without changing the setting. * As you select an option that has higher effect, printing density becomes lower. Outlines of printed text or images may be less clear, or images may be slightly jagged. 9-16
-
 1
1 -
2
-
3
-
4
-
5
-
6
-
7
-
8
-
9
-
10
-
11
-
12
-
13
-
14
-
15
-
16
-
17
-
18
-
19
-
20
-
21
-
22
-
23
-
24
-
25
-
26
-
27
-
28
-
29
-
30
-
31
-
32
-
33
-
34
-
35
-
36
-
37
-
38
-
39
-
40
-
41
-
42
-
43
-
44
-
45
-
46
-
47
-
48
-
49
-
50
-
51
-
52
-
53
-
54
-
55
-
56
-
57
-
58
-
59
-
60
-
61
-
62
-
63
-
64
-
65
-
66
-
67
-
68
-
69
-
70
-
71
-
72
-
73
-
74
-
75
-
76
-
77
-
78
-
79
-
80
-
81
-
82
-
83
-
84
-
85
-
86
-
87
-
88
-
89
-
90
-
91
-
92
-
93
-
94
-
95
-
96
-
97
-
98
-
99
-
100
-
101
-
102
-
103
-
104
-
105
-
106
-
107
-
108
-
109
-
110
-
111
-
112
-
113
-
114
-
115
-
116
-
117
-
118
-
119
-
120
-
121
-
122
-
123
-
124
-
125
-
126
-
127
-
128
-
129
-
130
-
131
-
132
-
133
-
134
-
135
-
136
-
137
-
138
-
139
-
140
-
141
-
142
-
 143
143 -
 144
144 -
 145
145 -
 146
146 -
 147
147 -
 148
148 -
 149
149 -
 150
150 -
 151
151 -
 152
152 -
 153
153 -
154
-
155
-
156
-
157
-
158
-
159
-
160
-
161
-
162
-
163
-
164
 |
 |
