Canon imagePROGRAF iPF6300S iPF6300S Basic Guide No.2 - Page 27
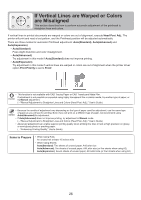
Tab Selection screen, Control Panel, Settings/Adj. tab, Adjust Printer, Head Posi. Adj., Set./Adj.
 |
View all Canon imagePROGRAF iPF6300S manuals
Add to My Manuals
Save this manual to your list of manuals |
Page 27 highlights
Perform adjustment as follows. If Vertical Lines are Warped or Colors are Misaligned 1 Load paper. (→ , Loading Rolls on the Roll Holder) (→ , Loading Rolls in the Printer) (→ , Loading Sheets in the Printer) • Always make sure the loaded paper matches the type of paper specified on the printer. Adjustment cannot be completed correctly unless the loaded paper matches the settings. 2 On the Tab Selection screen of the Control Panel, press ◄ or ► to select the Settings/Adj. tab ( ). Ready OK:Setting/Adj. Menu Maint.C Remain.: 80% Tot.Print Area(m2): 678 • If the Tab Selection screen is not displayed, press the Menu button. 3 Press the OK button. The Set./Adj. Menu is displayed. 4 Press ▲ or ▼ to select Adjust Printer, and then press the OK button. 5 Press ▲ or ▼ to select Head Posi. Adj., and then press the OK button. 6 Press ▲ or ▼ to select Auto(Standard), Auto(Advanced), or Auto(Expansion), and then press the OK button. A test pattern is printed for adjustment. Adjustment is now finished if you have printed on a roll. • Auto(Expansion) may be unavailable in some cases, even if it is displayed in the menu. If so, execute Auto(Advanced) once. 7 If you are printing on sheets, a confirmation message is displayed requesting you to continue printing. Press the OK button and follow the instructions displayed. 27
-
 1
1 -
2
-
3
-
4
-
5
-
6
-
7
-
8
-
9
-
10
-
11
-
12
-
13
-
14
-
15
-
16
-
17
-
18
-
19
-
20
-
21
-
 22
22 -
 23
23 -
 24
24 -
 25
25 -
 26
26 -
 27
27 -
 28
28 -
 29
29 -
 30
30 -
 31
31 -
 32
32 -
33
-
34
-
35
-
36
-
37
-
38
-
39
-
40
-
41
-
42
-
43
-
44
-
45
-
46
-
47
-
48
-
49
-
50
-
51
-
52
 |
 |
