Cisco 7941G Phone Guide - Page 69
Using the Address Book Synchronization Tool, Setting Up Speed Dials on the Web
 |
UPC - 746320949420
View all Cisco 7941G manuals
Add to My Manuals
Save this manual to your list of manuals |
Page 69 highlights
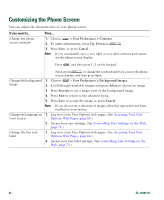
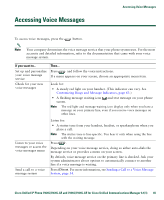
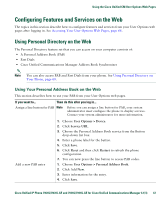
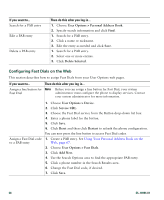
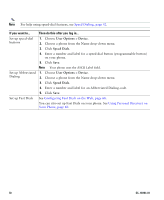
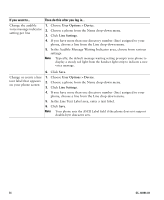
Using the Cisco Unified CM User Options Web Pages If you want to... Then do this after you log in... Assign a Fast Dial code to a phone number (without using a PAB entry) 1. Choose User Options > Fast Dials. 2. Click Add New. 3. Change the Fast Dial code, if desired. 4. Enter a phone number. 5. Click Save. Search for a Fast Dial entry 1. Choose User Options > Fast Dials. 2. Specify search information and click Find. Edit a Fast Dial phone 1. Choose User Options > Fast Dials. number 2. Search for the Fast Dial entry that you want to edit. 3. Click on a component of the entry. 4. Change the phone number. 5. Click Save. Delete a Fast Dial entry 1. Search for a Fast Dial. 2. Select one or more entries. 3. Click Delete Selected. Tips • You can create up to 500 Fast Dial and PAB entries. • You can create a new Fast Dial entry without using a PAB entry. Such Fast Dial entries are labeled "raw" in the User Options web pages and do not display a configurable text label. Using the Address Book Synchronization Tool You can use the Address Book Synchronization Tool (TABSynch) to synchronize your existing Microsoft Windows Address Book (if applicable) with your PAB. Entries from your Microsoft Windows Address Book will then be accessible on your Cisco Unified IP Phone and User Options web pages. Your system administrator can give you access to TABSynch and provide detailed instructions. Setting Up Speed Dials on the Web Depending on configuration, your phone can support several speed-dial features: • Speed-dial buttons • Abbreviated Dialing • Fast Dials Cisco Unified IP Phone 7961G/7961G-GE and 7941G/7941G-GE for Cisco Unified Communications Manager 6.1(3) 69
-
 1
1 -
2
-
3
-
4
-
5
-
6
-
7
-
8
-
9
-
10
-
11
-
12
-
13
-
14
-
15
-
16
-
17
-
18
-
19
-
20
-
21
-
22
-
23
-
24
-
25
-
26
-
27
-
28
-
29
-
30
-
31
-
32
-
33
-
34
-
35
-
36
-
37
-
38
-
39
-
40
-
41
-
42
-
43
-
44
-
45
-
46
-
47
-
48
-
49
-
50
-
51
-
52
-
53
-
54
-
55
-
56
-
57
-
58
-
59
-
60
-
61
-
62
-
63
-
 64
64 -
 65
65 -
 66
66 -
 67
67 -
 68
68 -
 69
69 -
 70
70 -
 71
71 -
 72
72 -
 73
73 -
 74
74 -
75
-
76
-
77
-
78
-
79
-
80
-
81
-
82
-
83
-
84
-
85
-
86
-
87
-
88
-
89
-
90
-
91
-
92
 |
 |