Cisco AIR-AP521G-A-K9 Configuration Guide - Page 133
Conversion Settings, DHCP IP, Address, DHCP IP Address, Retain Hostname, Standard, Remote TFTP Server
 |
UPC - 882658161988
View all Cisco AIR-AP521G-A-K9 manuals
Add to My Manuals
Save this manual to your list of manuals |
Page 133 highlights
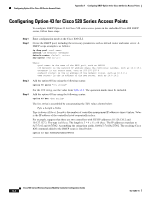
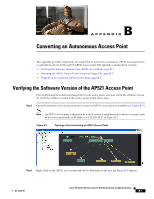
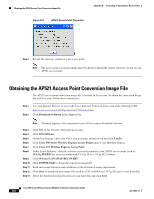
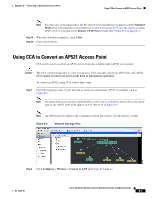
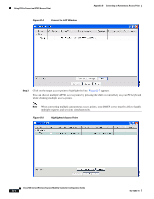
Appendix B Converting an Autonomous Access Point Step 4 Click Conversion Settings and Figure B-6 appears. Figure B-6 Conversion Settings Window Using CCA to Convert an AP521 Access Point Step 5 If you want the converted access point to obtain a new IP address using DHCP, check DHCP IP Address. Note If you check the DHCP IP Address box, the Domain Name and DNS IP Address fields will be filled in from the corresponding DHCP server. Step 6 Step 7 Step 8 Step 9 If you want to keep the access point hostname, check Retain Hostname. Click the drop-down arrow in the Mode field and choose Standard to use a conversion image that is stored locally on your PC, otherwise choose Remote TFTP Server to use TFTP to access a remote conversion image. If you choose Standard, enter the path and filename for the conversion image in the Conversion Image field or click Browse to locate the conversion image file on your PC. If you choose Remote TFTP Server, perform these steps (see Figure B-7): a. In the Conversion Image field, enter the path and filename for the remote conversion image. b. In the TFTP Server IP Address field, enter the IP address for your TFTP server. Figure B-7 Remote TFTP Server Conversion Settings Step 10 In the Domain Name field, enter the domain name for your network (if used). OL-15283-01 Cisco 500 Series Wireless Express Mobility Controller Configuration Guide B-5
-
 1
1 -
2
-
3
-
4
-
5
-
6
-
7
-
8
-
9
-
10
-
11
-
12
-
13
-
14
-
15
-
16
-
17
-
18
-
19
-
20
-
21
-
22
-
23
-
24
-
25
-
26
-
27
-
28
-
29
-
30
-
31
-
32
-
33
-
34
-
35
-
36
-
37
-
38
-
39
-
40
-
41
-
42
-
43
-
44
-
45
-
46
-
47
-
48
-
49
-
50
-
51
-
52
-
53
-
54
-
55
-
56
-
57
-
58
-
59
-
60
-
61
-
62
-
63
-
64
-
65
-
66
-
67
-
68
-
69
-
70
-
71
-
72
-
73
-
74
-
75
-
76
-
77
-
78
-
79
-
80
-
81
-
82
-
83
-
84
-
85
-
86
-
87
-
88
-
89
-
90
-
91
-
92
-
93
-
94
-
95
-
96
-
97
-
98
-
99
-
100
-
101
-
102
-
103
-
104
-
105
-
106
-
107
-
108
-
109
-
110
-
111
-
112
-
113
-
114
-
115
-
116
-
117
-
118
-
119
-
120
-
121
-
122
-
123
-
124
-
125
-
126
-
127
-
 128
128 -
 129
129 -
 130
130 -
 131
131 -
 132
132 -
 133
133 -
 134
134 -
 135
135 -
 136
136 -
 137
137 -
 138
138 -
139
-
140
-
141
-
142
-
143
-
144
 |
 |
