Cisco AIR-AP521G-A-K9 Configuration Guide - Page 134
DHCP IP Address, Convert, Status, B-8, Conversion Setting Information Incorporated - air - e k9
 |
UPC - 882658161988
View all Cisco AIR-AP521G-A-K9 manuals
Add to My Manuals
Save this manual to your list of manuals |
Page 134 highlights
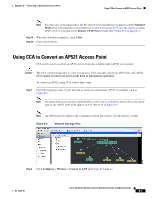
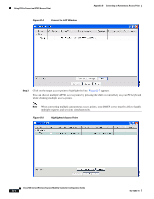
Using CCA to Convert an AP521 Access Point Appendix B Converting an Autonomous Access Point Step 11 In the DNS IP address field, enter the IP address for your DNS server (if used). Note If you check the DHCP IP Address box, the Domain Name and DNS IP Address fields will be filled in from the corresponding DHCP server. Step 12 Click OK to save your settings and Figure B-8 appears and contains your conversion settings. Figure B-8 Conversion Setting Information Incorporated Step 13 Click Convert to begin the autonomous access point conversion process. This process will take approximately 1 to 2 minutes per access point to complete. Note Do not remove power or the Ethernet cable from the access point during the conversion process or the conversion process will be aborted. You can check the conversion status by clicking Status. Step 14 Click Yes on the pop-up message indicating that multiple access points can be converted. Step 15 Click OK on the pop-up message indicating that the devices need to be reloaded. Note The converted access point icon disappears from the topology view until the new software image is loaded from the controller and the LAP521 access point gets an IP address. The process might take a minute or more before the access point appears in the topology as an LAP521 access point. Note When an autonomous AP521 access point is converted to controller-based operation using the CCA, the access point properties screen continues to indicate that the access point is an AIR-AP521G-A-K9 after the conversion. This is in agreement with the product label on the access point. However, the CCA displays a small triangle icon next to the converted access point to indicate that the access point is now operating as a controller-based LAP521 access point. Cisco 500 Series Wireless Express Mobility Controller Configuration Guide B-6 OL-15283-01
-
 1
1 -
2
-
3
-
4
-
5
-
6
-
7
-
8
-
9
-
10
-
11
-
12
-
13
-
14
-
15
-
16
-
17
-
18
-
19
-
20
-
21
-
22
-
23
-
24
-
25
-
26
-
27
-
28
-
29
-
30
-
31
-
32
-
33
-
34
-
35
-
36
-
37
-
38
-
39
-
40
-
41
-
42
-
43
-
44
-
45
-
46
-
47
-
48
-
49
-
50
-
51
-
52
-
53
-
54
-
55
-
56
-
57
-
58
-
59
-
60
-
61
-
62
-
63
-
64
-
65
-
66
-
67
-
68
-
69
-
70
-
71
-
72
-
73
-
74
-
75
-
76
-
77
-
78
-
79
-
80
-
81
-
82
-
83
-
84
-
85
-
86
-
87
-
88
-
89
-
90
-
91
-
92
-
93
-
94
-
95
-
96
-
97
-
98
-
99
-
100
-
101
-
102
-
103
-
104
-
105
-
106
-
107
-
108
-
109
-
110
-
111
-
112
-
113
-
114
-
115
-
116
-
117
-
118
-
119
-
120
-
121
-
122
-
123
-
124
-
125
-
126
-
127
-
128
-
 129
129 -
 130
130 -
 131
131 -
 132
132 -
 133
133 -
 134
134 -
 135
135 -
 136
136 -
 137
137 -
 138
138 -
 139
139 -
140
-
141
-
142
-
143
-
144
 |
 |
