Cisco SPA502G User Guide - Page 62
Connecting a Second Cisco SPA 500S, Connecting the Cisco SPA 500S Attendant Console to the IP
 |
View all Cisco SPA502G manuals
Add to My Manuals
Save this manual to your list of manuals |
Page 62 highlights
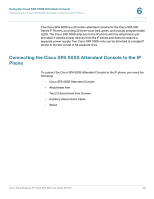
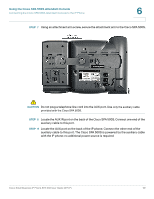
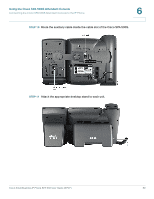
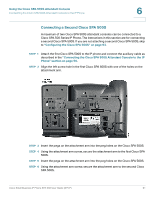
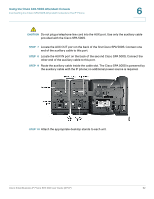
Using the Cisco SPA 500S Attendant Console Connecting the Cisco SPA 500S Attendant Console to the IP Phone 6 Connecting a Second Cisco SPA 500S A maximum of two Cisco SPA 500S attendant consoles can be connected to a Cisco SPA 500 Series IP Phone. The instructions in this section are for connecting a second Cisco SPA 500S. If you are not attaching a second Cisco SPA 500S, skip to "Configuring the Cisco SPA 500S" on page 63. STEP 1 Attach the first Cisco SPA 500S to the IP phone and connect the auxiliary cable as described in the "Connecting the Cisco SPA 500S Attendant Console to the IP Phone" section on page 56. STEP 2 Align the left screw hole in the first Cisco SPA 500S with one of the holes on the attachment arm. STEP 3 Insert the pegs on the attachment arm into the peg holes on the Cisco SPA 500S. STEP 4 Using the attachment arm screw, secure the attachment arm to the first Cisco SPA 500S. STEP 5 Insert the pegs on the attachment arm into the peg holes on the Cisco SPA 500S. STEP 6 Using the attachment arm screw, secure the attachment arm to the second Cisco SPA 500S. Cisco Small Business IP Phone SPA 50X User Guide (SPCP) 61
-
 1
1 -
2
-
3
-
4
-
5
-
6
-
7
-
8
-
9
-
10
-
11
-
12
-
13
-
14
-
15
-
16
-
17
-
18
-
19
-
20
-
21
-
22
-
23
-
24
-
25
-
26
-
27
-
28
-
29
-
30
-
31
-
32
-
33
-
34
-
35
-
36
-
37
-
38
-
39
-
40
-
41
-
42
-
43
-
44
-
45
-
46
-
47
-
48
-
49
-
50
-
51
-
52
-
53
-
54
-
55
-
56
-
 57
57 -
 58
58 -
 59
59 -
 60
60 -
 61
61 -
 62
62 -
 63
63 -
 64
64 -
 65
65 -
 66
66 -
 67
67
 |
 |
