| Section |
Page |
| Power Adapter Statement |
2 |
| FCC and IC Statement |
2 |
| Federal Communication Commission Interference Statement |
2 |
| IMPORTANT NOTE |
3 |
| FCC Radiation Exposure Statement: |
3 |
| Industry Canada Statement |
3 |
| Getting Started |
10 |
| Overview of the Cisco SPA 525G/525G2 IP Phone |
11 |
| Caring for Your Phone |
12 |
| Understanding Your Phone’s Lines and Buttons |
13 |
| Phone Components |
13 |
| Figure 1 Cisco SPA 525G/525G2 Phone Components |
13 |
| Table 1 IP Phone Components |
13 |
| Softkey Buttons |
15 |
| Table 2 Cisco SPA 525G/525G2 Softkey Buttons |
15 |
| Using the Keypad and Buttons with Menus |
18 |
| Using Keypad Shortcuts |
18 |
| Using the Navigation Button |
18 |
| Entering Numbers and Text in Fields |
19 |
| Using Phone Hardware and Accessories |
20 |
| Using the Speakerphone |
20 |
| Using Wired and Wireless Headsets |
20 |
| Connecting the Headset |
20 |
| Connecting Bluetooth Headsets |
21 |
| STEP 1 Press the Setup button. |
21 |
| STEP 2 Select User Preferences. |
21 |
| STEP 3 Select Bluetooth Configuration. |
21 |
| STEP 4 With Bluetooth selected, press the Right Arrow key to turn Bluetooth On. |
22 |
| STEP 5 Press Save. |
22 |
| STEP 1 Enable Bluetooth as described above. |
22 |
| STEP 2 Press the Setup button. |
22 |
| STEP 3 Scroll to User Preferences and press Select. |
22 |
| STEP 4 Scroll to Bluetooth Configuration and press Select. |
22 |
| STEP 5 Scroll to Bluetooth Mode and press the Right Arrow key to choose one of the following: |
22 |
| STEP 6 Scroll to Bluetooth Profiles and press the Right Arrow key to enter the profile screen. |
23 |
| STEP 7 Press Scan to scan for your headset. |
23 |
| STEP 8 In the list of found devices, select your headset and press the Select button to edit the profile. |
23 |
| STEP 9 Scroll to PIN and enter the PIN for your Bluetooth headset. |
23 |
| STEP 10 Scroll to Connect Automatically and press the Right Arrow key to turn to On. |
23 |
| STEP 11 Press Connect. The profile screen displays and a check mark appears next to the headset if the connection was successful. |
23 |
| Using a Headset with Your IP Phone |
23 |
| Switching Between the Handset/Headset/Speakerphone During a Call |
24 |
| Installing Your Phone |
25 |
| Before You Begin |
26 |
| CAUTION Do not plug a telephone line cord into the port marked “AUX.” |
26 |
| Connecting the Handset |
26 |
| STEP 1 Find the longer end of the coiled phone cord. Insert it into the back of the phone base in the slot marked with a phone symbol. This port is labeled #5 on the Cisco SPA 525G/525G2 IP Phone Connections graphic. |
26 |
| STEP 2 Insert the short end of the handset cord into the jack at the bottom of the handset (not shown). |
26 |
| Figure 1 Cisco SPA 525G/525G2 IP Phone Connections |
27 |
| (Optional) Attaching the Desk Stand |
28 |
| STEP 1 Line up the tabs on the desk stand with the slots on the back of the phone. |
28 |
| STEP 2 Slide the bottom tabs into the slots |
28 |
| STEP 3 Lightly press down on the top of the desk stand. It should easily slide into the top slots. Do not force. |
28 |
| (Optional) Mounting the Phone to the Wall |
29 |
| Figure 2 MB100 Wall Mount Kit |
29 |
| STEP 1 To attach the Mounting Bracket (MB), align the two cleats on the MB with the holes in the phone’s base. |
29 |
| STEP 2 Orient the MB such that the phone’s Ethernet and handset ports are accessible after installation. |
29 |
| STEP 3 Push the MB onto the phone’s base. Slide the MB upwards to lock it in place. |
30 |
| STEP 4 Plug in the Ethernet and power cables. |
30 |
| STEP 5 Hang onto screws mounted in the wall. |
31 |
| Connecting Your Phone’s Power |
31 |
| Connecting Your Phone to the Computer Network |
32 |
| Connecting Your Phone to the Wired Network |
32 |
| STEP 1 Plug the Ethernet cable into the back of the base station into the slot marked “SW.” This port is labeled #4 on Figure 1 on page 24. |
32 |
| STEP 2 Plug the other end of the Ethernet cable into the appropriate device on your network, such as a network switch. |
32 |
| Connecting Your Phone to the Wireless Network |
32 |
| Determining Your Wireless Router Security Type |
33 |
| STEP 1 Log in to your wireless router’s web interface using a web browser. Your computer must be connected to your wireless network. Enter the IP address of the wireless router in the browser toolbar. |
33 |
| STEP 2 If required, enter the user name and password. (By default, Linksys routers typically use “admin” for the user name and “admin” for the password.) |
33 |
| STEP 3 View the Wireless tab or window. Note the network name (SSID) and the type of security (WEP, WPA Personal, or WPA2 Personal). |
33 |
| STEP 1 If you have plugged in an Ethernet cable to connect the phone to the wired network, remove it and reboot the phone. If an Ethernet connection is present on the phone, it is used instead of the Wi-Fi connection. |
35 |
| STEP 2 Press the Setup button on your phone. |
35 |
| STEP 3 Scroll to Network Configuration and press Select. |
35 |
| STEP 4 In the Wi-Fi field, press the Left or Right Arrow key to turn Wi-Fi On. Press the Save softkey. |
35 |
| STEP 5 Scroll to Wi-Fi Configuration and press the Right Arrow key. Choose one of the following options: |
36 |
| Using Wi-Fi Protected Setup with the Cisco SPA 525G/525G2 |
36 |
| STEP 1 In the Wireless Configuration window, select Wi-Fi Protected Setup. |
36 |
| STEP 2 Choose one of the following options: |
36 |
| Push Button Configuration: |
36 |
| a. Press the WPS button on your router. |
36 |
| b. On your phone, with Push Button Configuration highlighted, press Select. Your phone may reboot before the Wi-Fi connection is working. |
36 |
| PIN Configuration |
36 |
| a. After selecting PIN Configuration on your phone, note the PIN displayed. |
36 |
| b. Connect to your router’s web interface using a web browser. Your computer must be connected to your wireless network. Enter the IP address of the wireless router in the browser address bar. |
36 |
| c. If required, enter the user name and password. (By default, Linksys routers typically use “admin” for the user name and “admin” for the password.) |
36 |
| d. View the Wireless tab or window. Locate the Wireless Protected Setup configuration menu. |
36 |
| e. Enter the PIN into the field that allows you to setup wireless devices using a PIN. |
37 |
| f. Save your changes. |
37 |
| g. On the Cisco SPA 525G/525G2, with PIN Configuration highlighted, press Select. To add the connection as a profile, press OK. Your phone may reboot before the Wi-Fi connection is working. |
37 |
| Manually Adding a Wireless Profile on the Cisco SPA 525G/525G2 |
37 |
| STEP 1 In the Network Configuration screen, ensure Wi-Fi is enabled. |
37 |
| STEP 2 Scroll to Wi-Fi Configuration. Press the Right Arrow key to enter the Wi-Fi Configuration screen. |
37 |
| STEP 3 Select Wireless Profile. Any previously configured wireless profiles are displayed. |
37 |
| STEP 4 Do one of the following: |
37 |
| Scanning for Available Networks |
37 |
| STEP 1 In the Wireless Profile screen, press Scan. |
37 |
| STEP 2 In the list of available networks, scroll to the desired network and click Add to select the highlighted network. |
37 |
| STEP 3 (Optional) Press the Right Arrow key under Security Mode to set the security options: |
38 |
| STEP 4 To save as a wireless profile, press Save. |
38 |
| Manually Adding a Network |
38 |
| STEP 1 From the Wireless Profile screen, press Option and select Add New to manually add the network. |
38 |
| STEP 2 (Optional) Press the Right Arrow key under Security Mode to set the security options: |
38 |
| STEP 3 To save as a wireless profile, press Save. |
39 |
| Uploading Security Certificates to the Phone |
39 |
| STEP 1 Connect a USB storage device to your PC. |
39 |
| STEP 2 Create a directory named “ca” on the USB device and copy the certificate files into that directory. |
39 |
| STEP 3 Remove the USB device from your PC and insert it into the USB slot on the Cisco SPA 525G/525G2. |
39 |
| STEP 4 After creating a wireless profile, in the Profile screen, press the Right Arrow key under Security Mode to set the security options (WPA Enterprise or WPA2 Enterprise). |
39 |
| STEP 5 Scroll to Root Certificate and press the Right Arrow key. All files in the “ca” folder are displayed. |
39 |
| STEP 6 Use the Up Arrow or Down Arrow key to choose the certificate you want to install (for example, the root certificate). Press the Select softkey. |
40 |
| STEP 7 Press Save to save the profile. |
40 |
| Verifying Phone Startup |
40 |
| Upgrading Your Phone’s Firmware |
40 |
| CAUTION If you are using your phone with an Internet Telephony Service Provider’s system, do not upgrade your phone’s firmware w... |
40 |
| Using Basic Phone Functions |
42 |
| Placing or Answering a Call |
43 |
| Using Dial Assistance |
43 |
| STEP 1 Use the navigation button to scroll down and highlight a phone number on the LCD screen. |
43 |
| STEP 2 Press the Select button or Dial to complete the call. |
43 |
| Adjusting Call Volume and Muting |
44 |
| Adjusting Call Volume |
44 |
| Using Mute |
44 |
| Putting a Call on Hold |
44 |
| Resuming a Call |
44 |
| Ending a Call |
44 |
| Transferring Calls |
45 |
| Performing an Attended Transfer |
45 |
| STEP 1 During an active call, or a call on hold, press Transfer. |
45 |
| STEP 2 Either: |
45 |
| STEP 3 Press Dial or wait a few seconds. The call is placed on hold and a new line is opened to dial the number. |
45 |
| STEP 4 Do one of the following: |
45 |
| Performing an Unattended (Blind) Transfer |
45 |
| STEP 1 During an active call, press BlindXfer. |
45 |
| STEP 2 Enter the number to which you want to transfer the call and press Dial. The call is transferred with no further action required on your part. |
45 |
| Redialing |
46 |
| STEP 1 Press the Redial button and select the desired number. |
46 |
| STEP 2 (Optional) Press EditDial to select a number and modify it (for example, to add an area code). |
46 |
| STEP 3 Lift the handset or press Dial to select a number. The number is automatically dialed. |
46 |
| Viewing and Returning Missed Calls |
46 |
| Returning a Missed Call |
46 |
| Viewing a List of Missed Calls |
46 |
| a. Press the Setup button. |
47 |
| b. Scroll to Call History and press Select. |
47 |
| c. Scroll to Missed Calls and press Select. You can do one of the following: |
47 |
| Turning the Missed Calls Shortcut On and Off |
47 |
| STEP 1 Press the Setup button. |
47 |
| STEP 2 Scroll to User Preferences and press Select. |
47 |
| STEP 3 Select Call Preferences. |
47 |
| STEP 4 Scroll to Miss Call Shortcut. |
47 |
| STEP 5 Press the Right Arrow key to turn the feature on and press the Save softkey. |
47 |
| Forwarding Calls |
47 |
| STEP 1 Press the Setup button. |
48 |
| STEP 2 Scroll to User Preferences and press Select. |
48 |
| STEP 3 Select Call Preferences. |
48 |
| STEP 4 Under Call Forwarding, press the Right Arrow key to turn call forwarding on and press the Save softkey. |
48 |
| Forwarding Calls to a Single Number |
48 |
| STEP 1 In the Call Preferences screen, scroll to Forward All Number. |
48 |
| STEP 2 Enter a number to which to forward all calls; for example, your voice mailbox, another extension, or an outside line. If forwarding calls to an outside line, be sure to enter any access and area codes required. |
48 |
| STEP 3 Press Save. |
48 |
| Forwarding Calls When Your Phone is Busy |
48 |
| STEP 1 In the Call Preferences screen, scroll to Forward Busy Number. |
48 |
| STEP 2 Enter “vm” for voice mail, or a number to which to forward all calls; for example, another extension, or an outside line. If forwarding calls to an outside line, be sure to enter any access and area codes required. |
48 |
| STEP 3 Press Save. |
48 |
| Forwarding Calls When You Don’t Answer the Phone |
49 |
| STEP 1 In the Call Preferences screen, scroll to Forward No Ans Number. |
49 |
| STEP 2 Enter “vm” for voice mail, or a number to which to forward all calls; for example, another extension, or an outside line. If forwarding calls to an outside line, be sure to enter any access and area codes required. |
49 |
| STEP 3 Press Save. |
49 |
| Delaying Call Forwarding When You Don’t Answer the Phone |
49 |
| STEP 1 In the Call Preferences screen, scroll to Forward No Ans Delay. |
49 |
| STEP 2 Enter the number of seconds to delay forwarding calls, if there is no answer at your phone. |
49 |
| STEP 3 Press Save. |
49 |
| Stopping Call Forwarding |
49 |
| STEP 1 Under Call Forwarding, press the Right Arrow key to turn call forwarding Off. |
49 |
| STEP 2 Press the Save softkey. |
49 |
| Setting Do Not Disturb |
49 |
| STEP 1 Choose Call Preferences. |
50 |
| STEP 2 Scroll to Do Not Disturb. |
50 |
| STEP 3 Press the Right Arrow key to turn Do Not Disturb on. |
50 |
| STEP 4 Press Save. |
50 |
| STEP 1 Choose Call Preferences. |
50 |
| STEP 2 Scroll to Do Not Disturb. |
50 |
| STEP 3 Press the Right Arrow key to turn Do Not Disturb Off. |
50 |
| STEP 4 Press Save. |
50 |
| Configuring Call Waiting |
50 |
| STEP 1 Press the Setup button. |
50 |
| STEP 2 Scroll to User Preferences and press Select. |
50 |
| STEP 3 Select Call Preferences. |
50 |
| STEP 4 Scroll to Call Waiting and press the Right Arrow key to turn call waiting On or Off. |
51 |
| STEP 5 Press Save. |
51 |
| Picking Up a Call |
51 |
| STEP 1 Press GrPickup. The phone displays any extensions in the group that have ringing calls. |
51 |
| STEP 2 Choose the call you want to pick up and press Dial. |
51 |
| STEP 1 Press the Pickup button. |
51 |
| STEP 2 Enter the extension number of the phone from which you are picking up the call and press Dial. |
51 |
| STEP 3 Select the call from the list and press Dial again. |
51 |
| Parking a Call |
51 |
| STEP 1 While on an active call, press the Park button. |
52 |
| STEP 2 Enter a number to identify the park line and press Dial. The park line number does not correspond with an actual phone ex... |
52 |
| STEP 3 You or another person must then “unpark” the call. |
52 |
| STEP 1 Press the Unpark button. |
52 |
| STEP 2 Enter the number identifier of the park line (for example, the number that was entered in Step 2 of “parking a call.”) |
52 |
| STEP 3 Press Dial. The call is picked up on your phone. |
52 |
| STEP 1 Press the Setup button. |
52 |
| STEP 2 Select Status. |
52 |
| STEP 3 Scroll to Call Park Status and press Select. |
52 |
| STEP 4 Choose the parked call you want to retrieve and press Unpark. |
52 |
| Placing a Three-Way Conference Call |
53 |
| STEP 1 Press the Conf button during an active call. The first call is placed on hold, a second line is opened, and you hear a dial tone. |
53 |
| STEP 2 Dial the second person’s telephone number. |
53 |
| STEP 3 Press the Conf button again. All three parties are connected in the conference call. |
53 |
| STEP 1 On one of the active calls, press ConfLx. If you have two active lines, the calls are conferenced. If you have more than two active lines, you must scroll to choose the line you want to conference in. |
53 |
| STEP 2 Press Select. |
53 |
| Using the Phone Directories |
53 |
| Using Your Personal Address Book |
54 |
| Adding a New Contact |
55 |
| STEP 1 In the Personal Address Book screen, press Add. |
55 |
| STEP 2 Use the keypad to enter the name of the directory entry. When finished with the name, use the Down Arrow key to navigate to the other fields. |
55 |
| STEP 3 Enter the office, mobile, or home phone number, including any digits you must dial to access an outside line and the appropriate area code, if necessary. You must enter at least one phone number for a contact. |
55 |
| STEP 4 (Optional) To change the ring tone for the caller: |
55 |
| a. Press the Right Arrow key to enter the Select Ring Tone screen. |
55 |
| b. Scroll through the available ring tones. |
55 |
| c. Press the Play button to play the selected ring tone or the Select button to assign that ringtone to the person whose number you are adding to the directory. |
55 |
| STEP 5 Press Save to save the entry. |
55 |
| Copying a Contact |
55 |
| STEP 1 In the Personal Address Book screen, scroll to highlight a contact. |
55 |
| STEP 2 Press Option and select Copy. |
55 |
| STEP 3 Press Option again and select Paste. |
56 |
| STEP 4 Edit any necessary fields and press Save. |
56 |
| Searching for a Contact |
56 |
| STEP 1 In the Personal Address Book screen, press Option and select Search. |
56 |
| STEP 2 Begin to enter the person’s name. The list below displays entries as you type in characters. Scroll to highlight the entry you want. |
56 |
| Deleting a Contact |
56 |
| STEP 1 In the Personal Address Book screen, highlight the contact you want to delete. |
56 |
| STEP 2 Press Option and select Delete. |
56 |
| STEP 3 Press OK to delete the contact. |
56 |
| Editing a Contact |
56 |
| STEP 1 In the Personal Address Book screen, highlight the contact you want to edit. |
56 |
| STEP 2 Choose one of the following: |
56 |
| Using the Corporate Directory |
57 |
| STEP 1 Press the Setup button and select Directories. |
57 |
| STEP 2 Scroll to the Corporate Directory you want to view and press Select. |
57 |
| STEP 1 Press the Setup button and select Directories. |
57 |
| STEP 2 Scroll to the LDAP Directory and press Select. |
57 |
| STEP 3 Choose the type of search to perform and press Select: |
57 |
| STEP 4 In the results, press Dial to dial the contact, or choose one of the other options. |
57 |
| Using the Call History Lists |
57 |
| Viewing the Call History Lists |
57 |
| STEP 1 Press the Setup button. |
57 |
| STEP 2 Scroll to Call History and press Select. |
57 |
| STEP 3 Select the Call History list you want to view. Available Call History lists are: |
58 |
| STEP 4 Press Select to view the list. |
58 |
| Deleting a Call History List |
58 |
| STEP 1 Press the Setup button. |
58 |
| STEP 2 Scroll to Call History and press Select. |
58 |
| STEP 3 Scroll to the Call History list you want to delete. |
58 |
| STEP 4 Press Option and select Delete List. |
58 |
| STEP 5 Press OK to delete the list. |
58 |
| Calling from the Call History Lists |
58 |
| STEP 1 Choose the call. |
58 |
| STEP 2 Press Dial. |
58 |
| Deleting an Entry from the Call History Lists |
59 |
| STEP 1 In the call history list, choose the call. |
59 |
| STEP 2 Press Option and select Delete Entry. |
59 |
| STEP 3 Press OK. |
59 |
| Saving a Call History List Number to Your Directory |
59 |
| STEP 1 In the call history list, choose the call. |
59 |
| STEP 2 Press Option and select Add to Address Book. |
59 |
| STEP 3 Press Select. The Address Book entry screen appears. |
59 |
| STEP 4 Edit the information (if desired) and press Save again. The entry is added to your directory. |
59 |
| Setting or Changing a Phone Password |
59 |
| STEP 1 Press the Setup button. |
59 |
| STEP 2 Scroll to Device Administration and press Select. |
59 |
| STEP 3 Select Set Password. |
59 |
| STEP 4 Enter your old password (leave blank if you have never set a password). Press the Down Arrow key to go to New Password. |
59 |
| STEP 5 Enter your new numeric password. Press the Down Arrow key to go to Re-enter New Password. |
59 |
| STEP 6 Reenter the same password. |
60 |
| STEP 7 Press Save. |
60 |
| STEP 1 Press the Setup button. |
60 |
| STEP 2 Scroll to Device Administration and press Select. |
60 |
| STEP 3 Select Set Password. |
60 |
| STEP 4 Enter your old password. Press the Down Arrow key to go to New Password. |
60 |
| STEP 5 Leave the New Password and Reenter New Password fields empty. |
60 |
| STEP 6 Press Save. |
60 |
| Logging In and Logging Out of Your Phone |
60 |
| STEP 1 Press the Setup button. |
60 |
| STEP 2 Scroll to Device Administration and press Select. |
60 |
| STEP 3 Scroll to Login and press Select. |
60 |
| STEP 4 Enter your password and press Login. |
60 |
| Accessing Voicemail |
61 |
| STEP 1 Press the Setup button. |
61 |
| STEP 2 Scroll to User Preferences and press Select. |
61 |
| STEP 3 Scroll to Call Preferences and press Select. |
61 |
| STEP 4 Scroll to Voice Mail. |
61 |
| STEP 5 Enter the number to dial for voicemail. For a Cisco SPA 9000 Voice System, this is normally “vmm.” For an external system, enter the phone number, including any digits you must dial to reach an outside line. |
61 |
| STEP 6 Press Save. |
61 |
| Using Advanced Phone Features |
62 |
| Configuring Privacy and Security Features |
63 |
| Blocking Caller ID |
63 |
| STEP 1 Press the Setup button. |
63 |
| STEP 2 Scroll to User Preferences and press Select. |
63 |
| STEP 3 Select Call Preferences. |
63 |
| STEP 4 Scroll to Block Caller ID and press the Right Arrow key to choose On. |
63 |
| STEP 5 Press Save. |
63 |
| Blocking Anonymous Calls |
63 |
| STEP 1 Press the Setup button. |
63 |
| STEP 2 Scroll to User Preferences and press Select. |
63 |
| STEP 3 Select Call Preferences. |
63 |
| STEP 4 Scroll to Block Anonym Call and press the Right Arrow key to choose On. |
64 |
| STEP 5 Press Save. |
64 |
| Using Secure Call |
64 |
| STEP 1 Press the Setup button. |
64 |
| STEP 2 Scroll to User Preferences and press Select. |
64 |
| STEP 3 Select Call Preferences. |
64 |
| STEP 4 Scroll to Secure Call and press the Right Arrow key to choose On. |
64 |
| STEP 5 Press Save. When you dial, you will hear a tone before the call. |
64 |
| Enabling Dial Assistance |
64 |
| STEP 1 Press the Setup button. |
64 |
| STEP 2 Scroll to User Preferences and press Select. |
64 |
| STEP 3 Select Call Preferences. |
64 |
| STEP 4 Scroll to Dial Assist and press the Right Arrow key to choose On. |
65 |
| STEP 5 Press Save. |
65 |
| Connecting to a Virtual Private Network (VPN) |
65 |
| STEP 1 Press the Setup button. |
65 |
| STEP 2 Scroll to Network Configuration and press Select. |
65 |
| STEP 3 Scroll to VPN and press the Right Arrow key. |
65 |
| STEP 4 Enter the IP address of the VPN server. You need to get this information from your phone administrator. |
65 |
| STEP 5 Press the Down Arrow key to enter your user name. |
65 |
| STEP 6 Press the Down Arrow key to enter your password. |
65 |
| STEP 7 Press the Down Arrow key to enter the tunnel group (typically not required). |
65 |
| STEP 8 (Optional) If you want your phone to connect to the VPN every time it starts up (for example, if you will always be using... |
65 |
| STEP 9 Press Save. |
65 |
| STEP 1 Press the Setup button. |
66 |
| STEP 2 Scroll to Network Configuration and press Select. |
66 |
| STEP 3 Scroll to VPN and press the Right Arrow key. |
66 |
| STEP 4 Press the Down Arrow button to Connect and press the Right Arrow key to connect to the VPN. |
66 |
| Viewing Your VPN Status |
66 |
| STEP 1 Press the Setup button. |
66 |
| STEP 2 Scroll to Status and press Select. |
66 |
| STEP 3 Scroll to VPN Status and press Select. |
66 |
| Creating and Using Speed Dials |
66 |
| Creating Speed Dials on Unused Line Buttons |
67 |
| STEP 1 Press the unused line button and hold down for three seconds. The Define Speed Dial window displays. |
67 |
| STEP 2 Enter the name for the speed dial. |
67 |
| STEP 3 Press the Down Arrow key to reach the phone number field. Enter the phone number and press Save. |
67 |
| STEP 4 After creating the speed dial, it displays next to the line button. Press the line button to use the speed dial. |
67 |
| Creating Numerical Speed Dials |
67 |
| STEP 1 Press the Setup button. |
67 |
| STEP 2 Scroll to Speed Dials and press Select. |
67 |
| STEP 3 For a new speed dial, scroll to select an unused speed dial location (2 through 9). You can have up to 8 speed dials (location 1 is reserved for voice mail). To edit a previously existing speed dial, select it. |
67 |
| STEP 4 Press Edit. |
67 |
| STEP 5 Enter the name and phone number for the speed dial. |
67 |
| STEP 6 Press Save. |
67 |
| Using the Cisco SPA 525G2 With Your Bluetooth-Enabled Mobile Phone |
68 |
| Enabling Bluetooth (Cisco SPA 525G/525G2) |
68 |
| STEP 1 Press the Setup button. |
68 |
| STEP 2 Scroll to User Preferences and press Select. |
68 |
| STEP 3 Scroll to Bluetooth Configuration and press Select. |
68 |
| STEP 4 With Bluetooth selected, press the Right Arrow key until a blue check mark appears. |
69 |
| STEP 5 Press Save. |
69 |
| Pairing Your Cisco SPA 525G2 with a Bluetooth-Enabled Mobile Phone |
69 |
| Initiating Pairing from the Cisco SPA 525G2 |
70 |
| STEP 1 Enable Bluetooth as described in the “Enabling Bluetooth (Cisco SPA 525G/ 525G2)” section on page 65. |
70 |
| STEP 2 Press the Setup button. |
70 |
| STEP 3 Scroll to User Preferences and press Select. |
70 |
| STEP 4 Scroll to Bluetooth Configuration and press Select. |
70 |
| STEP 5 Scroll to Bluetooth Mode and press the Right Arrow key to choose one of the following: |
70 |
| STEP 6 Scroll to Bluetooth Profiles and press the Right Arrow key to enter the profile screen. |
70 |
| STEP 7 Press Scan to scan for your mobile phone. |
70 |
| STEP 8 In the Select a Bluetooth Device to Pair list, select the mobile phone to which you want to pair and press Connect. |
70 |
| Initiating Pairing from Your Bluetooth-Enabled Mobile Phone |
71 |
| STEP 1 On your iPhone, click Settings. |
71 |
| STEP 2 Under General, choose Bluetooth. Ensure Bluetooth is turned on. |
71 |
| STEP 3 In the Bluetooth Window, under Devices, find the MAC address of your Cisco SPA 525G2 IP phone. |
71 |
| STEP 4 Select the MAC address of the Cisco SPA 525G2. |
71 |
| STEP 5 Enter the PIN (the default is 0000) and press Connect. |
72 |
| When paired with your mobile phone, the Cisco SPA 525G2 display screen assigns one of your line buttons to the mobile phone. A m... |
73 |
| STEP 1 On the Cisco SPA 525G2, press the Setup Button. |
74 |
| STEP 2 Scroll to User Preferences and press Select. |
74 |
| STEP 3 Scroll to Bluetooth Configuration and press Select. |
74 |
| STEP 4 Scroll to Bluetooth Profiles and press the Right Arrow key. |
74 |
| Importing Your Mobile Phone Address Book into the Cisco SPA 525G2 |
74 |
| STEP 1 Press the Directory softkey, or press the Setup button and select Directories. |
74 |
| STEP 2 Select Personal Address Book. |
74 |
| STEP 3 Press the Import softkey. |
75 |
| The phone displays a status message about the import. |
75 |
| If the import is successful, your imported contacts are shown in the Directory. |
76 |
| Making a Mobile Phone Call Using Your Cisco SPA 525G2 |
76 |
| STEP 1 Press the line button associated with your mobile phone (the line button is marked with a mobile phone icon with a flashing lightning bolt). |
76 |
| STEP 2 Do one of the following: |
76 |
| The outgoing call appears on both your Cisco SPA 525G2 and your mobile phone display. The Cisco SPA 525G2 displays an off-hook icon next to the mobile phone display name. |
77 |
| After the call is connected, the icon next to the mobile phone display shows that the call is established. The audio goes through the Cisco SPA 525G2, although the mobile phone display also shows a connected call. |
78 |
| Receiving Mobile Phone Calls Using the Cisco SPA 525G2 |
79 |
| If your mobile phone is paired with the Cisco SPA 525G2, an incoming call to your mobile phone is also shown on the Cisco SPA 525G2. |
79 |
| Switching Audio from Your Cisco SPA 525G2 to Your Mobile Phone |
79 |
| Viewing Mobile Phone Battery and Signal Information on Your Cisco SPA 525G2 |
80 |
| Charging Your Mobile Phone Using Your Cisco SPA 525G2 |
81 |
| You can use the USB port on the Cisco SPA 525G2 model to charge your Bluetooth-enabled mobile phone if your phone has a mini-USB port. |
81 |
| Playing MP3 Files on Your Phone |
81 |
| Creating the Playlist |
81 |
| STEP 1 Connect a USB storage device to your PC. |
82 |
| STEP 2 Create a directory named “mp3” on the USB device and copy the audio files into that directory. |
82 |
| STEP 3 Remove the USB device from your PC and insert it into the USB slot on the Cisco SPA 525G/525G2. |
82 |
| STEP 4 Press the Setup button. |
82 |
| STEP 5 Scroll to MP3 Player and press Select. |
82 |
| STEP 6 Press Add List to create a playlist from the songs on the USB device. |
82 |
| STEP 7 Choose songs by choosing one of the following methods: |
82 |
| STEP 8 After choosing songs, the songs will be marked with a check in the box next to the song. Press Add to add the selected songs to the playlist. |
82 |
| Playing Songs |
82 |
| Controlling the Audio |
82 |
| To switch the audio destination between the speaker, headset, and handset, press the Up Arrow or Down Arrow key. The icon on the left above the song length display shows the audio destination of speaker, handset, or headset (see the following graphic). |
83 |
| Changing the Left and Right Channel for Stereo Headsets |
83 |
| STEP 1 Press the Setup button. |
83 |
| STEP 2 Scroll to User Preferences and press Select. |
83 |
| STEP 3 Scroll to Audio Preferences and press Select. |
83 |
| STEP 4 Press the Right Arrow key to set Swap L/R Channel to On. |
83 |
| STEP 5 Press Save. |
83 |
| Using the Paging Feature |
84 |
| Paging Another Phone |
84 |
| Paging a Group of Phones |
84 |
| Configuring Auto Answer |
84 |
| STEP 1 Press the Setup button. |
84 |
| STEP 2 Scroll to User Preferences and press Select. |
84 |
| STEP 3 Select Call Preferences. |
84 |
| STEP 4 Scroll to Auto Answer Page. Press the Right Arrow key to choose On. |
84 |
| STEP 5 Press Save. |
84 |
| Customizing Your LCD Screen |
85 |
| Changing the LCD Screen Contrast |
85 |
| STEP 1 Press the Setup button. |
85 |
| STEP 2 Scroll to User Preferences and press Select. |
85 |
| STEP 3 Scroll to Screen Preferences and press Select. |
85 |
| STEP 4 Scroll to Display Brightness. The default contrast is 15. Enter a number between 1 (lowest) and 15 (greatest) to change the contrast. |
85 |
| STEP 5 Press Save. |
85 |
| Setting the Screen Backlight Timer |
85 |
| STEP 1 Press the Setup button. |
85 |
| STEP 2 Scroll to User Preferences and press Select. |
85 |
| STEP 3 Scroll to Screen Preferences and press Select. |
85 |
| STEP 4 Scroll to Backlight. Press the Right Arrow key to choose On, which means that the darkening feature is enabled. |
85 |
| STEP 5 Scroll to Backlight Timer. Enter the number of seconds before the display should shut off after the phone is idle. |
85 |
| STEP 6 Press Save. |
85 |
| Configuring the Phone Screen Saver |
86 |
| STEP 1 Press the Setup button. |
86 |
| STEP 2 Scroll to User Preferences and press Select. |
86 |
| STEP 3 Scroll to Screen Preferences and press Select. |
86 |
| STEP 4 With Screen Saver highlighted, press the Right Arrow key to choose On. |
86 |
| STEP 5 Scroll to Screen Saver Settings and press the Right Arrow key to choose the settings: |
86 |
| STEP 6 Press Save. |
86 |
| Changing the Phone Wallpaper |
86 |
| STEP 1 Connect a USB storage device to your PC. |
87 |
| STEP 2 Create a directory named “pictures” on the USB device and copy the image files into that directory. Image files must be between 30K and 300K in size. The phone can only read 45 images from the USB device. |
87 |
| STEP 3 Remove the USB device from your PC and insert it into the USB slot on the Cisco SPA 525G/525G2. |
87 |
| STEP 1 Press the Setup button. |
87 |
| STEP 2 Scroll to User Preferences and press Select. |
87 |
| STEP 3 Scroll to Screen Preferences and press Select. |
87 |
| STEP 4 Scroll to Wallpaper. Press the Right Arrow key to select an image to use as the wallpaper. |
87 |
| STEP 5 Use the navigation arrows to choose an image. Press Select to choose the image, or to preview how the image will look on your phone, select the image and press View. Press Select to choose the image, or use the Previous, Next, and Back keys. |
87 |
| STEP 6 Press Save. |
87 |
| Using Ring Tones |
87 |
| STEP 1 Press the Setup button. |
87 |
| STEP 2 Scroll to User Preferences and press Select. |
87 |
| STEP 3 Scroll to Audio Preferences and press Select. |
87 |
| STEP 4 Scroll to the extension for which you want to select a ring tone and press the Right Arrow key. |
88 |
| STEP 5 Scroll through the ring tones and press Play to play the highlighted ring tone. Press Select to choose the highlighted ringtone for that extension. |
88 |
| Accessing Weather and News on Your Phone |
88 |
| STEP 1 Press the Setup button. |
88 |
| STEP 2 Select Web Applications. |
88 |
| STEP 3 Select the type of service. |
88 |
| Accessing Weather Information |
88 |
| STEP 1 In the Web Applications screen, select Weather. |
88 |
| STEP 2 Press Add. |
88 |
| STEP 3 Enter the city name or zip code, and press Search. |
88 |
| STEP 4 Select the city from the list of results and press Add. |
88 |
| STEP 1 In the Web Applications screen, select Weather. |
88 |
| STEP 2 Weather information for the first entry in the list of cities is displayed. To view other cities on the list, press List and select the city. Then press View. |
88 |
| STEP 1 In the Web Applications screen, select Weather. |
89 |
| STEP 2 To move entries up or down in the list or delete an entry, select the city you want to move, press Option, and choose Move Up, Move Down, or Delete. |
89 |
| Accessing News |
89 |
| STEP 1 In the Web Applications screen, select News. |
89 |
| STEP 2 Scroll to select the type of news you want to view: |
89 |
| STEP 3 Press Select to bring up the list of articles and use the Up and Down Arrow keys to scroll through them. |
89 |
| STEP 4 Press View to read an article, using the Down Arrow key to scroll through the article. Press Prev or Next to go to other articles in the news category. |
89 |
| Configuring Date and Time Parameters on Your Phone |
90 |
| STEP 1 Press the Setup button. |
90 |
| STEP 2 Scroll to Device Administration and press Select. |
90 |
| STEP 3 Scroll to Date/Time and press Select. |
90 |
| STEP 4 Scroll to the date and time setting that you want to change: |
90 |
| Using Star Codes |
91 |
| Restarting Your Phone |
93 |
| STEP 1 Press the Setup button. |
93 |
| STEP 2 Scroll to Device Administration and press Select. |
93 |
| STEP 3 Scroll to Restart and press Select. |
93 |
| Viewing Phone, Network, and Call Information |
93 |
| Viewing Phone Information |
93 |
| STEP 1 Press the Setup button. |
93 |
| STEP 2 Scroll to Status and press Select. |
93 |
| STEP 3 Select Product Information. You can view the following information: |
93 |
| Viewing Network Information |
94 |
| STEP 1 Press the Setup button. |
94 |
| STEP 2 Scroll to Status and press Select. |
94 |
| STEP 3 Scroll to Network Status and press Select. You can view the following information: |
94 |
| Viewing Phone Line and Extension Information |
94 |
| STEP 1 Press the Setup button. |
94 |
| STEP 2 Scroll to Status and press Select. |
94 |
| STEP 3 Scroll to Phone Status and press Select. You can view the following information: |
95 |
| Viewing Peripheral Status |
95 |
| STEP 1 Press the Setup button. |
95 |
| STEP 2 Scroll to Status and press Select. |
95 |
| STEP 3 Scroll to Peripheral Status and press Select. You can view the following information: |
95 |
| Viewing the Wireless Connection Status |
95 |
| STEP 1 Press the Setup button. |
95 |
| STEP 2 Scroll to Network Configuration and press Select. |
95 |
| STEP 3 Select Wi-Fi Configuration and press the Right Arrow key. |
96 |
| STEP 4 Scroll to Wireless Status and press Select. The status, SSID name, and signal strength are displayed. Press Detail for more information. |
96 |
| Advanced Menus for Technical Support Personnel |
96 |
| CAUTION These menus are used to configure and troubleshoot your phone and the phone network. You should not change these settings or perform these actions unless directed to do so by your Administrator. |
96 |
| Settings Menu |
96 |
| Using the Web Interface |
97 |
| Logging in to the Web Interface |
98 |
| STEP 1 Obtain the IP address of your phone by pressing the Setup button and selecting Status. |
98 |
| STEP 2 Scroll to Network Status and press Select. Note the IP address. |
98 |
| STEP 3 On your PC, open Internet Explorer. |
98 |
| STEP 4 Enter the IP address in the browser’s toolbar. |
98 |
| STEP 5 The Info page of the IP Phone Web Interface displays. |
98 |
| Configuring Your Address Book |
98 |
| STEP 1 Log in to the web interface. |
98 |
| STEP 2 Choose the Personal Address Book tab. A window appears with the listings for your address book. |
98 |
| STEP 1 In the Personal Address Book tab, click Add Personal Address Entry. |
98 |
| STEP 2 Enter the name, office number, home number, or mobile number, and ring tone for the new contact. |
98 |
| STEP 3 Click Submit All Changes. The contact is added to your address book. |
98 |
| STEP 4 (Optional) To add the contact to a speed dial: |
99 |
| a. Click the Phone icon under Speed Dials. |
99 |
| b. Choose the phone (office, home, or mobile) that you want to add as a speed dial. |
99 |
| c. Choose the speed dial position to assign the contact. |
99 |
| d. Press Confirm. |
99 |
| STEP 1 In the Personal Address Book tab, check the box next to the contacts you want to remove. To select all contacts, check the box at the top of the column. |
99 |
| STEP 2 Press Remove. |
99 |
| STEP 3 Press OK. The contacts are removed from your address book. |
99 |
| STEP 1 In the Personal Address Book tab, click the Edit icon in the row for that contact. |
99 |
| STEP 2 Enter the information and press Submit All Changes. |
99 |
| Setting Do Not Disturb |
99 |
| STEP 1 Log in to the web interface. |
100 |
| STEP 2 In the Voice tab, User menu, under Supplementary Services, locate the Do Not Disturb field. |
100 |
| STEP 3 Choose Yes to turn on Do Not Disturb. |
100 |
| STEP 4 At the bottom of the page, click Submit All Changes. Your phone reboots. |
100 |
| Configuring Call Forwarding |
100 |
| STEP 1 Log in to the web interface. |
100 |
| STEP 2 In the Voice tab, User menu, under Call Forward, you can configure the following fields: |
100 |
| STEP 3 At the bottom of the page, click Submit All Changes. Your phone reboots. |
100 |
| Configuring Call Waiting |
101 |
| STEP 1 Log in to the web interface. |
101 |
| STEP 2 In the Voice tab, User menu, under Supplementary Services, locate the CW Setting field. |
101 |
| STEP 3 Choose yes or no to enable or disable. |
101 |
| STEP 4 At the bottom of the page, click Save All Settings. Your phone reboots. |
101 |
| Blocking Caller ID |
101 |
| STEP 1 Log in to the web interface. |
101 |
| STEP 2 In the Voice tab, User menu, under Supplementary Services, locate the Block CID Setting field. |
101 |
| STEP 3 Choose yes or no to enable or disable. |
101 |
| STEP 4 At the bottom of the page, click Save All Settings. Your phone reboots. |
101 |
| Blocking Anonymous Calls |
102 |
| STEP 1 Log in to the web interface. |
102 |
| STEP 2 In the Voice tab, User menu, under Supplementary Services, locate the Block ANC Setting field. |
102 |
| STEP 3 Choose yes or no to enable or disable. |
102 |
| STEP 4 At the bottom of the page, click Save All Settings. Your phone reboots. |
102 |
| Viewing Call History Lists |
102 |
| STEP 1 Log in to the web interface. |
102 |
| STEP 2 Choose the Call History tab. A window appears with the call history for your phone. Select a call history list to show from the drop-down list: |
102 |
| STEP 3 (Optional) To add a call from one of these lists to your address book, click the Address Book icon under the Add column. Edit any information and press Submit All Changes. |
102 |
| Creating Speed Dials |
103 |
| STEP 1 Log in to the web interface. |
103 |
| STEP 2 Choose the Speed Dials tab. |
103 |
| STEP 3 Enter the name and number for the speed dial entries you want to create or edit. Remember to enter any digits you must dial to reach an outside line. |
103 |
| STEP 4 Click Submit All Changes. |
103 |
| Configuring Wi-Fi |
103 |
| STEP 1 Log in to the web interface. |
103 |
| STEP 2 Choose the Wi-Fi tab. |
103 |
| STEP 3 Ensure Wireless Enable is set to On. |
103 |
| STEP 4 To manually enter a Wi-Fi profile, choose Wi-Fi Profile from the Wi-Fi Device list and proceed to the next section. To use WPS, choose Wi-Fi Protected Setup and follow the on-screen instructions |
103 |
| STEP 1 In the Wi-Fi tab, ensure Wi-Fi Profile is selected in the Wi-Fi Device box. |
104 |
| STEP 2 (Optional) To scan for available wireless networks, click Site Survey. Click the icon under Add in the row of the wireless network you want to select. |
104 |
| STEP 3 Click Add New Wi-Fi Profile. |
104 |
| STEP 4 Enter or edit (if you performed Step 2) the name, SSID, security mode, and security parameters. (See Connecting Your Phone to the Wireless Network, page 29 for more information on security.) |
104 |
| STEP 5 Click Submit. The wireless profile is added to the list. |
104 |
| STEP 6 Click Submit All Changes. |
104 |
| Configuring Bluetooth |
104 |
| STEP 1 Log in to the web interface. |
104 |
| STEP 2 Choose the Bluetooth Configuration tab. |
104 |
| STEP 3 Ensure Bluetooth Device is set to On. |
104 |
| STEP 4 To scan for your device, click Search Bluetooth Devices. |
104 |
| STEP 5 If found, your device appears in the Bluetooth Device List. |
104 |
| STEP 6 Click the name for your device. |
104 |
| STEP 7 Enter your PIN and press Submit All Changes. |
104 |
| Bluetooth Mode |
104 |
| Bluetooth Profiles |
105 |
| Upgrading Firmware |
105 |
| CAUTION If you are using your phone with an Internet Telephony Service Provider’s system, do not upgrade your phone’s firmware w... |
105 |
| STEP 1 Log in to the web interface. |
105 |
| STEP 2 Choose the Firmware Upgrade tab. |
105 |
| STEP 3 Click Firmware Upgrade Window. |
105 |
| STEP 4 Browse to select the firmware file from your PC. Click Submit. The firmware is installed and your phone reboots. |
105 |
| Using the Cisco SPA 500S Attendant Console |
106 |
| Figure 1 Cisco SPA 500S Attendant Console |
106 |
| Connecting the Cisco SPA 500S Attendant Console to the Cisco SPA 525G/525G2 IP Phone |
107 |
| CAUTION Power off the Cisco SPA 525G/525G2 before attaching or detaching the Cisco SPA 500S. |
107 |
| Connecting a Single Cisco SPA 500S |
108 |
| STEP 1 Turn both the Cisco SPA 525G/525G2 and Cisco SPA 500S face down. |
108 |
| STEP 2 Align the screw hole in the Cisco SPA 525G/525G2 with one of the holes on the attachment arm. |
108 |
| STEP 3 Insert the pegs on the attachment arm into the peg holes on the Cisco SPA 525G/ 525G2. |
108 |
| STEP 4 Using an attachment arm screw, secure the attachment arm to the Cisco SPA 525G/525G2. |
109 |
| STEP 5 Align the right screw hole in the Cisco SPA 500S with the unused hole on the attachment arm. |
109 |
| STEP 6 Insert the pegs on the attachment arm into the peg holes on the Cisco SPA 500S. |
109 |
| STEP 7 Using an attachment arm screw, secure the attachment arm to the Cisco SPA 500S. |
110 |
| CAUTION Do not plug a telephone line cord into the AUX port. Use only the auxiliary cable provided with the Cisco SPA 500S. |
110 |
| STEP 8 Locate the AUX IN port on the back of the Cisco SPA 500S. Connect one end of the auxiliary cable to this port. |
110 |
| STEP 9 Locate the AUX port on the back of the Cisco SPA 525G/525G2. Connect the other end of the auxiliary cable to this port. The Cisco SPA 500S is powered by the auxiliary cable with the Cisco SPA 525G/525G2; no additional power source is required. |
110 |
| STEP 10 Route the auxiliary cable inside the cable slot of the Cisco SPA 500S. |
111 |
| STEP 11 Attach the appropriate desktop stand to each unit. |
111 |
| Connecting a Second Cisco SPA 500S |
112 |
| STEP 1 Attach the first Cisco SPA 500S to the IP phone and connect the auxiliary cable as described in the “Connecting the Cisco SPA 500S Attendant Console to the Cisco SPA 525G/525G2 IP Phone” section on page 104. |
112 |
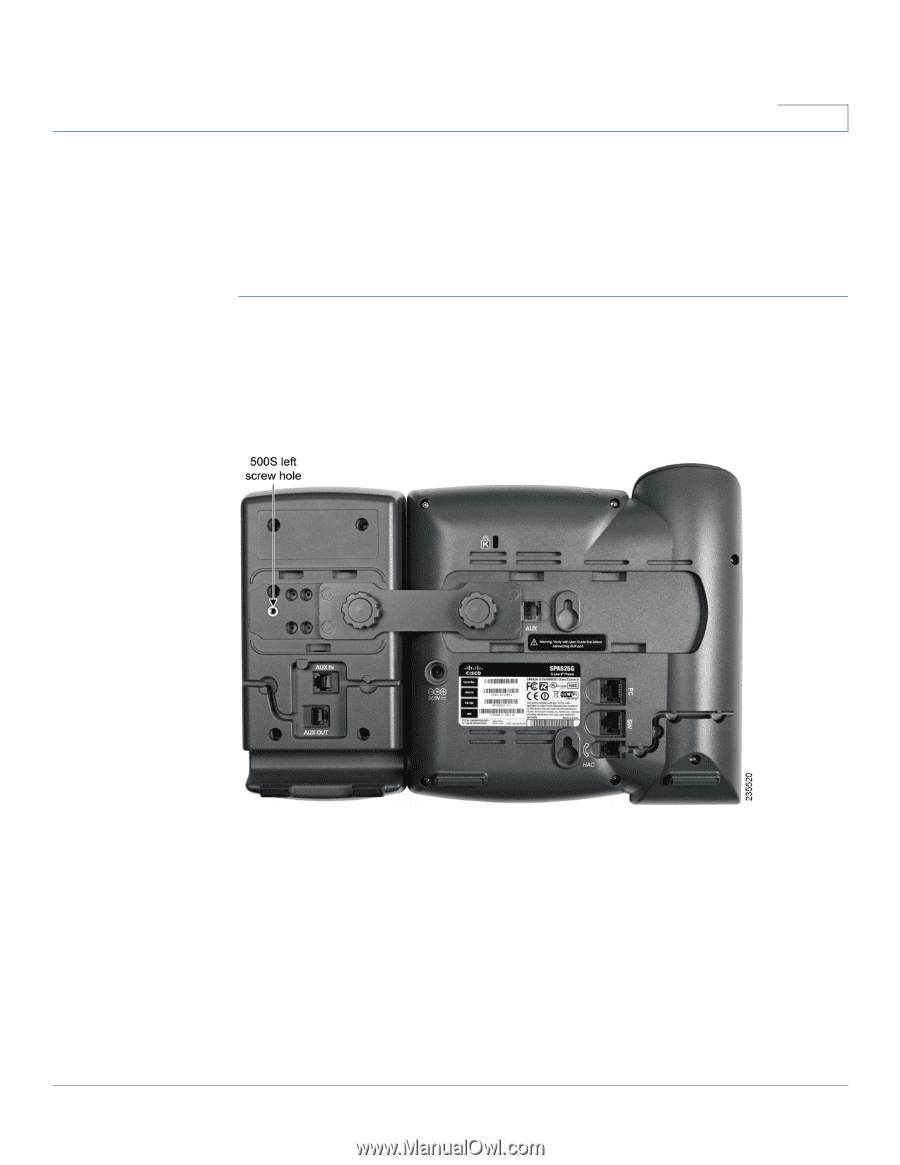
| STEP 2 Align the left screw hole in the first Cisco SPA 500S with one of the holes on the attachment arm. |
112 |
| STEP 3 Insert the pegs on the attachment arm into the peg holes on the Cisco SPA 500S. |
112 |
| STEP 4 Using the attachment arm screw, secure the attachment arm to the first Cisco SPA 500S. |
112 |
| STEP 5 Insert the pegs on the attachment arm into the peg holes on the Cisco SPA 500S. |
112 |
| STEP 6 Using the attachment arm screw, secure the attachment arm to the second Cisco SPA 500S. |
112 |
| CAUTION Do not plug a telephone line cord into the AUX port. Use only the auxiliary cable provided with the Cisco SPA 500S. |
113 |
| STEP 7 Locate the AUX OUT port on the back of the first Cisco SPA 500S. Connect one end of the auxiliary cable to this port. |
113 |
| STEP 8 Locate the AUX IN port on the back of the second Cisco SPA 500S. Connect the other end of the auxiliary cable to this port. |
113 |
| STEP 9 Route the auxiliary cable inside the cable slot. The Cisco SPA 500S is powered by the auxiliary cable with the Cisco SPA 525G/525G2; no additional power source is required. |
113 |
| STEP 10 Attach the appropriate desktop stands to each unit. |
113 |
| Configuring the Cisco SPA 500S |
113 |
| Using the Cisco SPA 500S |
114 |
| Monitoring the Cisco SPA 500S |
115 |
| STEP 1 Press the Setup button. |
115 |
| STEP 2 Scroll to Status and press Select. |
115 |
| STEP 3 Scroll to Peripheral Status and press Select. |
115 |
| STEP 4 The status is shown in the “Att Cons” fields. |
115 |
 1
1 107
107 108
108 109
109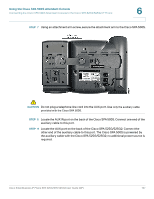 110
110 111
111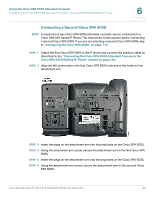 112
112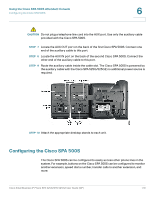 113
113 114
114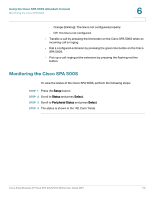 115
115 116
116 117
117