Cisco SPA525G2 User Manual - Page 39
Uploading Security Certificates to the Phone - sip configuration
 |
View all Cisco SPA525G2 manuals
Add to My Manuals
Save this manual to your list of manuals |
Page 39 highlights
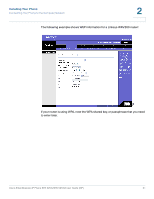
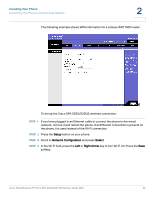
Installing Your Phone Connecting Your Phone to the Computer Network 2 • WPA/WPA2 Enterprise: You must enter the Cipher Type (TKIP or AES CCMP) and the EAP Type: - TTLS: Enter the anonymous ID, choose whether the phone should check for the server certificate, choose the TTLS Inner Protocol (MSCHV2, MSCHAP, PAP, CHAP, or MD5), and enter the User ID and password. - LEAP: Enter the User ID and password. - TLS: Enter the User ID, choose whether the phone should check for the server certificate, enter the User ID, and configure the Root certificate and User certificate (see the "Uploading Security Certificates to the Phone" section on page 36). STEP 3 To save as a wireless profile, press Save. Uploading Security Certificates to the Phone If you are using some types of wireless security (for example, WPA2 Enterprise), you will need to upload security certificates to the phone. Certificates must be in the following format: • Root certificate: DER encoded binary x.509 (CER) • User certificate: Personal Information Exchange (PKCS#12(.PFX)) STEP 1 Connect a USB storage device to your PC. STEP 2 Create a directory named "ca" on the USB device and copy the certificate files into that directory. STEP 3 Remove the USB device from your PC and insert it into the USB slot on the Cisco SPA 525G/525G2. STEP 4 After creating a wireless profile, in the Profile screen, press the Right Arrow key under Security Mode to set the security options (WPA Enterprise or WPA2 Enterprise). STEP 5 Scroll to Root Certificate and press the Right Arrow key. All files in the "ca" folder are displayed. Cisco Small Business IP Phone SPA 525G/SPA 525G2 User Guide (SIP) 36
-
 1
1 -
2
-
3
-
4
-
5
-
6
-
7
-
8
-
9
-
10
-
11
-
12
-
13
-
14
-
15
-
16
-
17
-
18
-
19
-
20
-
21
-
22
-
23
-
24
-
25
-
26
-
27
-
28
-
29
-
30
-
31
-
32
-
33
-
 34
34 -
 35
35 -
 36
36 -
 37
37 -
 38
38 -
 39
39 -
 40
40 -
 41
41 -
 42
42 -
 43
43 -
 44
44 -
45
-
46
-
47
-
48
-
49
-
50
-
51
-
52
-
53
-
54
-
55
-
56
-
57
-
58
-
59
-
60
-
61
-
62
-
63
-
64
-
65
-
66
-
67
-
68
-
69
-
70
-
71
-
72
-
73
-
74
-
75
-
76
-
77
-
78
-
79
-
80
-
81
-
82
-
83
-
84
-
85
-
86
-
87
-
88
-
89
-
90
-
91
-
92
-
93
-
94
-
95
-
96
-
97
-
98
-
99
-
100
-
101
-
102
-
103
-
104
-
105
-
106
-
107
-
108
-
109
-
110
-
111
-
112
-
113
-
114
-
115
-
116
-
117
 |
 |