Cisco SPA525G2 User Manual - Page 28
Optional Attaching the Desk Stand - adapter
 |
View all Cisco SPA525G2 manuals
Add to My Manuals
Save this manual to your list of manuals |
Page 28 highlights
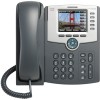
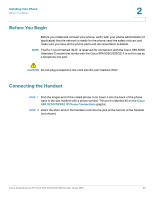
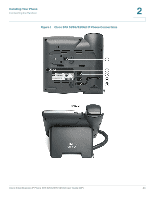
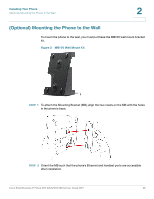
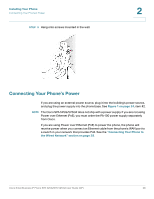
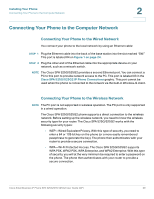
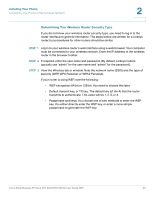
Installing Your Phone (Optional) Attaching the Desk Stand 2 Number 1 2 3 4 5 6 Component Auxiliary port. Only for use with the Cisco SPA 500S attendant console. Power port. Insert the power adapter plug into this port. Additional Ethernet port. Connect an Ethernet cable to this port to provide network connectivity to a PC. (This port cannot be used when the phone is connected to the network via the built-in Wireless-G client.) Switch (Ethernet) port. Connect the network cable to this port. Phone cord slot. Insert one end of the phone cord into this slot and the other into the jack at the bottom of the phone handset. USB port. For use with an external USB memory device (optional). You can also use the USB port on the Cisco SPA 525G2 model to charge a device such as a Bluetooth-enabled mobile phone if your phone has a mini-USB port. (Optional) Attaching the Desk Stand NOTE Do not attach the desk stand if you want to mount the phone to the wall. If you are attaching a Cisco SPA 500S attendant console attach the console before attaching the desk stand. STEP 1 Line up the tabs on the desk stand with the slots on the back of the phone. STEP 2 Slide the bottom tabs into the slots STEP 3 Lightly press down on the top of the desk stand. It should easily slide into the top slots. Do not force. Cisco Small Business IP Phone SPA 525G/SPA 525G2 User Guide (SIP) 25
-
 1
1 -
2
-
3
-
4
-
5
-
6
-
7
-
8
-
9
-
10
-
11
-
12
-
13
-
14
-
15
-
16
-
17
-
18
-
19
-
20
-
21
-
22
-
 23
23 -
 24
24 -
 25
25 -
 26
26 -
 27
27 -
 28
28 -
 29
29 -
 30
30 -
 31
31 -
 32
32 -
 33
33 -
34
-
35
-
36
-
37
-
38
-
39
-
40
-
41
-
42
-
43
-
44
-
45
-
46
-
47
-
48
-
49
-
50
-
51
-
52
-
53
-
54
-
55
-
56
-
57
-
58
-
59
-
60
-
61
-
62
-
63
-
64
-
65
-
66
-
67
-
68
-
69
-
70
-
71
-
72
-
73
-
74
-
75
-
76
-
77
-
78
-
79
-
80
-
81
-
82
-
83
-
84
-
85
-
86
-
87
-
88
-
89
-
90
-
91
-
92
-
93
-
94
-
95
-
96
-
97
-
98
-
99
-
100
-
101
-
102
-
103
-
104
-
105
-
106
-
107
-
108
-
109
-
110
-
111
-
112
-
113
-
114
-
115
-
116
-
117
 |
 |