Cisco SPA525G2 User Manual - Page 37
Manually Adding a Wireless Profile on the Cisco SPA 525G/525G2 - user manual
 |
View all Cisco SPA525G2 manuals
Add to My Manuals
Save this manual to your list of manuals |
Page 37 highlights
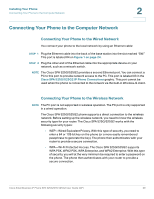
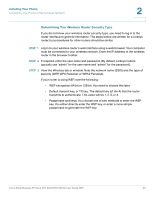
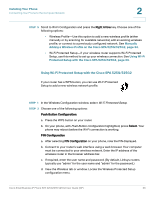
Installing Your Phone Connecting Your Phone to the Computer Network 2 e. Enter the PIN into the field that allows you to setup wireless devices using a PIN. f. Save your changes. g. On the Cisco SPA 525G/525G2, with PIN Configuration highlighted, press Select. To add the connection as a profile, press OK. Your phone may reboot before the Wi-Fi connection is working. Manually Adding a Wireless Profile on the Cisco SPA 525G/525G2 To add a new wireless network profile: STEP 1 In the Network Configuration screen, ensure Wi-Fi is enabled. STEP 2 Scroll to Wi-Fi Configuration. Press the Right Arrow key to enter the Wi-Fi Configuration screen. STEP 3 Select Wireless Profile. Any previously configured wireless profiles are displayed. STEP 4 Do one of the following: • Scan for available networks. See Scanning for Available Networks, page 34. • Manually add the network. See Manually Adding a Network, page 35. Scanning for Available Networks NOTE If your router has SSID (router name) broadcast disabled, it may not appear in the list of networks. In that case, you need to manually add it (see Manually Adding a Network, page 35). STEP 1 In the Wireless Profile screen, press Scan. STEP 2 In the list of available networks, scroll to the desired network and click Add to select the highlighted network. Cisco Small Business IP Phone SPA 525G/SPA 525G2 User Guide (SIP) 34
-
 1
1 -
2
-
3
-
4
-
5
-
6
-
7
-
8
-
9
-
10
-
11
-
12
-
13
-
14
-
15
-
16
-
17
-
18
-
19
-
20
-
21
-
22
-
23
-
24
-
25
-
26
-
27
-
28
-
29
-
30
-
31
-
 32
32 -
 33
33 -
 34
34 -
 35
35 -
 36
36 -
 37
37 -
 38
38 -
 39
39 -
 40
40 -
 41
41 -
 42
42 -
43
-
44
-
45
-
46
-
47
-
48
-
49
-
50
-
51
-
52
-
53
-
54
-
55
-
56
-
57
-
58
-
59
-
60
-
61
-
62
-
63
-
64
-
65
-
66
-
67
-
68
-
69
-
70
-
71
-
72
-
73
-
74
-
75
-
76
-
77
-
78
-
79
-
80
-
81
-
82
-
83
-
84
-
85
-
86
-
87
-
88
-
89
-
90
-
91
-
92
-
93
-
94
-
95
-
96
-
97
-
98
-
99
-
100
-
101
-
102
-
103
-
104
-
105
-
106
-
107
-
108
-
109
-
110
-
111
-
112
-
113
-
114
-
115
-
116
-
117
 |
 |