Craftsman 21829 Operation Manual - Page 19
Tounlock/move, Therails
 |
View all Craftsman 21829 manuals
Add to My Manuals
Save this manual to your list of manuals |
Page 19 highlights
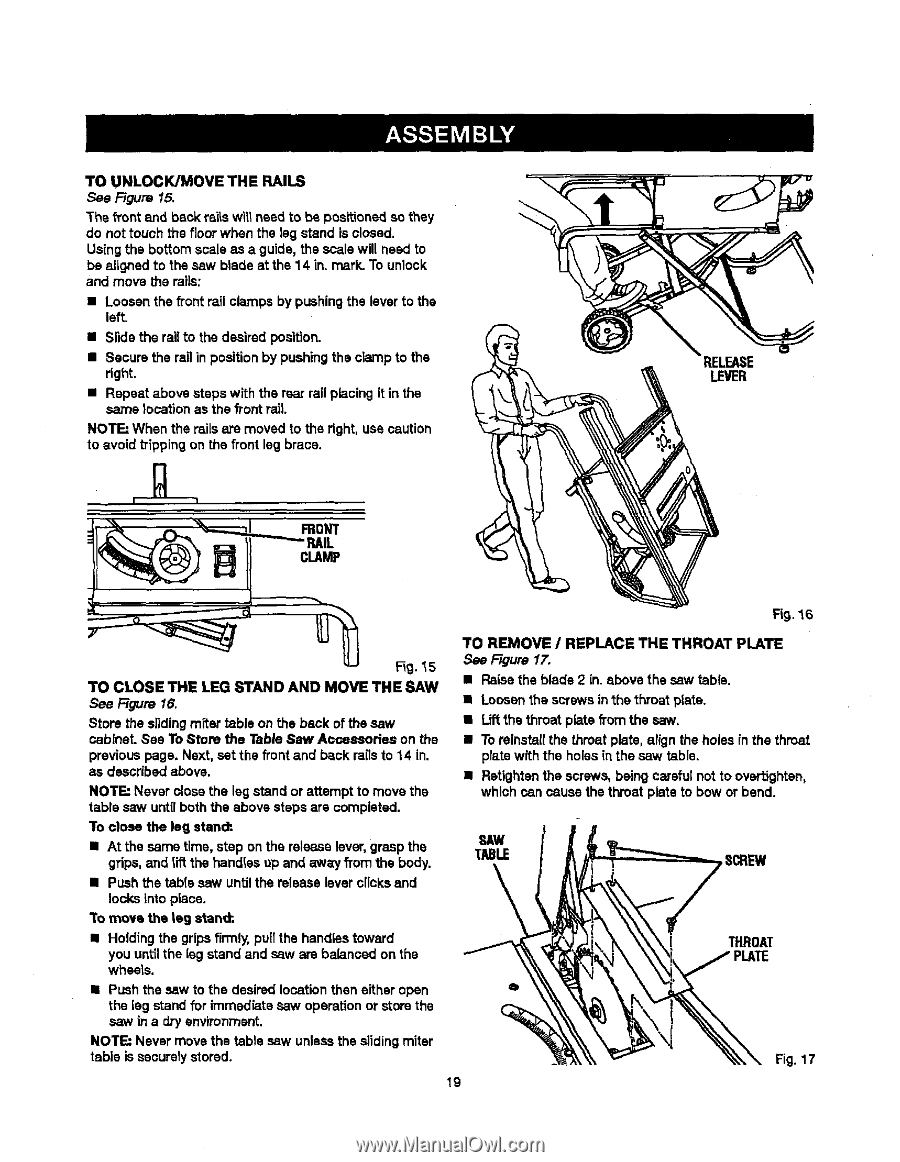
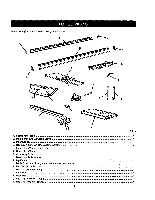
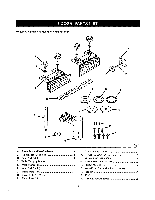
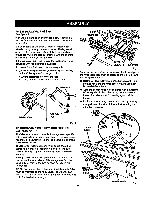
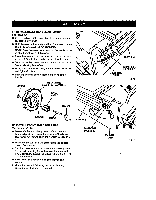
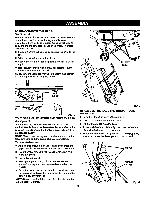
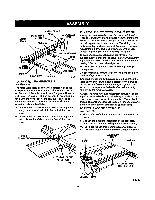
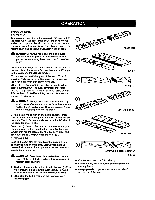
TO UNLOCK/MOVTEHERAILS See Figure 15. The front and back rails will need to be positionedso they do not touch the floor when the Sagstand isclosed. Using the bottom scale as a guide, the scalewill need to be aligned to the saw blade at the 14 in. mark. To unlock and move t_e mils: • Loosen the front rali clamps by pushingthe lever to the left. • Slide the ra'dto the desired position. • Secure the rag in position by pushing the clamp to the right. • Repeat shove steps with the rear rail plscingit in the same locationas the front rail. NOTI:-' When the rails are moved to the right, use caution to avoid trippingon the front leg brace. RELEASE LEVER IL CLAMP Fig. 16 _g. 15 TO CLOSE THE LEG STAND AND MOVE THE SAW See Figure 16. Store the slidingmiter table on the back of the saw cabinet. See To Store the Tab/e Saw A_ssories on the previouspage. Next, set the frontand back ransto 14 in. as described above. NOTE: Never close the leg stand or attempt to move the table saw untilboth the above steps are complsted. TO REMOVE / REPLACE THE THROAT PLATE ,..%eFigure 1.7, • Raise the blade 2 in. above the saw table. • Loosen tha screws in the throat prate. • Liftthe throat plate from the saw, • To reinstallthe threat plate, af(gn the holes in the throat plate with the holes in the saw table. • Ratightenthe screws, being carefulnot to overt_ghtan, which can cause the throat plate to bow or bend. To cfoae the leg stand:. • At the same time, step on the release lever,grasp the grips, and t_ the handles op and away from the body. • Push the table saw until the release lever clicks and locks into place. To moYa the |eg s_and; • Holding the grips firmly,pu(tthe handles toward you untUthe lag stand and saw are balanced on the wheels. • Push the saw to the desired locationthen either open the lag stand for immediate saw operation or store the saw in a dry environTnent. NOTE: Never movethe table saw unlessthe sliding miter table issecurely stored. Fig. 17 19
-
 1
1 -
2
-
3
-
4
-
5
-
6
-
7
-
8
-
9
-
10
-
11
-
12
-
13
-
 14
14 -
 15
15 -
 16
16 -
 17
17 -
 18
18 -
 19
19 -
 20
20 -
 21
21 -
 22
22 -
 23
23 -
 24
24 -
25
-
26
-
27
-
28
-
29
-
30
-
31
-
32
-
33
-
34
-
35
-
36
-
37
-
38
-
39
-
40
-
41
-
42
-
43
-
44
-
45
-
46
-
47
-
48
-
49
-
50
-
51
-
52
-
53
-
54
-
55
-
56
-
57
-
58
 |
 |