Craftsman 21829 Operation Manual - Page 27
checking, fence
 |
View all Craftsman 21829 manuals
Add to My Manuals
Save this manual to your list of manuals |
Page 27 highlights
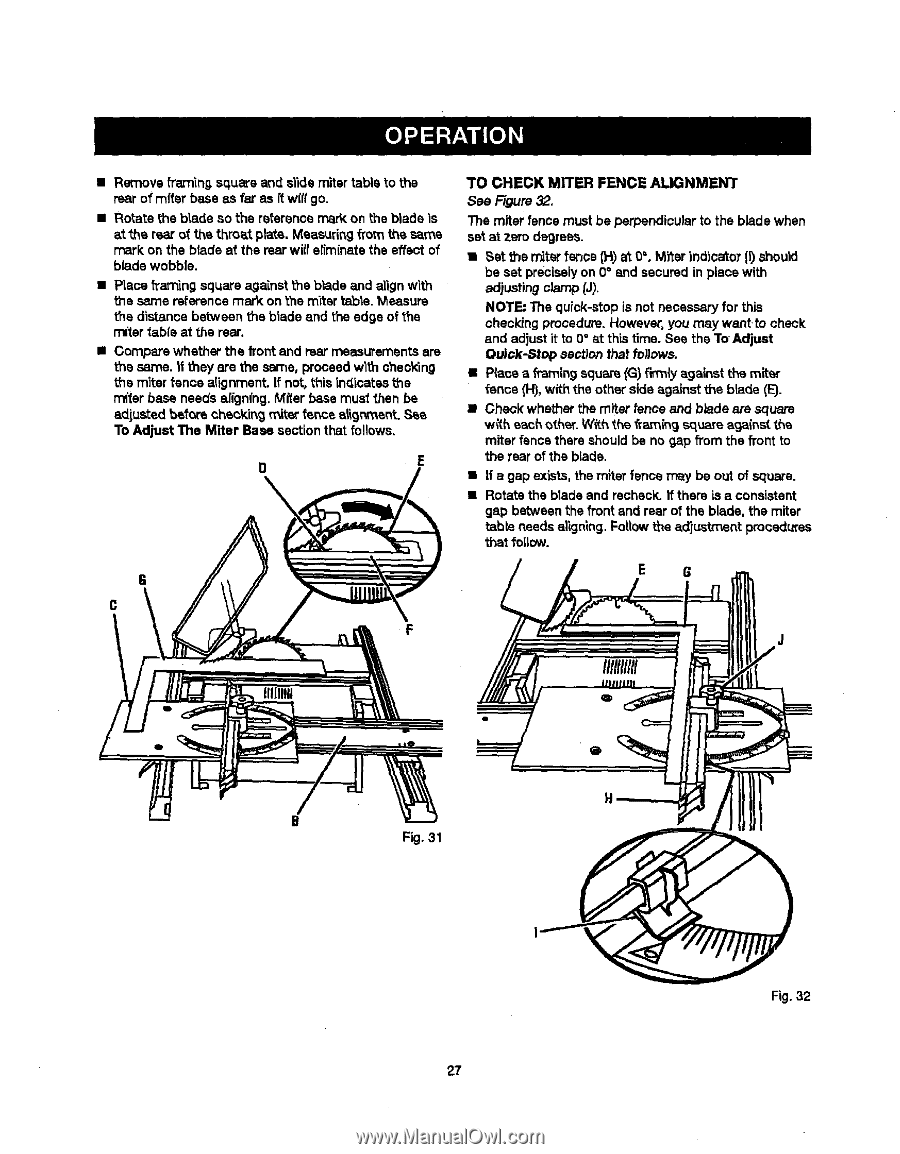
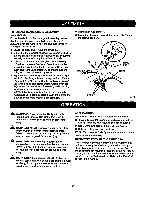
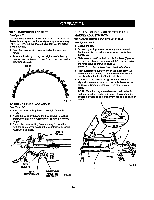
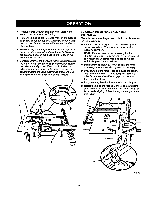
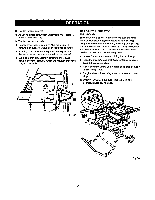
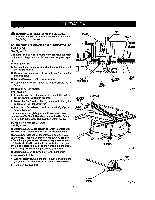
• Remove framinQs,quare and slide miter table to the rear o1rafterbase as far as ft w(fl go. • Rotate the blade so the reference markon the blade is at the rear of the throat plate. Measuringfrom the s_ms mark on the blade at the rear wiif eriminatsthe effect of blade wobble. • Place framing square againstthe blade and align with the same reference marY:on the mitsr table. Measure the distance between the blade and the edge of the miter table at the rear. • Compare whether the front and rear measurementsare the same. It they are the same, proceed with shecking ths miter fence alignment, If not, this inc{icatasthe miter base needs afign(ng. Mi!sr base musl then be adjustedbmforecheckingmiterfencealig_'nenSt_.e To Adjust The Miter Base sectionthat follows, I] E \ 3"0 CHECK MITER FENCE ALIGNMENT See Figure 32, The miter fence must be perpendicularto the blade when set at zero degrees. • Set _e miter fanes (H) at 0% M_er indicatoT (I) should be set preciselyon 0° end securedin place with adjustingclamp _J). NOTE" The quick-atopis not necessaryfor this checking procedure.However, you may want.to check and adjustit to 0° at this time. See the ToAdjust Ou_k-Sl_> sent/on thaf fo_ows. • Plaea a framingsqu_ {G) flnmiya_}_'_sttl_ miter fence (H), with the other side against the blade (E}. • Check whetherthe miter fence and blade ate square with each other. W#.hthe freLrn{9n squme age{net the miter fence there shouldbe no gap from the front to the rear of the blade, • H a gap exists, the miter fence may be out of square. • Rotate the blade and recheck.If there is a consistent gap between the front and rear of the blade, the miter table needs a|ignlng.Followthe adjustment procedures that follow. F I B Fig. 31 Fig. 32 27
-
 1
1 -
2
-
3
-
4
-
5
-
6
-
7
-
8
-
9
-
10
-
11
-
12
-
13
-
14
-
15
-
16
-
17
-
18
-
19
-
20
-
21
-
 22
22 -
 23
23 -
 24
24 -
 25
25 -
 26
26 -
 27
27 -
 28
28 -
 29
29 -
 30
30 -
 31
31 -
 32
32 -
33
-
34
-
35
-
36
-
37
-
38
-
39
-
40
-
41
-
42
-
43
-
44
-
45
-
46
-
47
-
48
-
49
-
50
-
51
-
52
-
53
-
54
-
55
-
56
-
57
-
58
 |
 |