Craftsman 21829 Operation Manual - Page 29
result, See
 |
View all Craftsman 21829 manuals
Add to My Manuals
Save this manual to your list of manuals |
Page 29 highlights
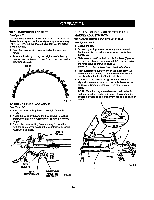
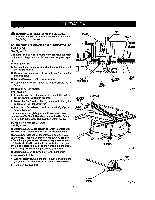
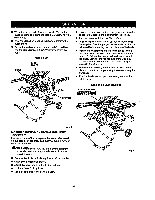
• Tightenhex nut securely. • Adjust rightrear screw from underneath miter table to remove excessiveplay. • Tighten hex nut securely. • Recheck your setups carefully.Alse make sure a[[ screws, hex nu_s,etc., h_ve been tightened securely. • If sliding miter table assembly is still not square with the blade, repeat the above proceduresas needed. • Make sure that sfidss remainsquareto miter base edo,e to preve_ =oookir=_=which will resultin excessive play in miter table. TO ADJUST QUICK STOP See Figure 38. The quick stop is preset at the factory to stop the miter fence at sxactiy zero degrees. However,when sliding miter table adjustmentsare made, these adiustmentsmay cause the quick stop to need adiusting.Check qu(ck stop with miter scale set at zero degrees. If adjustmentsare needed, proceed with the followingsteps: • Loosenthe eccentric screw holding the quick stop. • Piecethe quick stop againstthe miter fence with miter scale set at zero degrees. • Adjusteccentricscrew untilit holds quick stop securely a_]aJnstmiter fence. • Rstk..lhtenhe);nut, secur{ngeccentric screw and q,qck stop. • Check yourwork. If the quickstop is not at zero degrees, repeat above steps. t Q Fig. 35 QUICK STOP Fig. 36 29
-
 1
1 -
2
-
3
-
4
-
5
-
6
-
7
-
8
-
9
-
10
-
11
-
12
-
13
-
14
-
15
-
16
-
17
-
18
-
19
-
20
-
21
-
22
-
23
-
 24
24 -
 25
25 -
 26
26 -
 27
27 -
 28
28 -
 29
29 -
 30
30 -
 31
31 -
 32
32 -
 33
33 -
 34
34 -
35
-
36
-
37
-
38
-
39
-
40
-
41
-
42
-
43
-
44
-
45
-
46
-
47
-
48
-
49
-
50
-
51
-
52
-
53
-
54
-
55
-
56
-
57
-
58
 |
 |
