Dell 3010cn Color Laser Printer Printer Menus - Page 116
Other Problems, Removing the Used Drum Cartridge
 |
View all Dell 3010cn Color Laser Printer manuals
Add to My Manuals
Save this manual to your list of manuals |
Page 116 highlights
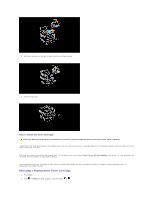
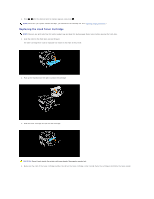
Testing "Toner Pallets Check" or "Contamination Check" "Toner Pallet Check" and "Contamination Chk" are used to diagnose machine problems. 1. On the Customer Mode menu, go down to TonerPalletCheck or ContaminationChk, and press . Allows you to identify the problem with the toner when print quality problems occur while printing pictures or photos. Toner Pallet Check Allows you to check for any regular lines or spots when printing if print quality problems are occurring. Contamination Check After you output the test results, contact Dell. Clear NVRAM You can restore the original factory default menu settings by initializing NVRAM. 1. Press Menu. 2. Press until Configure appears, and then press or . 3. Press until Maintenance appears, and then press or . 4. Press until Init NVRAM appears, and then press or . 5. The Init NVRAM Are you sure? message appears on the operator panel. Press . 6. Turn off the printer, and then on again. Other Problems How to replace the Drum Cartridge CAUTION: Before performing any of the following procedures, read and follow the safety instructions in your Owner's Manual. Dell cartridges are available only through Dell. You can order more online at http://www.dell.com/supplies or by phone. To order by phone, see your Owner's Manual. Dell recommends Dell drum cartridges for your printer. Dell does not provide warranty coverage for problems caused by using accessories, parts, or components not supplied by Dell. Removing the Used Drum Cartridge NOTE: Remove any print jobs from the center output tray and close the multipurpose feeder cover before opening the top cover or front door. 1. To open both covers on the printer, grab the notch in the front door and pull forward. Lift the top cover and push back. 2. To remove the used drum cartridge, push up the lever on the right side of the printer.
-
 1
1 -
2
-
3
-
4
-
5
-
6
-
7
-
8
-
9
-
10
-
11
-
12
-
13
-
14
-
15
-
16
-
17
-
18
-
19
-
20
-
21
-
22
-
23
-
24
-
25
-
26
-
27
-
28
-
29
-
30
-
31
-
32
-
33
-
34
-
35
-
36
-
37
-
38
-
39
-
40
-
41
-
42
-
43
-
44
-
45
-
46
-
47
-
48
-
49
-
50
-
51
-
52
-
53
-
54
-
55
-
56
-
57
-
58
-
59
-
60
-
61
-
62
-
63
-
64
-
65
-
66
-
67
-
68
-
69
-
70
-
71
-
72
-
73
-
74
-
75
-
76
-
77
-
78
-
79
-
80
-
81
-
82
-
83
-
84
-
85
-
86
-
87
-
88
-
89
-
90
-
91
-
92
-
93
-
94
-
95
-
96
-
97
-
98
-
99
-
100
-
101
-
102
-
103
-
104
-
105
-
106
-
107
-
108
-
109
-
110
-
 111
111 -
 112
112 -
 113
113 -
 114
114 -
 115
115 -
 116
116 -
 117
117 -
 118
118 -
 119
119 -
 120
120 -
 121
121 -
122
 |
 |
