Dell B3465dn Mono Laser Multifunction Printer User Guide - Page 131
Scanning to a flash drive, Understanding the scan options, FTP, File Name
 |
View all Dell B3465dn Mono Laser Multifunction Printer manuals
Add to My Manuals
Save this manual to your list of manuals |
Page 131 highlights
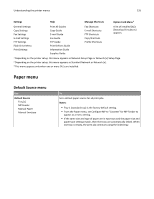
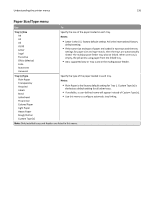
Scanning 131 5 From the printers folder, right‑click the printer, and then click Scan Properties or Properties to configure the scan settings. 6 From the printer control panel, touch Scan to Computer > Options. 7 Select from the following options: • Scan-Scan and save the document directly to a selected location on the computer. • Scan for Print-Scan and automatically print the document. • Scan for E‑mail-Attach a scanned document to an e‑mail. • Scan for Fax-Attach a scanned document to be sent through fax. • Scan for OCR-Scan the document using an optical character recognition (OCR) software that turns your printed documents into various electronic formats, including Microsoft Word, Microsoft Excel, and searchable PDF. For help, see the documentation that came with the OCR software. 8 Touch Send It. Remote scan in progress appears on the printer display. The scanned image opens automatically on the computer screen. Scanning to a flash drive 1 Load an original document faceup, short edge first into the ADF tray or facedown on the scanner glass. Notes: • Do not load postcards, photos, small items, transparencies, photo paper, or thin media (such as magazine clippings) into the ADF tray. Place these items on the scanner glass. • The ADF indicator light comes on when the paper is loaded properly. 2 If you are loading a document into the ADF tray, then adjust the paper guides. 3 Insert the flash drive into the USB port on the front of the printer. Note: The USB Drive home screen appears. 4 Select the destination folder, and then touch Scan to USB drive. Note: The printer goes back to the home screen after 30 seconds of inactivity. 5 Adjust the scan settings, and then touch Scan It. Understanding the scan options FTP This option lets you enter the IP address for the FTP destination. Note: An IP address appears as four sets of numbers separated by periods, such as 123.123.123.123. File Name This option lets you type a file name for the scan image.
-
 1
1 -
2
-
3
-
4
-
5
-
6
-
7
-
8
-
9
-
10
-
11
-
12
-
13
-
14
-
15
-
16
-
17
-
18
-
19
-
20
-
21
-
22
-
23
-
24
-
25
-
26
-
27
-
28
-
29
-
30
-
31
-
32
-
33
-
34
-
35
-
36
-
37
-
38
-
39
-
40
-
41
-
42
-
43
-
44
-
45
-
46
-
47
-
48
-
49
-
50
-
51
-
52
-
53
-
54
-
55
-
56
-
57
-
58
-
59
-
60
-
61
-
62
-
63
-
64
-
65
-
66
-
67
-
68
-
69
-
70
-
71
-
72
-
73
-
74
-
75
-
76
-
77
-
78
-
79
-
80
-
81
-
82
-
83
-
84
-
85
-
86
-
87
-
88
-
89
-
90
-
91
-
92
-
93
-
94
-
95
-
96
-
97
-
98
-
99
-
100
-
101
-
102
-
103
-
104
-
105
-
106
-
107
-
108
-
109
-
110
-
111
-
112
-
113
-
114
-
115
-
116
-
117
-
118
-
119
-
120
-
121
-
122
-
123
-
124
-
125
-
 126
126 -
 127
127 -
 128
128 -
 129
129 -
 130
130 -
 131
131 -
 132
132 -
 133
133 -
 134
134 -
 135
135 -
 136
136 -
137
-
138
-
139
-
140
-
141
-
142
-
143
-
144
-
145
-
146
-
147
-
148
-
149
-
150
-
151
-
152
-
153
-
154
-
155
-
156
-
157
-
158
-
159
-
160
-
161
-
162
-
163
-
164
-
165
-
166
-
167
-
168
-
169
-
170
-
171
-
172
-
173
-
174
-
175
-
176
-
177
-
178
-
179
-
180
-
181
-
182
-
183
-
184
-
185
-
186
-
187
-
188
-
189
-
190
-
191
-
192
-
193
-
194
-
195
-
196
-
197
-
198
-
199
-
200
-
201
-
202
-
203
-
204
-
205
-
206
-
207
-
208
-
209
-
210
-
211
-
212
-
213
-
214
-
215
-
216
-
217
-
218
-
219
-
220
-
221
-
222
-
223
-
224
-
225
-
226
-
227
-
228
-
229
-
230
-
231
-
232
-
233
-
234
-
235
-
236
-
237
-
238
-
239
-
240
-
241
-
242
-
243
-
244
-
245
-
246
-
247
-
248
-
249
-
250
-
251
-
252
-
253
-
254
-
255
-
256
-
257
-
258
-
259
-
260
-
261
-
262
-
263
-
264
-
265
-
266
-
267
-
268
-
269
-
270
-
271
-
272
-
273
-
274
-
275
-
276
-
277
-
278
-
279
-
280
-
281
-
282
-
283
-
284
-
285
-
286
-
287
-
288
-
289
-
290
-
291
-
292
-
293
-
294
-
295
-
296
-
297
-
298
-
299
-
300
-
301
-
302
-
303
-
304
-
305
-
306
-
307
-
308
-
309
-
310
-
311
-
312
-
313
-
314
-
315
-
316
-
317
-
318
-
319
-
320
-
321
-
322
-
323
-
324
 |
 |
