Dell B3465dn Mono Laser Multifunction Printer User Guide - Page 229
Restoring factory default settings, Notes, Settings, Print Settings, Supply Notifications, Submit
 |
View all Dell B3465dn Mono Laser Multifunction Printer manuals
Add to My Manuals
Save this manual to your list of manuals |
Page 229 highlights
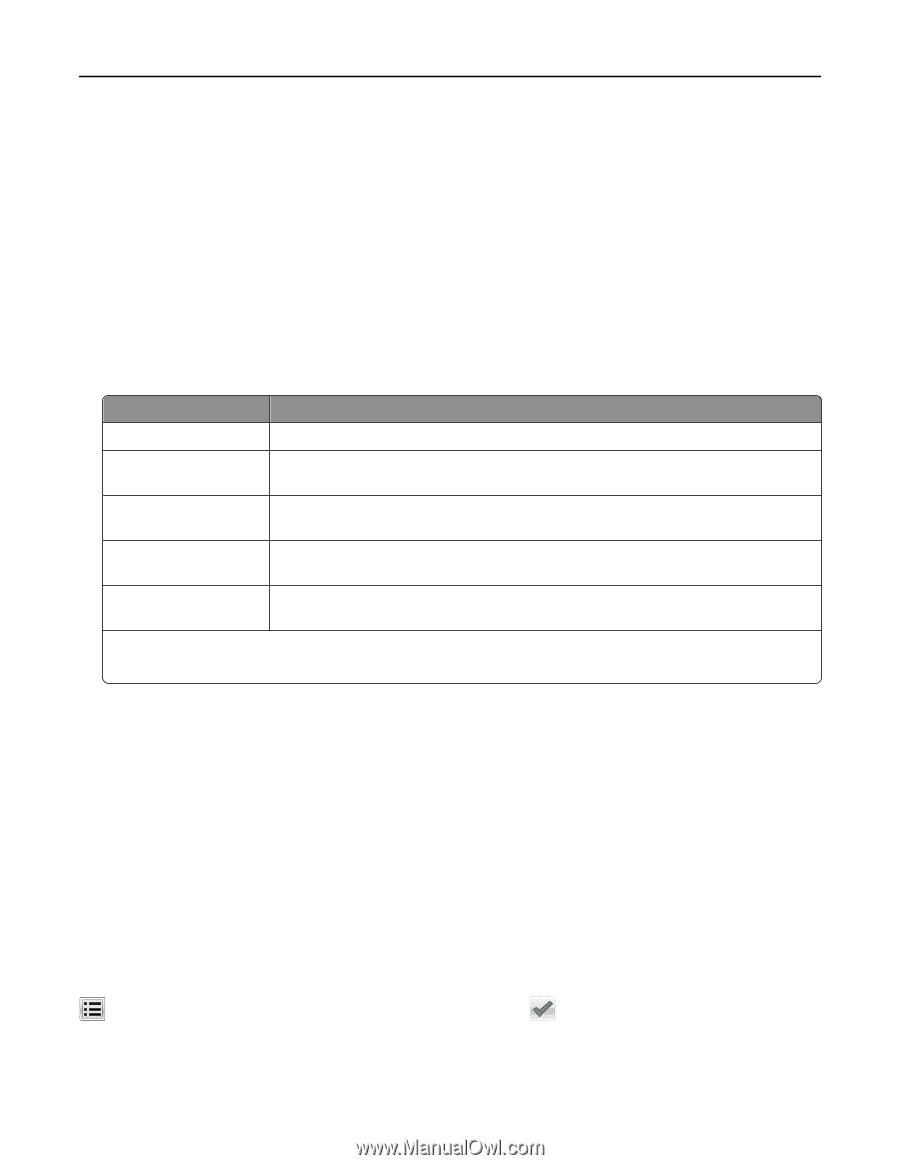
Managing the printer 229 • All selectable alerts can be set for nearly low, low, and very low supply conditions. Not all selectable alerts can be set for the end‑of‑life supply condition. E‑mail selectable alert is available for all supply conditions. • The percentage of estimated remaining supply that prompts the alert can be set on some supplies for some supply conditions. 1 Open a Web browser, and then type the printer IP address in the address field. Notes: • View the printer IP address on the printer home screen. The IP address appears as four sets of numbers separated by periods, such as 123.123.123.123. • If you are using a proxy server, then temporarily disable it to load the Web page correctly. 2 Click Settings > Print Settings > Supply Notifications. 3 From the drop‑down menu for each supply, select one of the following notification options: Notification Description Off The normal printer behavior for all supplies occurs. E‑mail Only The printer generates an e‑mail when the supply condition is reached. The status of the supply appears on the menus page and status page. Warning The printer displays the warning message and generates an e‑mail about the status of the supply. The printer does not stop when the supply condition is reached. Continuable Stop1 The printer stops processing jobs when the supply condition is reached, and the user needs to press a button to continue printing. Non Continuable Stop1,2 The printer stops processing jobs when the supply condition is reached. The supply must be replaced to continue printing. 1 The printer generates an e-mail about the status of the supply when supply notification is enabled. 2 The printer stops when some supplies become empty to prevent damage. 4 Click Submit. Restoring factory default settings If you want to keep a list of the current menu settings for reference, then print a menu settings page before restoring the factory default settings. For more information, see "Printing a menu settings page" on page 55. If you want a more comprehensive method of restoring the printer factory default settings, then perform the Wipe All Settings option. For more information, see "Erasing non‑volatile memory" on page 212. Warning-Potential Damage: Restoring factory defaults returns most printer settings to the original factory default settings. Exceptions include the display language, custom sizes and messages, and network/port menu settings. All downloads stored in the RAM are deleted. Downloads stored in the flash memory or in a printer hard disk are not affected. From the home screen, navigate to: > Settings > General Settings > Factory Defaults > Restore Now >
-
 1
1 -
2
-
3
-
4
-
5
-
6
-
7
-
8
-
9
-
10
-
11
-
12
-
13
-
14
-
15
-
16
-
17
-
18
-
19
-
20
-
21
-
22
-
23
-
24
-
25
-
26
-
27
-
28
-
29
-
30
-
31
-
32
-
33
-
34
-
35
-
36
-
37
-
38
-
39
-
40
-
41
-
42
-
43
-
44
-
45
-
46
-
47
-
48
-
49
-
50
-
51
-
52
-
53
-
54
-
55
-
56
-
57
-
58
-
59
-
60
-
61
-
62
-
63
-
64
-
65
-
66
-
67
-
68
-
69
-
70
-
71
-
72
-
73
-
74
-
75
-
76
-
77
-
78
-
79
-
80
-
81
-
82
-
83
-
84
-
85
-
86
-
87
-
88
-
89
-
90
-
91
-
92
-
93
-
94
-
95
-
96
-
97
-
98
-
99
-
100
-
101
-
102
-
103
-
104
-
105
-
106
-
107
-
108
-
109
-
110
-
111
-
112
-
113
-
114
-
115
-
116
-
117
-
118
-
119
-
120
-
121
-
122
-
123
-
124
-
125
-
126
-
127
-
128
-
129
-
130
-
131
-
132
-
133
-
134
-
135
-
136
-
137
-
138
-
139
-
140
-
141
-
142
-
143
-
144
-
145
-
146
-
147
-
148
-
149
-
150
-
151
-
152
-
153
-
154
-
155
-
156
-
157
-
158
-
159
-
160
-
161
-
162
-
163
-
164
-
165
-
166
-
167
-
168
-
169
-
170
-
171
-
172
-
173
-
174
-
175
-
176
-
177
-
178
-
179
-
180
-
181
-
182
-
183
-
184
-
185
-
186
-
187
-
188
-
189
-
190
-
191
-
192
-
193
-
194
-
195
-
196
-
197
-
198
-
199
-
200
-
201
-
202
-
203
-
204
-
205
-
206
-
207
-
208
-
209
-
210
-
211
-
212
-
213
-
214
-
215
-
216
-
217
-
218
-
219
-
220
-
221
-
222
-
223
-
 224
224 -
 225
225 -
 226
226 -
 227
227 -
 228
228 -
 229
229 -
 230
230 -
 231
231 -
 232
232 -
 233
233 -
 234
234 -
235
-
236
-
237
-
238
-
239
-
240
-
241
-
242
-
243
-
244
-
245
-
246
-
247
-
248
-
249
-
250
-
251
-
252
-
253
-
254
-
255
-
256
-
257
-
258
-
259
-
260
-
261
-
262
-
263
-
264
-
265
-
266
-
267
-
268
-
269
-
270
-
271
-
272
-
273
-
274
-
275
-
276
-
277
-
278
-
279
-
280
-
281
-
282
-
283
-
284
-
285
-
286
-
287
-
288
-
289
-
290
-
291
-
292
-
293
-
294
-
295
-
296
-
297
-
298
-
299
-
300
-
301
-
302
-
303
-
304
-
305
-
306
-
307
-
308
-
309
-
310
-
311
-
312
-
313
-
314
-
315
-
316
-
317
-
318
-
319
-
320
-
321
-
322
-
323
-
324
 |
 |