Denon CDR-1000 Owners Manual - Page 7
Restrictions Related To The Cd-r/rw Standards, 6. Connections - recorder
 |
View all Denon CDR-1000 manuals
Add to My Manuals
Save this manual to your list of manuals |
Page 7 highlights
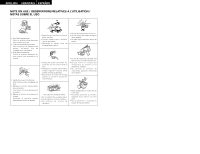
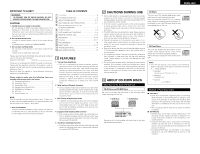
ENGLISH Precautions When Loading Discs • Only load one disc. Loading two or more discs in a layer will cause breakdown and may also scratch the discs. • Discs of the 8 cm size should be carefully aligned with the recessed disc guide area and loaded without the use of an adapter. If not properly loaded, the disc may fall out or the disc holder may cease to open. • Be careful not to get your finger caught when the disc holder is closing. • Do not place anything other than a disc on the disc tray. • Do not use discs that are cracked, misshapen, or have been repaired with an adhesive, etc. • Do not use discs that have adhesive coming out from cellophane tape or the label of a rental disc, or adhesive remaining after removal of the label. Use of a disc in this condition may result in the disc not being ejected or in breakdown. 5 RESTRICTIONS RELATED TO THE CD-R/RW STANDARDS 5 Standards concerned with CD recorder playback have been established based on the existing standards of CD players; however, for recording, the method differs from that used with existing cassette decks and MD recorders, etc. In view of this, please gain a good understanding of the following restrictions associated with CD-R/RW discs and enjoy the medium. Restrictions of Audio CD-R/RW Discs • Only audio CD-R/RW discs can be recorded with this unit. "WRONG DISC" will be displayed when a disc other than one for use with audio such as a CD-R/RW disc for use with a personal computer or another type of disc is loaded. (See "Discs that Can Be Used with this unit" on Page 5.) • CD-R discs can be recorded to only once. The recorded information cannot be erased. • The recorded information of CD-RW discs can be erased. When this disc has been finalized, erase after the finalization removal operation has been performed. (See "Unfinalizing CD-RW Discs" on Page 12.) • Recording mistakes made with CD-R discs cannot be erased; therefore, it is recommended that a CD-RW disc be used until you are accustomed to the recording operation. Restrictions in Recording with this Unit • The recording operation procedure is the same for CD-R discs and CD-RW discs. • When making additional recording to a previously recorded disc, the end of the last track is detected and recording is started from there. • The record standby mode cannot be set for CD-R/RW discs with a recordable time of about 7 seconds or less remaining. "DISC FULL" will be displayed at this time. • Songs with a recording time of less than 4 seconds cannot be recorded. Stopping the recording within 3 seconds of starting will result in no recording. • A maximum of 99 tracks can be recorded to one CD-R/RW disc. When the recording reaches the 99th track, "DISC FULL" is displayed and recordings beyond this track will not be possible. • Digital recording is not possible from CD-R/RW discs onto which have been digitally recorded, normal is it possible from MD or DAT, etc. When a digital recording is attempted from such sources, "COPY PROTECT" is displayed. To record from these digital sources, make the recording from the analog input. (See "Digital Copies" on Page 6.) • This unit cannot record CD-ROM and other non-audio signal sources. When an attempt is made to record from such sources, "NO AUDIO TR" is displayed. • When a recording is made from a disc that includes data other than audio signals such as CD graphics or CD-TEXT, only the audio signal is recorded; other data is not recorded. • DVD (Dolby Digital, DTS, and other compressed audio signals) cannot be recorded. 6 CONNECTIONS (1) Analog Input/Output Jack Connections • Use the supplied pin plug cable when making connections with the analog input/output jacks. q Input: Connect the analog input jacks (ANALOG IN) of this unit with the output jacks of the amplifier (MD or TAPE). w Output: Connect the analog output jacks (ANALOG OUT) of this unit with the input jacks of the amplifier (MD or TAPE). Amplifier w SIGNAL GND INPUTS PHONO CD TUNER AUX L PB REC TAPE-1 TAPE-2 TAPE-1 TAPE-2 /MD /DAT /MD /DAT L R R CDR-1000 SPEAKER SYSTEMS R L A B ANALOG OUT IN R L R L DIGITAL OUT OUT IN IN IN COAXIAL OPTICAL COAXIAL-1 COAXIAL-2 OPTICAL q (2) Connection of Digital Input/Output Jacks • Please use the supplied optical fiber cables when making connections to the digital (OPTICAL) input/output jacks. Use 75Ω/ohms pin plug cable, which is available on the market, when making connections to the digital (COAXIAL) input/output jacks. q Input: Connections with Playback Equipment such as the CD Players The digital input jacks of this unit (either DIGITAL IN OPTICAL or DIGITAL IN COAXIAL) should be connected with the digital output jacks of the CD player (OPTICAL or COAXIAL). Up to three pieces of digital playback equipment can be connected. w Output: Connections with Equipment having a Digital Input such as the MD Recorder The digital output jacks of this unit (either DIGITAL OUT OPTICAL or DIGITAL OUT COAXIAL) should be connected with the digital input jacks of the MD recorder or other equipment (OPTICAL or COAXIAL). MD recorder DIGITAL OUT IN IN IN OPTICAL COAXIAL OPTICAL-1 OPTICAL-2 ANALOG OUT IN L R CDR-1000 ANALOG OUT IN R L R L q CD player w DIGITAL OUT OUT IN IN IN COAXIAL OPTICAL COAXIAL-1 COAXIAL-2 OPTICAL q LINE OUT R L DIGITAL OUT OUT COAXIAL OPTICAL Power Supply outlet 120 V 60 Hz Power Supply outlet 120 V 60 Hz AC IN Power Supply outlet 120 V 60 Hz AC IN Compatibility with Other CD Players and Discs • Finalization processing on a CD-R disc that has been recorded with this unit will permit that disc to be played on ordinary CD player. (See "Finalization Processing of CD-R Discs" on Page 6.) • Finalization processing on a CD-RW disc that has been recorded with this unit will permit that disc to be played only on a CD player designed to be used with CD-RW discs or on another CD recorder. (See "Finalization Processing of CD-RW Discs" on Page 6.) NOTES: • To assure accurate recording, record with an ambient temperature of 30°C or less. • Do not obstruct the ventilation holes on the top and side. • Recording may stop if the unit is subject to shocks during recording. If recording stops, it may no longer be possible to use the disc normally. NOTES: • Do not plug the power plug into the power outlet until all connections have been completed. • Connect the red plug of the pin plug cable into the R (right) jack and the white plug into the L (left) jack. • Do not make a connection to the PHONO jack of the amplifier. Doing so will lead to breakdown. • Firmly plug in the power plug. An imperfect connection will cause noise to be generated. • Bundling the connection cables together with the power cable will cause hum or other noise. • When the power plug is disconnected from the power outlet, wait about 5 seconds before reinserting. 7
-
 1
1 -
 2
2 -
 3
3 -
 4
4 -
 5
5 -
 6
6 -
 7
7 -
 8
8 -
 9
9 -
 10
10 -
 11
11 -
 12
12 -
13
-
14
-
15
-
16
-
17
-
18
-
19
-
20
-
21
-
22
-
23
-
24
-
25
-
26
-
27
-
28
-
29
-
30
-
31
-
32
-
33
-
34
-
35
-
36
-
37
-
38
-
39
-
40
-
41
-
42
-
43
-
44
-
45
-
46
-
47
-
48
-
49
-
50
 |
 |
