Denon CDR-1000 Owners Manual - Page 8
Part Names And Functions - remote control
 |
View all Denon CDR-1000 manuals
Add to My Manuals
Save this manual to your list of manuals |
Page 8 highlights
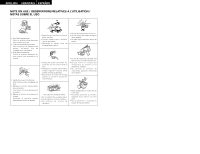
ENGLISH (3) Connection of the AC Cord q Plug the power cord supplied into the AC IN on the CD recorder, then into a mains socket. 7 PART NAMES AND FUNCTIONS Front Panel q Power button • Turns the CD recorder ON and OFF. • When the power is ON, On/Standby switching is possible with the power button of the remote control. w Phones jack (PHONES) • Jack for headphones. e Phones level control (PHONES LEVEL) • Adjust the headphone volume. r Remote control sensor (REMOTE SENSOR) • Receives signals from the remote control. t Disc tray y Display button (DISPLAY) • Selects display information/text. u Scroll button (SCROLL) • Use to display the text information once only. i Input button (INPUT) • Selects input source. • Switching will be as follows each time the button is pressed. DIGITAL (COAXIAL 1) DIGITAL (COAXIAL 2) OPTICAL ANALOG ✽ Switching is not permitted during recording. o Erase button (ERASE) • Selects erasing mode. !0 Shuffle button (SHUFFLE) • Plays CD, CD-R/RW or program in random order. !1 Finalize button (FINALIZE) • Selects finalize mode. !2 Cancel/Delete button (CANCEL/DELETE) • Deletes tracks from a program. • Deletes text in Menu mode. • Returns to a higher level in the menu. !3 Store/Menu button (STORE/MENU) • Enters Menu mode. • Stores Menu settings. !4 Multi Jog dial (8 MULTI JOG 9) • Beginning of the current/next track (Play and Program mode). • Recording level control (Recording). • Selects settings (Menu mode). Enter button (ENTER) (push) • Plays selected tracks. • Selects settings in Menu mode. • Programs track numbers. !5 Rec button (REC) • Starts recording (Manual REC Mode) finalizing, erasing. !6 Program button (PROGRAM) • Opens/closes program memory. !7 Rec Mode button (REC MODE) • Selects recording modes. !8 Repeat button (REPEAT) • Selects repeat mode. • Switching will be as follows each time the butotn is pressed. REPEAT TRACK REPEAT ALL (OFF) !9 Stop button (2 STOP) • Stops/clears a program. @0 Manual search forward button (7) • Searches forward. • Use this to fast-forward in Menu/Program. @1 Play/Pause button (1/3 PLAY/PAUSE) • Starts play/interrupts play or recording. @2 Manual search reverse button (6) • Searches backward. • Use this to fast-reverse in Menu/Program. @3 Open/Close button (5 OPEN/CLOSE) • Opens/closes disc tray. @4 Display • Information screen. @5 Standby indicator (STANDBY) Rear Panel @6 Analog output jacks (ANALOG OUT) • Connects to the line input of an amplifier (left and right). @7 Analog input jacks (ANALOG IN) • Connects to the line output of an amplifier (left and right). @8 Digital output jack (DIGITAL OUT COAXIAL) • Connects to the digital coaxial input of e.g. amplifier or recording device. @9 Digital output jack (DIGITAL OUT OPTICAL) • Connects to the digital optical input of e.g. amplifier or recording device. #0 Digital input jacks (DIGITAL IN COAXIAL-1, 2) • Connects to the digital coaxial output of an external digital sources. • Two systems can be connected. Use the INPUT button to select "DIGITAL I" or "DIGITAL II". #1 Digital input jack (DIGITAL IN OPTICAL) • Connects to the digital optical output of an external digital source. #2 AC inlet (AC IN) • Connect the supplied power cable. Display indications q Input source display • DIGITAL I: DIGITAL IN COAXIAL-1 selected for external recording. • DIGITAL II: DIGITAL IN COAXIAL-2 selected for external recording. • OPTICAL I: DIGITAL IN OPTICAL selected for external recording. • ANALOG: ANALOG IN selected. w Music calendar display • Tracks on a disc or in a program. • Track in play/recording. • The "+" sign is displayed when there are 21 or more track numbers. e Mode display • CD : CD (a pre-recorded CD or finalized CD-R or CD-RW disc) is loaded. • CD R: An unfinalized CD-R disc is loaded. • CD RW: An unfinalized CD-RW disc is loaded. • 4: Lights during recording. • 1: Lights during play/recording. • 3: Pause function active. • PROGRAM: Flashes during programming/lights in program mode. • MANUAL: Manual recording active. (In auto track increment mode OFF) • SYNC: Synchronized recording active. • SHUFFLE: Plays tracks in random order. • REPEAT TRACK/ALL: Lights up when a track/complete disc (or program) is repeated. • SCAN: Lights up when the first 10 seconds of each track are played. • STEP: • Indicates the number of tracks in a program. • FADE: Fade mode active. • : Balance (lights during balance adjustment). • : Remote control active. r Level meter • Record/play level bar, indicates the audio signal level. t Multiple display • This display indicates the number of tracks, track number, play time, recording time, various operational information, text messages, etc. y Time display • TOTAL REM/TRACK TIME: Total or remaining time of disc or track. • TRACK: Track number. • REM TIME: Remaining recording time/recording time. Display messages Messages, as listed and explained here, may appear on the display for your guidance. General READING Reading disc information. OPEN During tray opening. CLOSE During tray closing. NO DISC No disc inserted, disc unreadable or disc inserted upside down. PROG FULL Program full. INSERT DISC Insert disc or insert disc in correct way. WRONG DISC Inserted disc is no audio CD. USE AUDIO CD UNFINALIZED Unfinalized CD-R/RW disc. MEMORY O/O Indicates the amount of text memory used for unfinalized discs. Recording WAIT The specified operation is being set. UPDATE Updating disc contents. DISC FULL No more recording possible. DIGITAL Digital input coaxial 1 selected. DIGITAL 2 Digital input coaxial 2 selected. OPTICAL Digital input optical selected. 8
-
 1
1 -
2
-
 3
3 -
 4
4 -
 5
5 -
 6
6 -
 7
7 -
 8
8 -
 9
9 -
 10
10 -
 11
11 -
 12
12 -
 13
13 -
14
-
15
-
16
-
17
-
18
-
19
-
20
-
21
-
22
-
23
-
24
-
25
-
26
-
27
-
28
-
29
-
30
-
31
-
32
-
33
-
34
-
35
-
36
-
37
-
38
-
39
-
40
-
41
-
42
-
43
-
44
-
45
-
46
-
47
-
48
-
49
-
50
 |
 |
