Denon DVD 1930CI Owners Manual - Eng/Frn/Span - Page 24
Virtual Surround, Black Level Setting, Stereo Sound Mode, Picture Control, Sound Mode - sacd
 |
UPC - 081757507257
View all Denon DVD 1930CI manuals
Add to My Manuals
Save this manual to your list of manuals |
Page 24 highlights
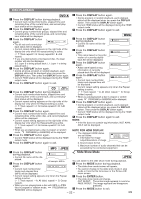
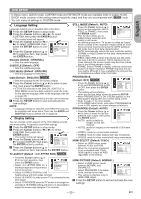
DISC PLAYBACK NOTE: • If the ANGLE ICON setting is OFF in the Display menu, the ( ) will not appear. Picture Control DVD-V DVD-A Picture Control adjusts Brightness, Contrast, Color, Gamma Correction and Sharpness of the specific display. 1 During playback, press the MODE button. BRIGHTNESS s+1B 2 Press the Cursor buttons (K or L) to switch among items. 3 Press the ENTER button or the Cursor buttons (s or B) to adjust the selected item to a desired level. • -6, -5, -4, -3, -2, -1, 0, +1, +2, +3, +4, +5, +6 can be selected. 4 To return to normal playback, press the RETURN button. NOTES: • The default settings for all items in Picture Control are "0". • The setting display will disappear in 10 seconds of no use. • This function cannot be used during Dialog Speed (refer to page 23). • If you return all items to the default settings please execute initialize. Super Audio CD 1 Press the SUPER AUDIO CD SET UP button repeatedly to select among MULTI-CH AREA, CD AREA, or 2CH AREA. MULTI-CH AREA - Playback in multi channel format.The number of channels depends on the disc being played. CD AREA - Playback in the same quality with sound as normal CDs. 2CH AREA - Playback in higher quality than that of normal CD sound. MULTI-CH AREA SACD CD AREA 2CH AREA SACD front panel display Sound Mode DVD-A This function allows you to select a desired sound mode during DVD-Audio playback. 1 Press the AUDIO button during playback. NOTES: • The Virtual Surround setting is not available for Super Audio CDs. (It may be possible to use the Virtual Surround setting when playing back discs that include a CD area.) • Some playback options may not be available.These will be skipped. • MULTI-CH AREA is selected as default. 2 Press the AUDIO button repeatedly to select your desired sound. NOTE: • When selecting a multi- 1.LPCM 3/2.1ch 96k/2 Virtual Surround DVD-V DVD-A CD MP3 WMA You can enjoy surround-sound effect with two speakers. channel sound, it may not mixed down in some cases even though the HDMI AUDIO or ANALOG AUDIO is 2 CHANNEL. 2.PPCM 2/0ch 96k/2 Stereo Sound Mode CD 1 Press the AUDIO button repeatedly during playback to select your desired sound mode. STEREO - both right and left channels are active (stereo) L-ch - only left channel is active R-ch - only right channel is active STEREO Both right and left channels are active (stereo). 1 During playback, press the MODE button repeatedly until the OFF Virtual Surround setting appears. 2 Press the ENTER button to set it 1(Natural effect), 2(Emphasized effect) or OFF. 3 Press the RETURN button to exit. NOTES: • Select Virtual Surround OFF or lower the volume if the sound is distorted. • Virtual Surround will not be effective if the sound mode is set to something other than STEREO (for Audio CD playback only). • This function cannot be used during Dialog Speed (refer to page 23). • Set HDMI AUDIO and ANALOG AUDIO to 2 CHANNEL to use this function. • The Virtual Surround setting is not available for Super Audio CDs. (It may be possible to use the Virtual Surround setting when playing back discs that include a CD area.) Black Level Setting L-ch Only the left channel is active. DVD-V DVD-A Adjust the Black Level Setting to make the black parts of the R-ch picture as bright as you prefer. Only the right channel is active. 1 During playback, press the MODE button repeatedly until ON Black Level setting appears. NOTE: • The STEREO can only be output when playing back DTS CD. 2 Press the ENTER button to switch ON/OFF. ON (Default) : Makes the dark parts brighter. OFF : Shows the original picture as recorded. 3 Press the RETURN button to exit. NOTE: • This function cannot be used during Dialog Speed - 24 - (refer to page 23). EN
-
 1
1 -
2
-
3
-
4
-
5
-
6
-
7
-
8
-
9
-
10
-
11
-
12
-
13
-
14
-
15
-
16
-
17
-
18
-
 19
19 -
 20
20 -
 21
21 -
 22
22 -
 23
23 -
 24
24 -
 25
25 -
 26
26 -
 27
27 -
 28
28 -
 29
29 -
30
-
31
-
32
-
33
-
34
-
35
-
36
-
37
-
38
-
39
-
40
-
41
-
42
-
43
-
44
-
45
-
46
-
47
-
48
-
49
-
50
-
51
-
52
-
53
-
54
-
55
-
56
-
57
-
58
-
59
-
60
-
61
-
62
-
63
-
64
-
65
-
66
-
67
-
68
-
69
-
70
-
71
-
72
-
73
-
74
-
75
-
76
-
77
-
78
-
79
-
80
-
81
-
82
-
83
-
84
-
85
-
86
-
87
-
88
-
89
-
90
-
91
-
92
 |
 |
