Denon DVD 1930CI Owners Manual - Eng/Frn/Span - Page 25
Quick
 |
UPC - 081757507257
View all Denon DVD 1930CI manuals
Add to My Manuals
Save this manual to your list of manuals |
Page 25 highlights
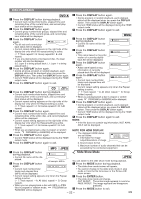
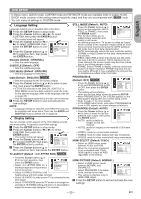
DVD SETUP English In Setup menu, QUICK mode, CUSTOM mode and INITIALIZE mode are available (refer to pages 25-28). QUICK mode consists of the setting menus frequently used, and they are accompanied with QUICK mark. You can make all settings in CUSTOM mode. Language Setting Language options are not available with some discs. 1 Press the SETUP button in stop mode. 2 Press the Cursor buttons (s or B) to select CUSTOM, then press the ENTER button. • The custom mode will appear. 3 Press the Cursor buttons (s or B) to select LANGUAGE, then press the ENTER button to con- LANGUAGE firm. 4 Press the Cursor buttons (K or DIALOG SUBTITLE DISC MENU OSD ORIGINAL OFF ENGLISH ENGLISH L) to select an item, then press the ENTER button. DIALOG (Default : ORIGINAL) • Sets the audio language. SUBTITLE (Default : OFF) • Sets the subtitle language. DISC MENU (Default : ENGLISH) • Sets the language for DVD Menu. OSD (Default : ENGLISH) QUICK • Sets the language for the On-Screen display. 5 Press the Cursor buttons (K or L) to select a set- ting, then press the ENTER button. • If OTHER is selected in the DIALOG, SUBTITLE or DISC MENU, press four-digit number to enter the code for the desired language (refer to the language code list on page 29). • Only the languages supported by the disc can be selected. 6 Press the SETUP button to exit and activate the new settings. NOTE: • Language Setting for DIALOG and SUBTITLE may not be available with some discs. Then use the AUDIO and SUBTITLE buttons. Details are on page 23. Display Setting You can change certain aspects of the DVD display screens, still mode setting, Progressive and HDMI settings. 1 Press the SETUP button in stop mode. 2 Press the Cursor buttons (s or B) to select CUSTOM, then press the ENTER button. • The custom mode will appear. 3 Press the Cursor buttons (s or B) to select DISPLAY, then press the ENTER button to confirm. DISPLAY TV ASPECT STILL MODE PROGRESSIVE PROG.MODE HDMI SELECT HDMI PICTURE 4:3 LETTER BOX AUTO OFF AUTO1 YCbCr NORMAL 4 Press the Cursor buttons (K or L) to select an item, then press the ENTER button. TV ASPECT (Default : 4:3 LETTER BOX) QUICK • Press the Cursor buttons (K or L) for an item selection, then press the ENTER button. • Select 4:3 LETTER BOX for a black bars appears on top and bottom of the screen. DISPLAY TV ASPECT 4:3 LETTER BOX 4:3 PAN & SCAN 16:9 WIDE 4:3 SQUEEZE • Select 4:3 PAN & SCAN for a full height picture with both sides trimmed. • Select 16:9 WIDE if a wide-screen TV is connected to the DVD player. • Select 4:3 SQUEEZE when the TV screen is too large hor- izontally at 16:9 WIDE setting and when it is impossible to adjust the screen size using the TV's controls. STILL MODE (Default : AUTO) • Press the Cursor buttons (K or L) for an item selection (AUTO, FIELD, or FRAME), then press the ENTER button. DISPLAY STILL MODE AUTO FIELD FRAME • This function allows you to adjust picture resolution and quality in still mode. • An individual picture on TV screen is called as "frame", which consists of two separate images called as "field". Some pictures may be blurred at the AUTO setting in still mode due to their data characteristics. • AUTO: Automatically selects the best resolution setting (FRAME or FIELD) based on the data characteristics of the pictures. • FIELD: Select FIELD when the pictures are still unsta- ble even if AUTO is selected. FIELD stabilizes the pic- tures, although the picture quality may become coarse due to the limited amount of data. • FRAME: Select FRAME to display relatively motionless pictures in higher resolution. FRAME improves the pic- ture quality, although it may unstabilize the pictures due to simultaneous output of two field data. PROGRESSIVE (Default: OFF) QUICK • Press the Cursor buttons (K or L) to set PROGRESSIVE to ON or OFF, then press the ENTER button. DISPLAY TV ASPECT STILL MODE PROGRESSIVE PROG.MODE HDMI SELECT HDMI PICTURE 4:3 LETTER BOX AUTO OFF AUTO1 RGB NORMAL • The setting will be effective when you exit the setup screen by pressing SETUP. • When PROGRESSIVE is ON, P.SCAN appears on the DVD player's display after you exit the setup screen. • Refer to page 11 for more details. • In the HDMI output mode, even when PROGRESSIVE is set to ON, signals are output always as Interlace. PROG.MODE (Default: AUTO1) • Press the Cursor buttons (K or L) to select a mode for the progressive scan output, then press the ENTER button. • AUTO1: mode suitable for images on the film material. DISPLAY PROG.MODE AUTO1 AUTO2 VIDEO1 VIDEO2 VIDEO3 • AUTO2: mode for images on the material of 30-frame film. • VIDEO1: mode for normal video material. • VIDEO2: mode for video material with less movements. • VIDEO3: mode for video material with many movements. HDMI SELECT (Default: YCbCr) • Select an HDMI output mode between YCbCr and RGB. • When the connected equipment is not compatible with YCbCr, HDMI signal is output as RGB regardless of the setting. DISPLAY TV ASPECT STILL MODE PROGRESSIVE PROG.MODE HDMI SELECT HDMI PICTURE 4:3 LETTER BOX AUTO OFF AUTO1 YCbCr NORMAL HDMI PICTURE (Default: NORMAL) • Select a HDMI picture mode between NORMAL and ENHANCED. • Select ENHANCED if the blackwhite contrast is not clear. • This setting is effective only for HDMI RGB output. DISPLAY TV ASPECT STILL MODE PROGRESSIVE PROG.MODE HDMI SELECT HDMI PICTURE 4:3 LETTER BOX AUTO OFF AUTO1 YCbCr NORMAL 5 Press the SETUP button to exit and activate the new settings. - 25 - EN
-
 1
1 -
2
-
3
-
4
-
5
-
6
-
7
-
8
-
9
-
10
-
11
-
12
-
13
-
14
-
15
-
16
-
17
-
18
-
19
-
 20
20 -
 21
21 -
 22
22 -
 23
23 -
 24
24 -
 25
25 -
 26
26 -
 27
27 -
 28
28 -
 29
29 -
 30
30 -
31
-
32
-
33
-
34
-
35
-
36
-
37
-
38
-
39
-
40
-
41
-
42
-
43
-
44
-
45
-
46
-
47
-
48
-
49
-
50
-
51
-
52
-
53
-
54
-
55
-
56
-
57
-
58
-
59
-
60
-
61
-
62
-
63
-
64
-
65
-
66
-
67
-
68
-
69
-
70
-
71
-
72
-
73
-
74
-
75
-
76
-
77
-
78
-
79
-
80
-
81
-
82
-
83
-
84
-
85
-
86
-
87
-
88
-
89
-
90
-
91
-
92
 |
 |
