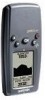
Garmin Geko 301 Owner's Manual
Garmin Geko 301 - Hiking GPS Receiver Manual
 |
UPC - 753759042073
View all Garmin Geko 301 manuals
Add to My Manuals
Save this manual to your list of manuals |
Garmin Geko 301 manual content summary:
- Garmin Geko 301 | Owner's Manual - Page 1
Geko™ 301 Personal Navigator® owner's manual and reference guide - Garmin Geko 301 | Owner's Manual - Page 2
of such changes or improvements. Web Site address: www.garmin.com Garmin®, TracBack®, Personal Navigator®, and MapSource® are registered trademarks and Geko™, PanTrack™, Gekoids™, Geko Smak™, Nibbons™, and Virtua Maze™ are trademarks of Garmin Ltd. or its subsidiaries and may not be used without - Garmin Geko 301 | Owner's Manual - Page 3
can do next. If knowledge is power, then the Geko 301 is a powerful navigational tool right at your fingertips! To get the most out of your new Geko 301, take the time to read through this Owner's Manual to understand the operating features of the unit. This manual has been designed to provide all - Garmin Geko 301 | Owner's Manual - Page 4
Time/Distance 15 Zoom Ranges 15 Options 16 View Points 16 Reset 16 Calibrate Altimeter 17 Data Fields 18 TRIP COMPUTER 19-20 Data Field Options 20 MENU PAGE 21-33 Menu Navigation 21 Waypoints 22 Mark Waypoint Page 22 Review Waypoint Page 24 Tracks 26 Routes 29 Games 32 SETUP PAGE - Garmin Geko 301 | Owner's Manual - Page 5
and used in accordance with the instructions, may cause harmful interference to radio receiver is connected. • Consult the dealer or and experienced radio/TV technician for help. The Geko 301 does not contain any user-serviceable parts. Repairs should only be made by an authorized Garmin service - Garmin Geko 301 | Owner's Manual - Page 6
of unsafe operation, carefully review and understand all aspects of this Owner's Manual-and thoroughly practice operation using the simulator mode prior to actual use. When in actual use, carefully compare indications from the Geko 301 to all available navigation sources, including the information - Garmin Geko 301 | Owner's Manual - Page 7
air bag safety precautions contained in the vehicle's owner manual. Do not mount the Geko 301 in a place where the driver or passengers are likely to impact it in an accident or collision. The mounting hardware provided by Garmin is not warranted against collision damage or the consequences thereof - Garmin Geko 301 | Owner's Manual - Page 8
repair or replace the unit or software or offer a full refund of the purchase price at its sole discretion. SUCH REMEDY SHALL BE YOUR SOLE AND EXCLUSIVE REMEDY FOR ANY BREACH OF WARRANTY. To obtain warranty service, call your local Garmin authorized dealer. Or call Garmin Customer Service at one of - Garmin Geko 301 | Owner's Manual - Page 9
LICENSE AGREEMENT BY USING THE GEKO 301, YOU AGREE TO BE BOUND BY THE TERMS AND CONDITIONS OF THE FOLLOWING SOFTWARE LICENSE AGREEMENT. PLEASE READ THIS AGREEMENT CAREFULLY. Garmin grants you a limited license to use the software embedded in this device (the "Software) in binary executable form in - Garmin Geko 301 | Owner's Manual - Page 10
, routes, etc. will be retained in the unit's memory without the need for external power. It is always a good practice to back up important user data by manually recording it or downloading it to a PC (transferring it to MapSource). WATER IMMERSION The Geko 301 is waterproof to IEC Standard 529 IPX7 - Garmin Geko 301 | Owner's Manual - Page 11
used, but cannot be charged while in the unit. External power and data connector (under rubber tab) Battery Compartment Introduction power source. ) NOTE: If you intend to store your Geko 301 for an extended period of time, remove the batteries. Follow the battery manufacturer's instructions - Garmin Geko 301 | Owner's Manual - Page 12
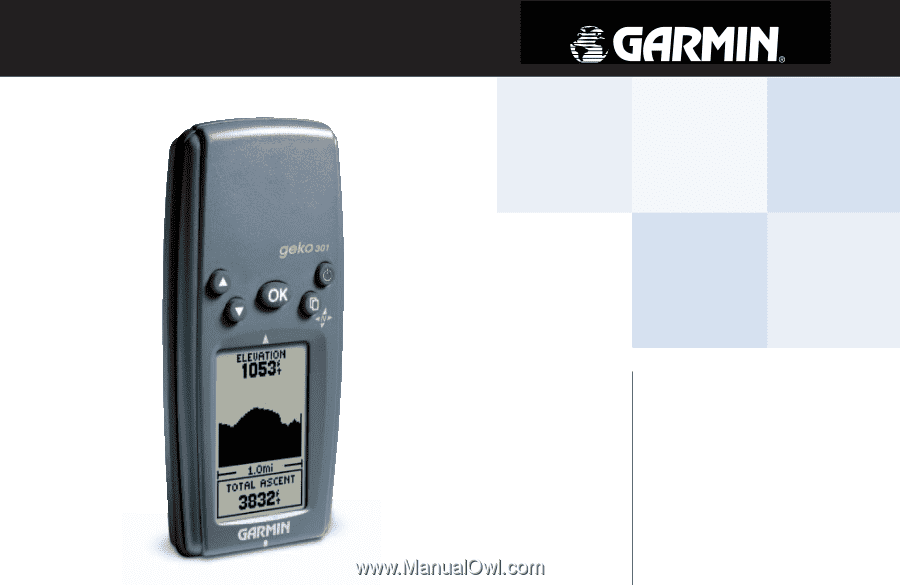
you to quickly retrace your track log to a start- ing position POWER Button • 5 interactive games based on your real-time position and controlled by your geo- graphical movement • WAAS enabled for accuracy less than 3 meters, 95% typical • Trip Computer page with 34 selectable fields Geko 301 - Garmin Geko 301 | Owner's Manual - Page 13
MAIN PAGES All of the information needed to operate the Geko 301 is found on six main 'pages' (or display screens). These pages are the Satellite, Map, Navigation, Elevation, Trip Computer, and Menu. Press the PAGE Button to cycle through the six pages. Main Pages Down to the Basics Satellite Map - Garmin Geko 301 | Owner's Manual - Page 14
(8) 4-D: Goto Line (8) 2 MENU NAVIGATION Your Geko 301 allows you to navigate through menus quickly and efficiently using a combination of 17) 5. Reset Max Elevation (17) 6. Reset Elev Data (17) 7. Calibrate Altimeter (17) Trip Page (p. 19) 1. Change Fields (19) 2. List of Data Field Options ( - Garmin Geko 301 | Owner's Manual - Page 15
the satellites, receiving satellite signals, the signal strength, and the Geko 301's estimated NAVIGATE" message must display before you can begin using your Geko 301 to navigate. ) NOTE: When you use the Geko 301 for the first time, allow time for it to track satellites by leaving the Geko 301 - Garmin Geko 301 | Owner's Manual - Page 16
stem from the default Normal Skyview Page. Here are the available options and descriptions: NORMAL SKYVIEW OPTIONS: • Display Setup • Advanced Skyview • About Geko Display Setup: When you select this option you can adjust the backlight timeout and the contrast of the screen. To adjust the backlight - Garmin Geko 301 | Owner's Manual - Page 17
Display Setup • Orient Sky Northward/Sky Ahead • Normal Skyview • About Geko ) NOTE: A quick way to adjust the contrast is to press and hold the UP or rotate) 'Orient Ahead', displays the satellite positions relative to where the Geko 301 is pointing. North, South, East, or West can be displayed - Garmin Geko 301 | Owner's Manual - Page 18
: Select this option to return to Normal Skyview. About Geko: This option allows you to see what software version the Geko 301 is currently using. Visit www.garmin.com for the latest software updates. (A PC-compatible computer and Power/Data cable, not included, are required for transfer) About - Garmin Geko 301 | Owner's Manual - Page 19
'walks') and leaves a 'trail' (track log). Waypoint names and symbols are also shown on the map. To help you better visualize the 'real world', the Geko 301 automatically rotates the map as you move, so that waypoints that are ahead of you are always displayed in front of the animated figure. The - Garmin Geko 301 | Owner's Manual - Page 20
the North. Auto Zoom (On or Off): When 'AUTO ZOOM' is turned on, the map automatically adjusts its scale to display your entire navigating route until you manually change the zoom level. When it's turned off, you must press the UP or DOWN Button to select the appropriate map scale. Waypoints (Show - Garmin Geko 301 | Owner's Manual - Page 21
as you travel. The track log starts recording as soon as the Geko 301 gets a location fix. To make use 'MARK' and 'ZOOM'. 'TRACBACK' will guide you to where you started by following the track log that you left behind navigate to it. PanTrack™ mode 'CLEAR' the track log before starting a new trip. 9 - Garmin Geko 301 | Owner's Manual - Page 22
Navigation Page Show me the way! The Geko 301 includes an GPS receiver when your rate of travel reaches a user-defined speed, and comes back on when you have stopped moving after a user-defined period of time. Use the Heading Setup Page to change the user-defined speed and time. (See page 40) One Data - Garmin Geko 301 | Owner's Manual - Page 23
GPS Receiver and the approximate accuracy of our current position. The Compass Ring displays your heading while you are moving, but the data in the right column. Navigation Page Options Note: The default setting on the Geko 301 has the Compass turned OFF. Navigation Options This user is 107 ft off - Garmin Geko 301 | Owner's Manual - Page 24
different trip data. The Navigation Page allows you to display 11 types of different data, such as 'Elevation', 'Speed', etc. 12 To Stop Navigation: 1. Press ve gone since the last reset. • Heading-the direction you are traveling. The following fields display only when navigating: • Bearing- the - Garmin Geko 301 | Owner's Manual - Page 25
compass is On, the Geko 301 bypasses the Compass and uses the GPS receiver to track your heading. The criteria for switching between the Compass and the GPS receiver is customized on the 'HEADING' Setup Page. (See page 40) Navigation Page Options Calibration Menu Start Compass Calibration During - Garmin Geko 301 | Owner's Manual - Page 26
display options such as plotting over time, plotting over distance, displaying the zoom ranges of measurement, viewing elevation or pressure points, and resetting data displays. A single user-selectable data field allows you to display a variety of current and recorded pressure and elevation-related - Garmin Geko 301 | Owner's Manual - Page 27
page is user-selectable and displays a variety of recorded or current data. The Elevation Page Options Menu allows you to select the type of information and how it is to be displayed. Page Options include: 'PLOT OVER TIME/DISTANCE', 'ZOOM TIME/DISTANCE', 'ZOOM ELEVATION', 'VIEW POINTS', 'RESET MAX - Garmin Geko 301 | Owner's Manual - Page 28
moves past the pointer, the status at the top of page changes to display the altitude, time, and date for the point beneath the pointer. RESET You can reset the maximum elevation data and the elevation data by selecting the 'RESET' option from the Elevation Page Options Menu. - Garmin Geko 301 | Owner's Manual - Page 29
the UP or DOWN Button to highlight the 'RESET MAX ELEVATION' or 'RESET ELEV DATA' field. 3. Once the field is highlighted, press the OK Button again to reset the data and start recording new data. CALIBRATE ALTIMETER Because the Geko 301 relies on the Barometric pressure to determine the elevation - Garmin Geko 301 | Owner's Manual - Page 30
data. 18 DATA FIELDS The user-selectable data field found at the bottom of the screen can display different kinds of elevation data. Following are the available data at which you are descending to your destination altitude. (Active Navigation Only) Gld Rt Dest -(Glide Ration Destination) The Glide - Garmin Geko 301 | Owner's Manual - Page 31
User Selectable Data Fields Trip Computer Are we there yet? Four data list of 34 items. Page Options include 'CHANGE FIELDS', 'RESET MAX SPEED', 'RESET TRIP DATA', and 'RESTORE DEFAULTS'. To change the fields: 1. From navigating, are listed on the next page. Change all four fields to your - Garmin Geko 301 | Owner's Manual - Page 32
traveling. • Lat/Lon-(Latitude/Longitude) the current GPS position. • Location-shows your current latitude and longitude. • Max Speed-the maximum speed traveled since last reset. • Moving Avg-(Moving Average) the average speed while the unit is moving. • Odometer-a running tally of distance traveled - Garmin Geko 301 | Owner's Manual - Page 33
to help navigate through Games (32) 4-A: Gekoids (32) 4-B: Geko Smak (32) 4-D: Nibbons (33) 4-E: Virtua Units (37) 3-A: Position Format (37) 3-B: Map Datum (37) 3-C: Distance/Spd (38) 3-D: Elevation (38) 3-E: Pressure (38) 3-F: VSPD (38) 3-G: Defaults (38) 4: Interface (39) 6: System (42) 6-A: GPS - Garmin Geko 301 | Owner's Manual - Page 34
EDIT LOCATION Page displays on-screen instructions explaining how to edit the waypoint and location (latitude and longitude) using the Review Waypoint Page. It also organizes all of well for the popular Geocaching activity. To mark a new waypoint and/or change the position data, if needed: 1. From - Garmin Geko 301 | Owner's Manual - Page 35
by name and distance from your location. 3. Press the UP or DOWN Button to highlight the waypoint and press the OK Button to display the REVIEW WAYPOINT Page. To delete all waypoints: 1. From the MENU Page press the UP or DOWN Button to highlight 'WAYPOINTS', then press the OK Button. (continued - Garmin Geko 301 | Owner's Manual - Page 36
. If you do not want to delete the waypoint, press the UP or DOWN Button to highlight 'NO' and press the OK Button. To start a Goto: 1. From the REVIEW WAYPOINT Page, press the UP or DOWN Button to highlight 'GOTO'. 2. Press the OK Button to activate the 'Goto' with the selected waypoint - Garmin Geko 301 | Owner's Manual - Page 37
The Geko 301's Project waypoint NEAREST" waypoint from the Waypoints list. Press the OK Button to display the REVIEW WAYPOINT Page. Or, To project from an existing waypoint within your route, the OK Button to begin direct navigation to the waypoint. Menu Page Waypoints The 'PROJECT WAYPOINT' option The 'EDIT - Garmin Geko 301 | Owner's Manual - Page 38
you travel. The track log starts recording as soon as the Geko 301 gets a location fix. If you want to keep a record of a certain track log before deleting it, go ahead and save it. You can save a total of 10 tracks in the Geko 301. Saved tracks can be used for navigation later. After a track log is - Garmin Geko 301 | Owner's Manual - Page 39
and then press the OK Button to rename the saved track. • 'DELETE' and then press the OK Button to delete this track. • 'NAVIGATE' and then press the OK Button to begin navigation from either point. To rename a saved track log: 1. From the 'MENU' Page, highlight 'TRACKS' and press the OK Button to - Garmin Geko 301 | Owner's Manual - Page 40
the OK Button to keep the tracks in memory or press PAGE to exit at any time. To start TracBack navigation: 1. On the 'TRACK LOG' Page, press the UP or DOWN Button and highlight the saved track the desired destination point. The 'POINTER' Page displays to guide you to the destination you selected. - Garmin Geko 301 | Owner's Manual - Page 41
that reside in the Geko 301. (Follow the instructions below to insert a waypoint into a route.) • Plan a 'ROUTE' in Garmin MapSource® on your PC, and upload the 'ROUTE' to the Geko 301. See your Garmin Dealer for more information about MapSource (MapSource is an optional accessory, and is not - Garmin Geko 301 | Owner's Manual - Page 42
Routes "FOLLOW" choice list 30 In either case, you can navigate to a destination using 'ROUTE' if a route has more than always shows the FIRST (BEGIN) and the LAST (END) waypoint in the route. The Geko 301 guides you following each waypoint in the route. There are two ways to insert a waypoint into - Garmin Geko 301 | Owner's Manual - Page 43
, press the UP or DOWN Button to highlight 'NO' and press the OK Button to keep the waypoints in the route list. Menu Page Routes "Navigation" Page's pointer aimed at the "NEXT" waypoint in the route, 3.00 miles away. 31 - Garmin Geko 301 | Owner's Manual - Page 44
The Geko 301 offers five games with you, the user, as the key participant. The Games Page shows the listing, which includes: Gekoids, Geko Smak, Memory Race, Nibbons and Virtua Maze. Highlight the appropriate game and then press the OK Button to play. Brief instructions display when you start each - Garmin Geko 301 | Owner's Manual - Page 45
Button. 2. Choose the desired size and press the OK Button. 3. Highlight 'Start' and press the OK Button to begin the game. Nibbons In this game mode off pressing the OK Button. Menu Page Games Memory Race instructions Ready to start Memory Race Can you remember? Nibbons Playing Field Don't get - Garmin Geko 301 | Owner's Manual - Page 46
Time Menu Time Format Menu 34 Time Zone Menu The Setup Page allows you to customize the Geko 301. On the Setup Page you can change coordinate systems, map datums, and distance units. You can also change the time format, north reference, operating mode, display contrast, and back light timeout - Garmin Geko 301 | Owner's Manual - Page 47
the built-in almanac to automati- cally change the clock settings when daylight savings goes into or out of effect). You can choose 'Yes' to manually add daylight savings or 'No' to remain on standard time. To change the daylight saving field: 1. Press the PAGE Button and switch to the MENU - Garmin Geko 301 | Owner's Manual - Page 48
Setup Page Display Light Timeout The 'LIGHT TIMEOUT' option allows you to set the display backlight timeout (STAYS ON, 15 or 30 seconds, and 1 or 2 minutes). Monitor your battery life if set to STAYS ON. To change the light timeout: 1. From the SETUP Page press the UP or DOWN Button to highlight ' - Garmin Geko 301 | Owner's Manual - Page 49
Using the Geko 301 with a paper map increases the navigation capabilities of each. To use a map in conjunction with the Geko 301, you must select the position format, map datum, map units, and north reference to match the map. The Geko 301 supports both the UTM/UPS and latitude/longitude grids, - Garmin Geko 301 | Owner's Manual - Page 50
datum and press the OK Button. 4. Press the PAGE Button to return to the MENU Page. Units of Measure The Geko 301 allows you to select statute (the default setting), nautical, or metric units of measure for all speed and distance readouts, feet and meters for elevation readouts, inches (Hg) or - Garmin Geko 301 | Owner's Manual - Page 51
to use your Geko 301 with external NMEA devices, DGPS beacon receivers, a personal computer, etc. You can choose from seven different input/output serial data formats, or none at all. Below is a description of each format: • GARMIN - default setting that allows you to update software and communicate - Garmin Geko 301 | Owner's Manual - Page 52
180 seconds) the Geko 301 changes to the Compass heading instead of the GPS heading, and 'NORTH REFERENCE' to 'TRUE NORTH', 'MAGNETIC NORTH', 'GRID', or 'USER'. To change the Press the UP or DOWN Button to highlight the specific unit and press the OK Button. 4. Press the PAGE Button to return to the - Garmin Geko 301 | Owner's Manual - Page 53
True North for traveling on land. If necessary, manually correct for the difference between Grid North and True North. If you select User for North Reference, the 'VARIATION' field is highlighted for you to edit the declination. The declination of the Geko 301's compass is shown to the right of North - Garmin Geko 301 | Owner's Manual - Page 54
mode. The normal mode is more responsive to sudden turns or change of speed/acceleration. When the Geko 301 is in 'BATTERY SAVE' mode, the GPS receiver turns on and off alternatively to conserve power and the WAAS function is turned off. WAAS stands for Wide Area Augmentation System. This setting is - Garmin Geko 301 | Owner's Manual - Page 55
OK Button to display the SYSTEM Page. 2. Press the UP or DOWN Button to highlight 'GPS MODE' field and press the OK Button. 3. Press the UP or DOWN Button to on or off. Selecting 'Auto Cal On' for the Altimeter allows the unit to provide a fairly accurate reading within minutes of obtaining a 3D fix - Garmin Geko 301 | Owner's Manual - Page 56
your selection and press the OK Button. 4. Press the PAGE Button to return to the SYSTEM Page. Owner Info The Geko 301 can display information about the owner during the power-up sequence. You can press the Page Button to display the Satellite Page, or after 20 seconds the page automatically changes - Garmin Geko 301 | Owner's Manual - Page 57
for the Geko 301 may exceed the usable range of some batteries. Alkaline batteries can rupture at high temperatures. External power can only be applied using the Garmin Auto Power Adapter or PC Interface Cable with Auto Power Adapter. These cables contain a 12 Vdc to 3 Vdc voltage regulator. Modi - Garmin Geko 301 | Owner's Manual - Page 58
any mounting kit. Vehicle Mounting Kit Suction Cup Mounting Kit 46 Marine Mounting Kit Standard Accessories Owner's Manual and Reference Guide Quick Start Guide Optional Accessories Belt Clip Attaches to the back of the unit for convenient carrying. Bicycle Mounting Kit Allows the Geko 301 to - Garmin Geko 301 | Owner's Manual - Page 59
or a second GPS receiver. The NMEA 0183 version 3.0 interface format is supported by the Geko 301 and enables the unit to drive up to three NMEA devices. NMEA 0183 Version 3.0 Approved Sentences: GPGGA, GPGLL, GPGSA, GPGSV, GPRMB, GPRMC, GPRTE, GPVTG, GPWPL, GPBOD Garmin Proprietary Sentences: PGRME - Garmin Geko 301 | Owner's Manual - Page 60
Geko 6 Accessories 46 Advanced Skyview 3 Advanced Skyview Options 5 Altimeter 14-18, 43 Altitude 14-18 Arrival Time 12, 20 Auto Zoom On/Off 8 Average Ascent 18 Descent 18 Moving 20 Speed 12 B Barometric pressure 17 Battery 42, 43, 45, ix Battery Save Mode 42 Battery Usage Icon ix Beacon Receiver - Garmin Geko 301 | Owner's Manual - Page 61
(Data Fields cont.) Arrival Time 20 Average Speed 12 Bearing 20 Date 12 Final Distance 20 Glide Ratio 18 Heading 12 Location 12, E Edit Location 22 Electronic Compass 11 Elevation Page 14-18 ETA Final 20 Next 20 ETE Final 20 Next 20 F FCC Compliance iii Fields, Data 14, 15, 18 Final ETA 20 Index 49 - Garmin Geko 301 | Owner's Manual - Page 62
GOTO Line 8 GPS Cleaning viii GPS Mode 42, 43 H Heading 12, 20 Setup Page 10 Heading Page 40 How To adjust zoom ranges 16 calibrate the altimeter 17 calibrate the compass 13 reset the elevation data 17 reset the max elevation fields 17 use the View Points option 16 I Interface Settings 39 L Language - Garmin Geko 301 | Owner's Manual - Page 63
Distance 8 Menu Page/Main Menu 21 Minimum Elevation 18 Moving Average 20 Moving Time 20 N Navigation Main Page 10 Nearest Waypoints 23 Next Destination 20 Distance 20 ETA 20 ETE 20 Nibbons 33 8 Plot Over Distance 15 Plot Over Time 15 Position Format 37 POWER Button x Product Registration i Index 51 - Garmin Geko 301 | Owner's Manual - Page 64
39 Set course 10-14 Sight 'N Go 11 Skyview, Advanced 3 Software License Agreement vii Specifications 45 Speed 12, 20 Maximum 20 (Speed cont.) Overall 20 Vertical 20 Stopped Time 20 Stop Navigation 8 Storage viii Sunrise 20 Sunset 20 System Page GPS Mode 42, 43 Owner Info 44 T TEXT OUT 39 Time Moving - Garmin Geko 301 | Owner's Manual - Page 65
26-28 Track Log Clear Track Log 26 Delete a Saved Track 28 Rename A Saved Track Log 27 Save A Track For Navigation Later 27 Trip Odometer 12 Trip Time 20 Turn 20 U Units of Measure 38 UP Button x UTC offset field 34 V Velocity Made Good 20 Vertical Speed 20 Vertical Speed Destination 20 - Garmin Geko 301 | Owner's Manual - Page 66
Notes - Garmin Geko 301 | Owner's Manual - Page 67
- Garmin Geko 301 | Owner's Manual - Page 68
free software updates (excluding map data) throughout the life of your Garmin products, visit the Garmin web site at www.garmin.com. © Copyright 2003 Garmin Ltd. or its subsidiaries Garmin International, Inc. 1200 East 151st Street, Olathe, Kansas 66062, U.S.A. Garmin (Europe) Ltd. Unit 5, The
-
 1
1 -
 2
2 -
 3
3 -
 4
4 -
 5
5 -
 6
6 -
 7
7 -
8
-
9
-
10
-
11
-
12
-
13
-
14
-
15
-
16
-
17
-
18
-
19
-
20
-
21
-
22
-
23
-
24
-
25
-
26
-
27
-
28
-
29
-
30
-
31
-
32
-
33
-
34
-
35
-
36
-
37
-
38
-
39
-
40
-
41
-
42
-
43
-
44
-
45
-
46
-
47
-
48
-
49
-
50
-
51
-
52
-
53
-
54
-
55
-
56
-
57
-
58
-
59
-
60
-
61
-
62
-
63
-
64
-
65
-
66
-
67
-
68
 |
 |
owner’s
manual
and
reference
guide
Geko
™
301
Personal Navigator
®