Garmin Geko 301 Owner's Manual - Page 37
To Project a waypoint
 |
UPC - 753759042073
View all Garmin Geko 301 manuals
Add to My Manuals
Save this manual to your list of manuals |
Page 37 highlights
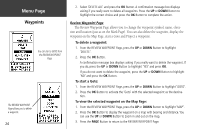
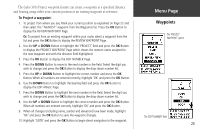
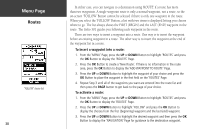
The Geko 301's Project waypoint feature can create a waypoint at a specified distance and bearing using either your current position or an existing waypoint as reference. To Project a waypoint: 1. To project from where you are, Mark your current position as explained on Page 22 and then select this "NEAREST" waypoint from the Waypoints list. Press the OK Button to display the REVIEW WAYPOINT Page. Or, To project from an existing waypoint within your route, select a waypoint from the list and press the OK Button to display the REVIEW WAYPOINT Page. 2. Use the UP or DOWN Button to highlight the 'PROJECT' field and press the OK Button to display the PROJECT WAYPOINT Page which shows the numeric name assigned to the new waypoint and with the distance field highlighted. 3. Press the OK Button to display the EDIT NUMBER Page. 4. Press the DOWN Button to move to the next number in the field. Select the digit you wish to change and press the OK Button to display the drop-down number list. 5. Press the UP or DOWN Button to highlight the correct number and press the OK Button. When all numbers are entered correctly, highlight 'OK' and press the OK Button. 6. Use the DOWN Button to highlight the bearing field and press the OK Button to display the EDIT ANGLE Page. 7. Press the DOWN Button to highlight the next number in the field. Select the digit you wish to change and press the OK Button to display the drop-down number list. 8. Use the UP or DOWN Button to highlight the correct number and press the OK Button. When all numbers are entered correctly, highlight 'OK' and press the OK Button. 9. When all changes (including name, symbol and elevation) have been made, highlight 'OK' and press the OK Button to save the waypoint changes. 10. Highlight 'GOTO' and press the OK Button to begin direct navigation to the waypoint. Menu Page Waypoints The 'PROJECT WAYPOINT' option The 'EDIT NUMBER' field 25
-
 1
1 -
2
-
3
-
4
-
5
-
6
-
7
-
8
-
9
-
10
-
11
-
12
-
13
-
14
-
15
-
16
-
17
-
18
-
19
-
20
-
21
-
22
-
23
-
24
-
25
-
26
-
27
-
28
-
29
-
30
-
31
-
 32
32 -
 33
33 -
 34
34 -
 35
35 -
 36
36 -
 37
37 -
 38
38 -
 39
39 -
 40
40 -
 41
41 -
 42
42 -
43
-
44
-
45
-
46
-
47
-
48
-
49
-
50
-
51
-
52
-
53
-
54
-
55
-
56
-
57
-
58
-
59
-
60
-
61
-
62
-
63
-
64
-
65
-
66
-
67
-
68
 |
 |