Garmin Geko 301 Owner's Manual - Page 34
Menu - geocaching
 |
UPC - 753759042073
View all Garmin Geko 301 manuals
Add to My Manuals
Save this manual to your list of manuals |
Page 34 highlights
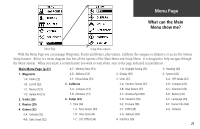
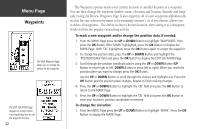
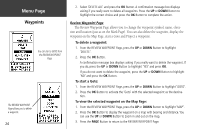
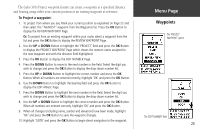
Menu Page Waypoints The Mark Waypoint Page allows you to change the symbol for the waypoint. The EDIT LOCATION Page displays on-screen instructions explaining how to edit the waypoint location. 22 The Waypoint options marks your current location or another location as a waypoint. You can then change the waypoint symbol, name, elevation and location (latitude and longitude) using the Review Waypoint Page. It also organizes all of your waypoints alphabetically in a list for easy selection by name or by proximity (nearest), or, if you choose, allows you to delete all waypoints. The ability to enter a known location, then saving it as a Waypoint, works well for the popular Geocaching activity. To mark a new waypoint and/or change the position data, if needed: 1. From the MENU Page press the UP or DOWN Button to highlight 'WAYPOINTS' then press the OK Button. With 'MARK' highlighted, press the OK Button to display the MARK Page. With 'OK' highlighted, press the OK Button again to accept the waypoint. 2. To change the position data, press the UP or DOWN Button and highlight the 'POSITION DATA' field and press the OK Button to display the EDIT LOCATION Page. 3. Scroll through the position coordinate places using the UP or DOWN Button (UP Button to move right to left, DOWN Button to move left to right). When you reach the position place you want to change, press the OK Button. Use the UP or DOWN Button to scroll through the choices and highlight one. Press the OK Button and the position place changes. Repeat to finish making changes. 4. Press the UP or DOWN Button to highlight the 'OK' field and press the OK Button to return to the MARK Page. 5. Press the UP or DOWN Button to highlight the 'OK' field and press the OK Button to store your location's position coordinates in memory. To change the elevation: 1. From the MENU Page press the UP or DOWN Button to highlight 'MARK'. Press the OK Button to display the MARK Page.
-
 1
1 -
2
-
3
-
4
-
5
-
6
-
7
-
8
-
9
-
10
-
11
-
12
-
13
-
14
-
15
-
16
-
17
-
18
-
19
-
20
-
21
-
22
-
23
-
24
-
25
-
26
-
27
-
28
-
 29
29 -
 30
30 -
 31
31 -
 32
32 -
 33
33 -
 34
34 -
 35
35 -
 36
36 -
 37
37 -
 38
38 -
 39
39 -
40
-
41
-
42
-
43
-
44
-
45
-
46
-
47
-
48
-
49
-
50
-
51
-
52
-
53
-
54
-
55
-
56
-
57
-
58
-
59
-
60
-
61
-
62
-
63
-
64
-
65
-
66
-
67
-
68
 |
 |
