Garmin Geko 301 Owner's Manual - Page 28
RESET' option from the Elevation Options Menu.
 |
UPC - 753759042073
View all Garmin Geko 301 manuals
Add to My Manuals
Save this manual to your list of manuals |
Page 28 highlights
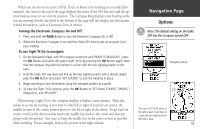
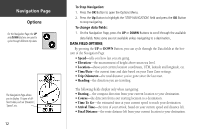
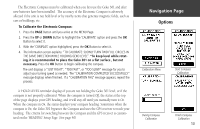
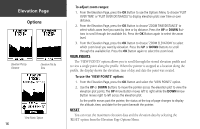
Elevation Page Options Elevation Plot by Distance Elevation Plot by Time 'View Points' Option 16 To adjust zoom ranges: 1. From the Elevation Page, press the OK Button to use the Options Menu to choose 'PLOT OVER TIME' or 'PLOT OVER DIST(ANCE)' to display elevation plots over time or over distance. 2. From the Elevation Page, press the OK Button to choose 'ZOOM TIME/DISTANCE' to select which zoom level you want by time or by distance. Press the UP or DOWN Buttons to scroll through the available list. Press the OK Button again to select the zoom level. 3. From the Elevation Page, press the OK Button to choose 'ZOOM ELEVATION' to select which zoom level you want by elevation. Press the UP or DOWN Buttons to scroll through the available list. Press the OK Button again to select the zoom level. VIEW POINTS The 'VIEW POINTS' option allows you to scroll through the stored elevation profile and to view a single point along the profile. When the pointer is stopped at a location along the profile, the display shows the elevation, time of day and date the point was created. To use the 'VIEW POINTS' option: 1. From the Elevation Page, press the OK Button and select the 'VIEW POINTS' option. 2. Use the UP or DOWN Buttons to move the pointer across the elevation plot to view the elevation plot points. The UP Arrow Button moves left to right while the DOWN Arrow Button moves right to left across the elevation plot. As the profile moves past the pointer, the status at the top of page changes to display the altitude, time, and date for the point beneath the pointer. RESET You can reset the maximum elevation data and the elevation data by selecting the 'RESET' option from the Elevation Page Options Menu.
-
 1
1 -
2
-
3
-
4
-
5
-
6
-
7
-
8
-
9
-
10
-
11
-
12
-
13
-
14
-
15
-
16
-
17
-
18
-
19
-
20
-
21
-
22
-
 23
23 -
 24
24 -
 25
25 -
 26
26 -
 27
27 -
 28
28 -
 29
29 -
 30
30 -
 31
31 -
 32
32 -
 33
33 -
34
-
35
-
36
-
37
-
38
-
39
-
40
-
41
-
42
-
43
-
44
-
45
-
46
-
47
-
48
-
49
-
50
-
51
-
52
-
53
-
54
-
55
-
56
-
57
-
58
-
59
-
60
-
61
-
62
-
63
-
64
-
65
-
66
-
67
-
68
 |
 |
