Haier 3U19FS1ERA Service Manual - Page 57
Under Ceiling Type
 |
View all Haier 3U19FS1ERA manuals
Add to My Manuals
Save this manual to your list of manuals |
Page 57 highlights
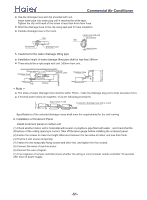
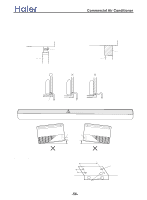
2. INSTALLING DRAIN HOSE Select whether the drain hose will be connected to the left or right side.(Fig.3) Insert the drain hose into the drain pan, then secure the drain hose with a nylon fastener. (Fig.6) (Fig. 6) Drain pan Drain hose Nylon fastener >_]]VbTZR\ _^UZdZ_^Vb Wrap the insulation (drain hose) around the drain hose connection. (Fig.7) (Fig. 7) Drain pan Drain hose Insulation (Drain hose) Be sure to arrange the drain hose correctly so that it is leveled lower than the drain hose connecting port of the indoor unit. Fig. 8 OK NO NO Arrange the drain hose lower than this portion. Drain hose CAUTION Do not install the unit drain hose side is too high. Height A should be less than 5 mm.(Fig.9) Fig. 9 Drain hose A A B. UNDER CEILING TYPE Using the installation template, drill holes for piping and anchor bolts(for holes).(Fig.10) 200mm Fig. 10 900mm Installation template Drilling position for piping -56- Drilling position for anchor bolt Ceilling Wall
-
 1
1 -
2
-
3
-
4
-
5
-
6
-
7
-
8
-
9
-
10
-
11
-
12
-
13
-
14
-
15
-
16
-
17
-
18
-
19
-
20
-
21
-
22
-
23
-
24
-
25
-
26
-
27
-
28
-
29
-
30
-
31
-
32
-
33
-
34
-
35
-
36
-
37
-
38
-
39
-
40
-
41
-
42
-
43
-
44
-
45
-
46
-
47
-
48
-
49
-
50
-
51
-
 52
52 -
 53
53 -
 54
54 -
 55
55 -
 56
56 -
 57
57 -
 58
58 -
 59
59 -
 60
60 -
 61
61 -
 62
62 -
63
-
64
-
65
-
66
-
67
-
68
-
69
-
70
-
71
-
72
-
73
-
74
-
75
-
76
-
77
-
78
-
79
-
80
-
81
-
82
-
83
-
84
-
85
-
86
-
87
-
88
-
89
-
90
-
91
-
92
-
93
-
94
-
95
-
96
-
97
-
98
-
99
-
100
-
101
-
102
-
103
-
104
-
105
-
106
-
107
-
108
-
109
-
110
-
111
-
112
-
113
-
114
-
115
-
116
-
117
-
118
-
119
-
120
-
121
-
122
-
123
-
124
-
125
-
126
-
127
-
128
-
129
-
130
-
131
-
132
-
133
-
134
-
135
-
136
-
137
 |
 |
