HP 1050c HP DesignJet 1000 Series Take-Up Reel UserÂ’s Guide - C60 - Page 7
HP DesignJet 1000 Series Take-Up Reel, the lower locking tab to release the module - firmware
 |
View all HP 1050c manuals
Add to My Manuals
Save this manual to your list of manuals |
Page 7 highlights
5 Looking at the back of the printer, you will see three slots. It is important to install the firmware module in the slot that is furthest to the right. 6 Put on a grounding wrist strap and attach the other end to the metal chassis of the printer. 7 Remove the module that is currently occupying the rightmost slot. First push down the lower locking tab to release the module, then pull out the module, holding it by its edges. 8 Take the firmware module out of its bag. Hold the firmware module by its edges with the non-metallic edges toward you. 7 HP DesignJet 1000 Series Take-Up Reel
-
 1
1 -
 2
2 -
 3
3 -
 4
4 -
 5
5 -
 6
6 -
 7
7 -
 8
8 -
 9
9 -
 10
10 -
 11
11 -
 12
12 -
13
-
14
-
15
-
16
-
17
-
18
-
19
-
20
-
21
-
22
-
23
-
24
-
25
-
26
-
27
-
28
-
29
-
30
-
31
-
32
-
33
-
34
-
35
-
36
-
37
-
38
-
39
-
40
-
41
-
42
-
43
-
44
 |
 |

7
HP DesignJet 1000 Series Take-Up Reel
5
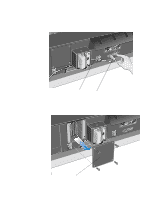
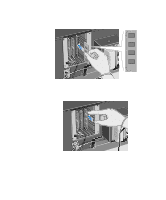
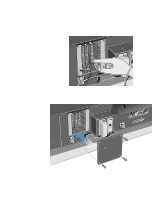
Looking at the back of the printer, you will see three slots. It is important to install
the firmware module in the slot that is furthest to the right.
6
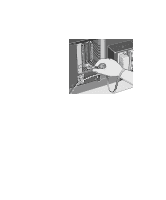
Put on a grounding wrist strap and attach the other end to the metal chassis of the
printer.
7
Remove the module that is currently occupying the rightmost slot. First push down
the lower locking tab to release the module, then pull out the module, holding it by
its edges.
8
Take the firmware module out of its bag. Hold the firmware module by its edges
with the non-metallic edges toward you.