HP 4300n HP LaserJet 4200 and 4300 series printer - User Guide - Page 107
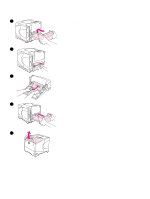
Replace the optional duplexer, if it was removed., Plug the power cord into the printer.
 |
UPC - 808736314381
View all HP 4300n manuals
Add to My Manuals
Save this manual to your list of manuals |
Page 107 highlights
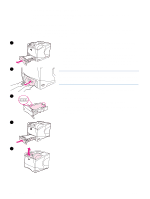
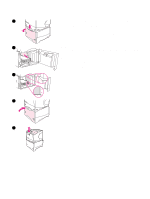
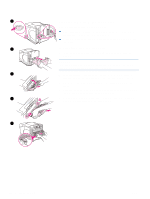
6 6 Remove the jammed paper. If necessary, lift the black plastic guide that is located on the top of the fuser to gain access to the jammed paper. You can also turn the jam-clearing wheel that is located on the side of the fuser to attempt to eject the jammed paper. CAUTION Do not use a sharp object to clear paper from the fuser area. You might damage the fuser. 7 7 Push the fuser firmly into the printer until the blue levers on both sides click into place. 8 Install the rear output bin. Pull gently on the bin to make sure that the hinge pins are fully inserted. 9 Plug the power cord into the printer. 10 Replace the optional duplexer, if it was removed. 8 11 Turn the printer power on. 12 If a jam message persists, there is still jammed paper in the printer. Look for the jam in another location. (See "Jam locations" on page 96.) After clearing all jams, you will need to send the print job again because the printer power has been turned off. 9 10 11 ENWW Clearing jams 105
-
 1
1 -
2
-
3
-
4
-
5
-
6
-
7
-
8
-
9
-
10
-
11
-
12
-
13
-
14
-
15
-
16
-
17
-
18
-
19
-
20
-
21
-
22
-
23
-
24
-
25
-
26
-
27
-
28
-
29
-
30
-
31
-
32
-
33
-
34
-
35
-
36
-
37
-
38
-
39
-
40
-
41
-
42
-
43
-
44
-
45
-
46
-
47
-
48
-
49
-
50
-
51
-
52
-
53
-
54
-
55
-
56
-
57
-
58
-
59
-
60
-
61
-
62
-
63
-
64
-
65
-
66
-
67
-
68
-
69
-
70
-
71
-
72
-
73
-
74
-
75
-
76
-
77
-
78
-
79
-
80
-
81
-
82
-
83
-
84
-
85
-
86
-
87
-
88
-
89
-
90
-
91
-
92
-
93
-
94
-
95
-
96
-
97
-
98
-
99
-
100
-
101
-
 102
102 -
 103
103 -
 104
104 -
 105
105 -
 106
106 -
 107
107 -
 108
108 -
 109
109 -
 110
110 -
 111
111 -
 112
112 -
113
-
114
-
115
-
116
-
117
-
118
-
119
-
120
-
121
-
122
-
123
-
124
-
125
-
126
-
127
-
128
-
129
-
130
-
131
-
132
-
133
-
134
-
135
-
136
-
137
-
138
-
139
-
140
-
141
-
142
-
143
-
144
-
145
-
146
-
147
-
148
-
149
-
150
-
151
-
152
-
153
-
154
-
155
-
156
-
157
-
158
-
159
-
160
-
161
-
162
-
163
-
164
-
165
-
166
-
167
-
168
-
169
-
170
-
171
-
172
-
173
-
174
-
175
-
176
-
177
-
178
-
179
-
180
-
181
-
182
-
183
-
184
-
185
-
186
-
187
-
188
-
189
-
190
-
191
-
192
-
193
-
194
-
195
-
196
-
197
-
198
-
199
-
200
-
201
-
202
-
203
-
204
-
205
-
206
-
207
-
208
-
209
-
210
-
211
-
212
-
213
-
214
-
215
-
216
-
217
-
218
 |
 |
