HP 4300n HP LaserJet 4200 and 4300 series printer - User Guide - Page 65
Setting custom paper sizes
 |
UPC - 808736314381
View all HP 4300n manuals
Add to My Manuals
Save this manual to your list of manuals |
Page 65 highlights
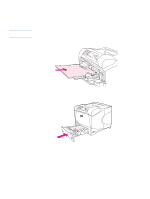
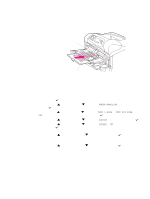
Setting custom paper sizes When custom paper is loaded, size settings need to be selected in the program (the preferred method), in the printer driver, or at the printer control panel. To reduce curl and other problems, heavy paper and very small custom-size paper should be printed from tray 1 to the rear output bin. (See "Printing to the rear output bin" on page 37.) X (front edge) Feed short edge first Y (side edge) If the settings are not available in your program, set the custom paper size at the printer control panel. To set custom paper sizes 1 If you loaded a 500-sheet tray with custom paper, be sure that the knob is set to Custom. (See "Loading tray 2 or an optional 500-sheet tray" on page 43.) 2 Press SELECT ( ) to open the menus. 3 Use UP ARROW ( ) or DOWN ARROW ( ) to scroll to PAPER HANDLING, and then press SELECT ( ). 4 Use UP ARROW ( ) or DOWN ARROW ( ) to scroll to TRAY 1 SIZE or TRAY [N] SIZE (where [N] is the number of the tray), and then press SELECT ( ). 5 Use UP ARROW ( ) or DOWN ARROW ( ) to scroll to CUSTOM, and then press SELECT ( ). 6 Use UP ARROW ( ) or DOWN ARROW ( ) to scroll to INCHES or MM (millimeters), and then press SELECT ( ). This selects the measurement units for determining the size of your custom paper. 7 Use UP ARROW ( ), then DOWN ARROW ( ), and then press SELECT ( ) to set the X dimension (the front edge of the paper, as shown in the figure above). The X dimension can be 76 to 216 mm (3 to 8.5 inches). 8 Use UP ARROW ( ), then DOWN ARROW ( ), and then press SELECT ( ) to set the Y dimension (the side edge of the paper, as shown in the figure above). The Y dimension can be 127 to 356 mm (5 to 14 inches). For example, if the custom paper is 203 by 254 mm, set X=203 mm and Y=254 mm. ENWW Printing special paper 63
-
 1
1 -
2
-
3
-
4
-
5
-
6
-
7
-
8
-
9
-
10
-
11
-
12
-
13
-
14
-
15
-
16
-
17
-
18
-
19
-
20
-
21
-
22
-
23
-
24
-
25
-
26
-
27
-
28
-
29
-
30
-
31
-
32
-
33
-
34
-
35
-
36
-
37
-
38
-
39
-
40
-
41
-
42
-
43
-
44
-
45
-
46
-
47
-
48
-
49
-
50
-
51
-
52
-
53
-
54
-
55
-
56
-
57
-
58
-
59
-
 60
60 -
 61
61 -
 62
62 -
 63
63 -
 64
64 -
 65
65 -
 66
66 -
 67
67 -
 68
68 -
 69
69 -
 70
70 -
71
-
72
-
73
-
74
-
75
-
76
-
77
-
78
-
79
-
80
-
81
-
82
-
83
-
84
-
85
-
86
-
87
-
88
-
89
-
90
-
91
-
92
-
93
-
94
-
95
-
96
-
97
-
98
-
99
-
100
-
101
-
102
-
103
-
104
-
105
-
106
-
107
-
108
-
109
-
110
-
111
-
112
-
113
-
114
-
115
-
116
-
117
-
118
-
119
-
120
-
121
-
122
-
123
-
124
-
125
-
126
-
127
-
128
-
129
-
130
-
131
-
132
-
133
-
134
-
135
-
136
-
137
-
138
-
139
-
140
-
141
-
142
-
143
-
144
-
145
-
146
-
147
-
148
-
149
-
150
-
151
-
152
-
153
-
154
-
155
-
156
-
157
-
158
-
159
-
160
-
161
-
162
-
163
-
164
-
165
-
166
-
167
-
168
-
169
-
170
-
171
-
172
-
173
-
174
-
175
-
176
-
177
-
178
-
179
-
180
-
181
-
182
-
183
-
184
-
185
-
186
-
187
-
188
-
189
-
190
-
191
-
192
-
193
-
194
-
195
-
196
-
197
-
198
-
199
-
200
-
201
-
202
-
203
-
204
-
205
-
206
-
207
-
208
-
209
-
210
-
211
-
212
-
213
-
214
-
215
-
216
-
217
-
218
 |
 |
