HP 4300n HP LaserJet 4200 and 4300 series printer - User Guide - Page 58
Loading envelopes in the optional envelope feeder
 |
UPC - 808736314381
View all HP 4300n manuals
Add to My Manuals
Save this manual to your list of manuals |
Page 58 highlights
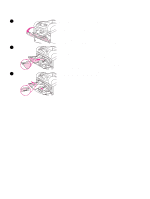
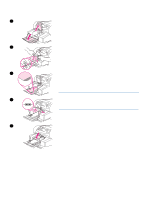
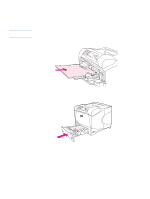
1 Loading envelopes in the optional envelope feeder Use these steps to load envelopes in the optional envelope feeder. To load envelopes in the optional envelope feeder 1 Fold down the envelope-feeder tray. Lift the envelope weight. 2 2 Squeeze the release lever that is located on the left envelope guide and slide the guides apart. 3 Load envelopes with the front side facing up, and the postage-end toward the printer. (Stack envelopes no higher than the arrows on the guides.) Slides the envelopes into the printer as far as they will go without forcing them. The envelopes at the bottom of the stack should slide in slightly further than the envelopes at the top of the stack. 3 4 Adjust the guides to touch the envelopes without bending them. 5 Lower the envelope weight onto the envelopes. 6 To reduce curl and jams, open the rear output bin to use the straight-through paper path. (See "Printing to the rear output bin" on page 37.) Note 4 Select the envelope size in one of these locations, trying them in this order: in the program, in the printer driver, or on the Paper Handling menu at the printer control panel. (See "Paper Handling menu" on page 154.) 5 56 2 Printing tasks ENWW
-
 1
1 -
2
-
3
-
4
-
5
-
6
-
7
-
8
-
9
-
10
-
11
-
12
-
13
-
14
-
15
-
16
-
17
-
18
-
19
-
20
-
21
-
22
-
23
-
24
-
25
-
26
-
27
-
28
-
29
-
30
-
31
-
32
-
33
-
34
-
35
-
36
-
37
-
38
-
39
-
40
-
41
-
42
-
43
-
44
-
45
-
46
-
47
-
48
-
49
-
50
-
51
-
52
-
 53
53 -
 54
54 -
 55
55 -
 56
56 -
 57
57 -
 58
58 -
 59
59 -
 60
60 -
 61
61 -
 62
62 -
 63
63 -
64
-
65
-
66
-
67
-
68
-
69
-
70
-
71
-
72
-
73
-
74
-
75
-
76
-
77
-
78
-
79
-
80
-
81
-
82
-
83
-
84
-
85
-
86
-
87
-
88
-
89
-
90
-
91
-
92
-
93
-
94
-
95
-
96
-
97
-
98
-
99
-
100
-
101
-
102
-
103
-
104
-
105
-
106
-
107
-
108
-
109
-
110
-
111
-
112
-
113
-
114
-
115
-
116
-
117
-
118
-
119
-
120
-
121
-
122
-
123
-
124
-
125
-
126
-
127
-
128
-
129
-
130
-
131
-
132
-
133
-
134
-
135
-
136
-
137
-
138
-
139
-
140
-
141
-
142
-
143
-
144
-
145
-
146
-
147
-
148
-
149
-
150
-
151
-
152
-
153
-
154
-
155
-
156
-
157
-
158
-
159
-
160
-
161
-
162
-
163
-
164
-
165
-
166
-
167
-
168
-
169
-
170
-
171
-
172
-
173
-
174
-
175
-
176
-
177
-
178
-
179
-
180
-
181
-
182
-
183
-
184
-
185
-
186
-
187
-
188
-
189
-
190
-
191
-
192
-
193
-
194
-
195
-
196
-
197
-
198
-
199
-
200
-
201
-
202
-
203
-
204
-
205
-
206
-
207
-
208
-
209
-
210
-
211
-
212
-
213
-
214
-
215
-
216
-
217
-
218
 |
 |
