HP Dc5700 Troubleshooting Guide - Page 25
Solving Hard Drive Problems continued, Table 2-4
 |
UPC - 882780819535
View all HP Dc5700 manuals
Add to My Manuals
Save this manual to your list of manuals |
Page 25 highlights
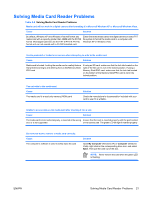
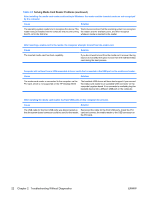
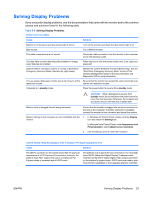
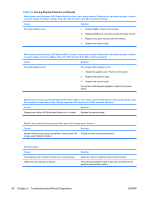
Table 2-4 Solving Hard Drive Problems (continued) Nonsystem disk/NTLDR missing message. Cause Solution The system is trying to start from a diskette that is not bootable. Remove the diskette from the diskette drive. The system is trying to start from the hard drive but the hard 1. Insert a bootable diskette into the diskette drive and drive may have been damaged. restart the computer. 2. Check the hard drive format using fdisk: If NTFS formatting, use a third party reader to evaluate the drive. If FAT32 formatting, the hard drive cannot be accessed. System files missing or not properly installed. 1. Insert a bootable diskette into the diskette drive and restart the computer. 2. Check the hard drive format using Fdisk: If NTFS formatting, use a third party reader to evaluate the drive. If FAT32 formatting, the hard drive cannot be accessed. 3. Install system files for the appropriate operating system. 4. Restore the system to a recovery point in HP Backup and Recovery Manager. Refer to the HP Backup and Recovery Manager User Guide in the Windows Start menu for more information. Hard drive boot has been disabled in Computer Setup. Run the Computer Setup utility and enable the hard drive entry in the Storage > Boot Order list. Bootable hard drive is not attached as first in a multi-hard drive If attempting to boot from a hard drive, ensure it is attached to configuration. the system board connector labeled P60 SATA 0. Bootable hard drive's controller is not listed first in the Boot Order. Run the Computer Setup utility and select Storage > Boot Order and ensure the bootable hard drive's controller is listed immediately under the Hard Drive entry. Computer will not boot from hard drive. Cause Solution The device is attached to a SATA port that has been disabled Run the Computer Setup utility and ensure the device's SATA in Computer Setup. port is enabled in Storage > Storage Options. Legacy operating system does not support boot devices attached to SATA 4 or SATA 5 ports. Connect boot devices to SATA 0 or SATA 1 ports. Boot order is not correct. Run the Computer Setup utility and change boot sequence in Storage > Boot Order. Hard Drive's "Emulation Type" is set to "None." Run the Computer Setup utility and change the "Emulation Type" to "Hard Disk" in the device's details under Storage > Device Configuration. The device is attached to a SATA port that has been disabled Run the Computer Setup utility and ensure the device's SATA in Computer Setup. port is enabled in Storage > Storage Options. Hard drive is damaged. Observe if the front panel Power LED is blinking RED and if any beeps are heard. See Appendix A, POST Error Messages on page 49 to determine possible causes for the blinking red and beep codes. See the Worldwide Limited Warranty for terms and conditions. ENWW Solving Hard Drive Problems 19
-
 1
1 -
2
-
3
-
4
-
5
-
6
-
7
-
8
-
9
-
10
-
11
-
12
-
13
-
14
-
15
-
16
-
17
-
18
-
19
-
 20
20 -
 21
21 -
 22
22 -
 23
23 -
 24
24 -
 25
25 -
 26
26 -
 27
27 -
 28
28 -
 29
29 -
 30
30 -
31
-
32
-
33
-
34
-
35
-
36
-
37
-
38
-
39
-
40
-
41
-
42
-
43
-
44
-
45
-
46
-
47
-
48
-
49
-
50
-
51
-
52
-
53
-
54
-
55
-
56
-
57
-
58
-
59
-
60
-
61
-
62
-
63
-
64
-
65
-
66
-
67
-
68
-
69
-
70
-
71
 |
 |