HP Designjet 4500 HP Designjet 4500 Printer Series - Setup Poster
HP Designjet 4500 Manual
 |
View all HP Designjet 4500 manuals
Add to My Manuals
Save this manual to your list of manuals |
HP Designjet 4500 manual content summary:
- HP Designjet 4500 | HP Designjet 4500 Printer Series - Setup Poster - Page 1
: HP Designjet 4500 Printer Series Assembly Instructions Part number: Q1272-90061 EN TEXT PAGES Page Count Paper Type Ink Coverage 26 (13 front and 13 back) HP standard 50# book (69 to 80g/m2) recycled offset or equivalent 4-color process (CMYK) 4/4 COVER PAGES Page Count Paper Type Ink Coverage - HP Designjet 4500 | HP Designjet 4500 Printer Series - Setup Poster - Page 2
these instructions carefully... What you will need for this procedure Because some of the components of the printer are bulky, you will need up to four people to lift them. When this is necessary, this symbol is displayed: 2 Scanner (mfp only) Printer working area HP Designjet 4500 with Scanner - HP Designjet 4500 | HP Designjet 4500 Printer Series - Setup Poster - Page 3
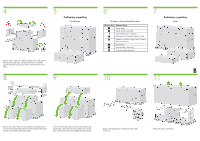
safe) Spare box (used on page I and J of these setup instructions) Roll module Scanner body (mfp only) Scanner stand (mfp only) 7 Preliminary unpacking Europe B 10 11 Remove the 2 lids. Place the consumables and spare boxes in front of the printer body. Then lower the stand and bin box onto the - HP Designjet 4500 | HP Designjet 4500 Printer Series - Setup Poster - Page 4
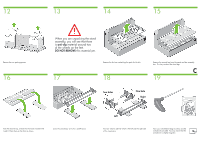
packing pieces. 16 When you are unpacking the stand assembly, you will see that there is anti-slip material around two of the wheels on the feet. DO NOT REMOVE this material yet. Remove the first tray containing the parts for the bin. 17 18 Remove the second tray from the stand - HP Designjet 4500 | HP Designjet 4500 Printer Series - Setup Poster - Page 5
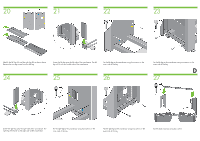
Lower the left leg onto the left side of the cross-brace. The left leg will fit only on the left side of the cross-brace. Fix the left leg to the cross-brace using four screws on the inner side of the leg. 24 25 26 Fix the left leg to the cross-brace using two screws on the outer - HP Designjet 4500 | HP Designjet 4500 Printer Series - Setup Poster - Page 6
32 33 Position a foot on the right leg. There are pins to help you to position the foot correctly. Do not remove the anti-slip material from 34 35 Turn the stand assembly into an upright position as shown above. Open the box containing the roll module. Remove the plastic bag containing the - HP Designjet 4500 | HP Designjet 4500 Printer Series - Setup Poster - Page 7
on the right leg. Locate the pin into the interior of the right leg. You now need to identify the left and right of the printer. This information is shown on the foam end packs. Also identify the rear of the - HP Designjet 4500 | HP Designjet 4500 Printer Series - Setup Poster - Page 8
47 Left leg. Right leg. 1m (3ft) Front 3m (9ft) Rear Pull open the protective plastic from the base of the printer. Please ensure that there is a three-meter space clear of obstructions to the rear of the printer and one meter at the front of the printer. Remove the two desiccant bags from the - HP Designjet 4500 | HP Designjet 4500 Printer Series - Setup Poster - Page 9
52 53 54 55 Open the box containing the roll module, then remove the two foam supports. 56 Remove the roll module from the people are needed, two at the front and one at the rear of the printer. The two at the front should lift the roll module and then, with the help of the third person at the - HP Designjet 4500 | HP Designjet 4500 Printer Series - Setup Poster - Page 10
60 61 62 63 Look at the front of the roll module and check that it comes close to -headed screws. Place the spare and consumables boxes against the rear of the printer box. The arrows on the boxes must point towards the printer box. Check that the anti-slip material is still fixed to the two - HP Designjet 4500 | HP Designjet 4500 Printer Series - Setup Poster - Page 11
74 Remove the two foam end packs and the plastic covering the printer. J 75 Position the left leg cover on the front of the left leg (1), then clip the rear edge (2) into place. Position the right leg cover on the front of the right leg (1), then clip the rear edge (2) into place. Remove - HP Designjet 4500 | HP Designjet 4500 Printer Series - Setup Poster - Page 12
the protective covering from the printer window and the front panel screen. Open the printhead cleaner door and remove the carriage packing material. Then close the cleaner door. 81 Beware, you must remove this plastic screw. 82 Install the Quick Reference Guide holder. Angle the holder at - HP Designjet 4500 | HP Designjet 4500 Printer Series - Setup Poster - Page 13
Down keys. Press the Select (¸) key. L 91 The front panel will now display how to install the ink supplies. Remove the printheads, printhead cleaners, and ink cartridges from the consumables box. Find the ink cartridge door, which is on the left side of the printer. Open the ink cartridge door. - HP Designjet 4500 | HP Designjet 4500 Printer Series - Setup Poster - Page 14
the ink cartridge at the rear of the drawer as indicated. M 99 Push the ink cartridge drawer back into the printer until it locks into position. Following the same instructions, install the other three ink cartridges. Close the ink cartridge door. Wait (about a minute) until you see this front - HP Designjet 4500 | HP Designjet 4500 Printer Series - Setup Poster - Page 15
100 101 102 103 Open the printer window. 104 Remove the packing tape that is holding down the printhead carriage latch. 105 Pull up and release the latch on top of the carriage assembly. 106 Lift up the cover. This will give you access to the setup printheads. N 107 Before removing the setup - HP Designjet 4500 | HP Designjet 4500 Printer Series - Setup Poster - Page 16
" is displayed on the front panel, check that the protective tape has been removed. Then try reseating the printhead more firmly. If the problem persists, refer to the Driver and Documentation CD. Close the carriage assembly cover. Make sure the latch engages correctly. Close the printer window. - HP Designjet 4500 | HP Designjet 4500 Printer Series - Setup Poster - Page 17
checks the printheads (~1 minute). 118 119 120 Wait until you see this front panel message. 121 Press the printhead cleaner door, which is on the right side of the printer. Open the printhead cleaner door. P 122 123 Insert the printhead cleaner into the slot of the correct color. Push - HP Designjet 4500 | HP Designjet 4500 Printer Series - Setup Poster - Page 18
the Select (¸) key 128 To load the paper roll from Drawer 1 into the printer. From the front panel, highlight the Paper icon and press the Select (¸) key. From the front panel, highlight 'Paper load' and press the Select (¸) key. 129 130 The front panel displays the above. Highlight 'Load roll - HP Designjet 4500 | HP Designjet 4500 Printer Series - Setup Poster - Page 19
the blue-colored stop from the left end of the spindle. Keep the spindle horizontal. 136 Slide the roll of paper that came with your printer onto the spindle. Make sure the paper is oriented exactly as shown. Push the black right-hand stop onto the roll. Make sure it is correctly seated - HP Designjet 4500 | HP Designjet 4500 Printer Series - Setup Poster - Page 20
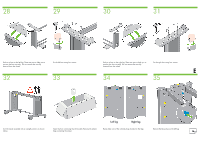
when the printer beeps. Lower the blue lever for Drawer 1. Push in Drawer 1. S 144 145 146 147 Using the stops, carefully wind the excess paper back on to the spindle. Select the roll length if known. To load the roll paper from Drawer 2: from the front panel, highlight the Paper icon and - HP Designjet 4500 | HP Designjet 4500 Printer Series - Setup Poster - Page 21
roll 2' and press the Select (¸) key. 152 The front panel displays the above. Highlight the paper type you have loaded and press the Select (¸) key. the right-hand side of the printer and under Drawer 1. Feed the paper onto the platen of Drawer 2. Align the paper with the blue line on the right - HP Designjet 4500 | HP Designjet 4500 Printer Series - Setup Poster - Page 22
156 157 158 159 Stop feeding the paper when the printer beeps. 160 Lower the blue lever for Drawer 2. 161 Using two hands, push in Drawer 2. 162 Using the stops, carefully wind the excess paper back on to the spindle. U 163 PC, Macintosh or workstation Pass the LAN cable through the hook at - HP Designjet 4500 | HP Designjet 4500 Printer Series - Setup Poster - Page 23
on the floor. Hold one cross frame vertically with the angled part located at the top of the end frame. The cross frame other 5 loops. Locate the bin against the printer. Now you have completed the assembly of your printer. The following pages describe how to configure your computer for - HP Designjet 4500 | HP Designjet 4500 Printer Series - Setup Poster - Page 24
CD drive, open the CD icon on your screen, and look for this icon: • 'OS X HP DJ 4500ps Install' 3. Double-click the icon to launch the installer, and then follow the instructions on your screen. 4. When the printer driver has been installed, the HP Printer Setup Assistant will start automatically - HP Designjet 4500 | HP Designjet 4500 Printer Series - Setup Poster - Page 25
to the network. 2. Go to the printer's front panel and highlight the Setup icon. 3. The front panel will display some information, including the printer's IP address. Make a note of the IP address. 4. Insert the Drivers and Documentation CD into your CD drive. If the CD does not autorun, run - HP Designjet 4500 | HP Designjet 4500 Printer Series - Setup Poster - Page 26
, and enter the IP address of your printer (available only if you have a network connection to the printer). 2. Check that the Embedded Web Server opens and you can see information about your printer similar to that shown below. Supplies window Hewlett-Packard Company Avenida Graells, 501 08174 - HP Designjet 4500 | HP Designjet 4500 Printer Series - Setup Poster - Page 27
Hewlett Packard Company Avenida Graells, 501 08174 Sant Cugat del Vallés Barcelona Spain © Hewlett-Packard Company, 2005 Printed in Imprimé en Stampato in
-
 1
1 -
 2
2 -
 3
3 -
 4
4 -
 5
5 -
 6
6 -
 7
7 -
8
-
9
-
10
-
11
-
12
-
13
-
14
-
15
-
16
-
17
-
18
-
19
-
20
-
21
-
22
-
23
-
24
-
25
-
26
-
27
 |
 |

Do not print this page. This page is for reference only.
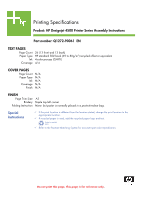
Printing Specifications
Product: HP Designjet 4500
Printer
Series
Assembly Instructions
Part number: Q
1272-900
6
1
EN
TEXT PAGES
Page Count
26
(
13
front and
13
back)
Paper Type
HP standard 50# book (69 to 80g/m ) recycled offset or equivalent
2
Ink
4-color process (CMYK)
Coverage 4/4
COVER PAGES
Page Count
N/A
Paper Type N/A
Ink
N/A
Coverage
N/A
Finish
N/A
FINISH
Page Trim Size
A3
Bindery
Staple top left corner
Folding Instruction
None
: but poster is normally placed in a protectiveclear bag.
Special
Instructions
If the print location is different from the location stated, change the print location to the
appropriate location.
If recycled paper is used,
add
the recycled paper logo and text.
Refer to the Pantone Matching System for accurate spot color reproduction.
Printed on recycled
paper