HP Designjet 4500 HP Designjet 4500 Printer Series - Setup Poster - Page 14
Slide the ink cartridge drawer out.
 |
View all HP Designjet 4500 manuals
Add to My Manuals
Save this manual to your list of manuals |
Page 14 highlights
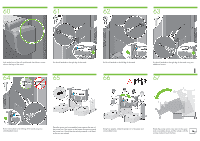
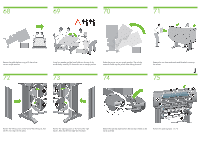
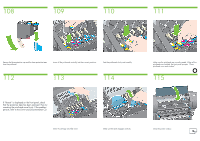
92 93 94 95 To release the ink cartridge drawer, gently pull the blue handle down. Slide the ink cartridge drawer out. 96 97 Place the ink cartridge onto the ink cartridge drawer. Note that there are marks on the drawer showing the correct location. 98 Position the ink cartridge at the rear of the drawer as indicated. M 99 Push the ink cartridge drawer back into the printer until it locks into position. Following the same instructions, install the other three ink cartridges. Close the ink cartridge door. Wait (about a minute) until you see this front panel message.
-
 1
1 -
2
-
3
-
4
-
5
-
6
-
7
-
8
-
 9
9 -
 10
10 -
 11
11 -
 12
12 -
 13
13 -
 14
14 -
 15
15 -
 16
16 -
 17
17 -
 18
18 -
 19
19 -
20
-
21
-
22
-
23
-
24
-
25
-
26
-
27
 |
 |

M
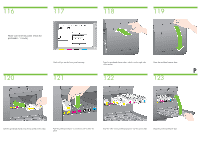
Push the ink cartridge drawer back into the printer until it
locks into position.
Following the same instructions, install the other three ink
cartridges.
Close the ink cartridge door.
Wait (about a minute) until you see this front
panel message.
Position the ink cartridge at the rear of the drawer
as indicated.
Slide the ink cartridge drawer out.
Place the ink cartridge onto the ink cartridge drawer. Note
that there are marks on the drawer showing the correct
location.
To release the ink cartridge drawer, gently pull the blue
handle down.
93
92
94
95
97
96
98
99