HP Designjet 4500 HP Designjet 4500 Printer Series - Setup Poster - Page 11
Remove the anti-slip material from the two rear wheels on
 |
View all HP Designjet 4500 manuals
Add to My Manuals
Save this manual to your list of manuals |
Page 11 highlights
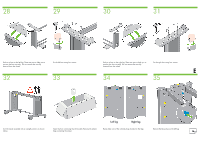
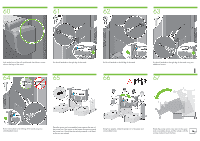
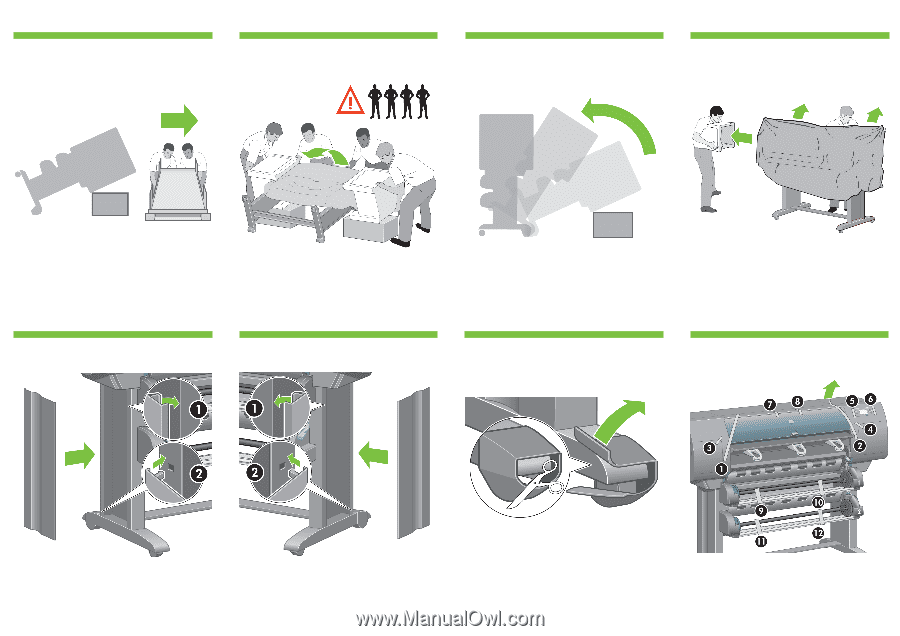
68 69 70 71 Remove the pallet before trying to lift the printer into an upright position. 72 Using four people and the hand holds on the rear of the printer body, carefully lift the printer into an upright position. Rotate the printer into an upright position. The anti-slip material should stop the printer from sliding forwards. 73 74 Remove the two foam end packs and the plastic covering the printer. J 75 Position the left leg cover on the front of the left leg (1), then clip the rear edge (2) into place. Position the right leg cover on the front of the right leg (1), then clip the rear edge (2) into place. Remove the anti-slip material from the two rear wheels on the stand assembly. Remove the packing tapes 1 to 12.
-
 1
1 -
2
-
3
-
4
-
5
-
 6
6 -
 7
7 -
 8
8 -
 9
9 -
 10
10 -
 11
11 -
 12
12 -
 13
13 -
 14
14 -
 15
15 -
 16
16 -
17
-
18
-
19
-
20
-
21
-
22
-
23
-
24
-
25
-
26
-
27
 |
 |
J
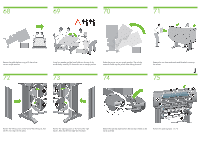
Position the left leg cover on the front of the left leg (1), then
clip the rear edge (2) into place.
Using four people and the hand holds on the rear of the
printer body, carefully lift the printer into an upright position.
Rotate the printer into an upright position. The anti-slip
material should stop the printer from sliding forwards.
Remove the two foam end packs and the plastic covering
the printer.
Position the right leg cover on the front of the right
leg (1), then clip the rear edge (2) into place.
Remove the anti-slip material from the two rear wheels on the
stand assembly.
Remove the packing tapes 1 to 12.
Remove the pallet before trying to lift the printer
into an upright position.
69
68
70
71
73
72
74
75