HP Designjet 4500 HP Designjet 4500 Printer Series - Setup Poster - Page 15
Remove the packing tape that is holding down the printhead
 |
View all HP Designjet 4500 manuals
Add to My Manuals
Save this manual to your list of manuals |
Page 15 highlights
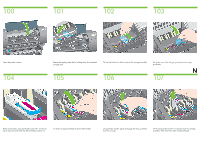
100 101 102 103 Open the printer window. 104 Remove the packing tape that is holding down the printhead carriage latch. 105 Pull up and release the latch on top of the carriage assembly. 106 Lift up the cover. This will give you access to the setup printheads. N 107 Before removing the setup printheads, look at the window on top of each one and check that the printhead contains ink. To remove a setup printhead, lift up the blue handle. Using the blue handle, gently disengage the setup printhead from the carriage.. Lift the setup printhead until it is released from the carriage assembly. Then remove the other setup printheads.
-
 1
1 -
2
-
3
-
4
-
5
-
6
-
7
-
8
-
9
-
 10
10 -
 11
11 -
 12
12 -
 13
13 -
 14
14 -
 15
15 -
 16
16 -
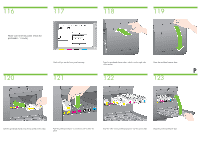 17
17 -
 18
18 -
 19
19 -
 20
20 -
21
-
22
-
23
-
24
-
25
-
26
-
27
 |
 |

N
Before removing the setup printheads, look at the window on
top of each one and check that the printhead contains ink.
To remove a setup printhead, lift up the blue handle.
Using the blue handle, gently disengage the setup printhead
from the carriage..
Lift the setup printhead until it is released from the carriage
assembly. Then remove the other setup printheads.
Lift up the cover. This will give you access to the setup
printheads.
Remove the packing tape that is holding down the printhead
carriage latch.
Pull up and release the latch on top of the carriage assembly.
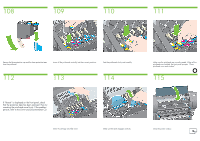
Open the printer window.
101
100
102
103
105
104
106
107