HP Designjet 4500 HP Designjet 4500 Printer Series - Setup Poster - Page 19
Lift the blue lever on Drawer 1. This is located on the right
 |
View all HP Designjet 4500 manuals
Add to My Manuals
Save this manual to your list of manuals |
Page 19 highlights
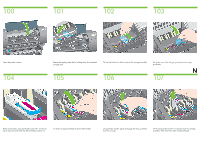
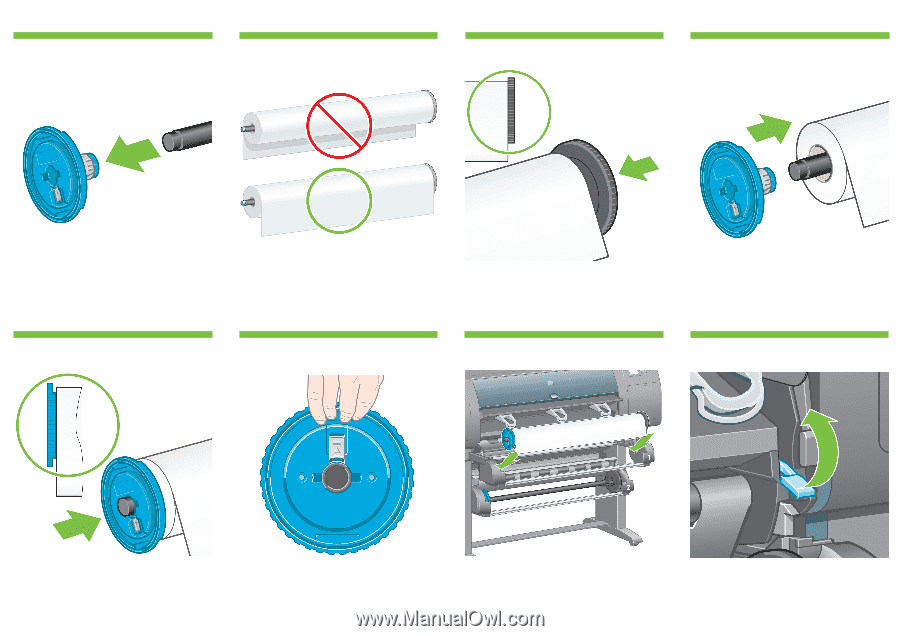
132 133 134 135 Remove the blue-colored stop from the left end of the spindle. Keep the spindle horizontal. 136 Slide the roll of paper that came with your printer onto the spindle. Make sure the paper is oriented exactly as shown. Push the black right-hand stop onto the roll. Make sure it is correctly seated. Put the blue-colored stop onto the spindle. R 137 138 139 Push the blue left-hand stop onto the roll. Make sure it is correctly seated. As shown above, hold the spindle assembly using the blue and black stops. With the blue stop on the left, lower the spindle into Drawer 1. Lift the blue lever on Drawer 1. This is located on the righthand side of the printer and above Drawer 1.
-
 1
1 -
2
-
3
-
4
-
5
-
6
-
7
-
8
-
9
-
10
-
11
-
12
-
13
-
 14
14 -
 15
15 -
 16
16 -
 17
17 -
 18
18 -
 19
19 -
 20
20 -
 21
21 -
 22
22 -
 23
23 -
 24
24 -
25
-
26
-
27
 |
 |
R
As shown above, hold the spindle assembly using the blue
and black stops.
Push the blue left-hand stop onto the roll. Make sure it is
correctly seated.
Push the black right-hand stop onto the roll. Make sure it is
correctly seated.
Slide the roll of paper that came with your printer onto the
spindle. Make sure the paper is oriented exactly as shown.
Put the blue-colored stop onto the spindle.
With the blue stop on the left, lower the spindle into
Drawer 1.
Lift the blue lever on Drawer 1. This is located on the right-
hand side of the printer and above Drawer 1.
Remove the blue-colored stop from the left end of
the spindle. Keep the spindle horizontal.
133
132
134
135
137
136
138
139