HP LaserJet Pro 300 HP LaserJet Pro 300 and 400 Color M351 and M451 - User Gui - Page 60
Printer sharing disclaimer, Use HP Smart Install to connect to a computer, a wired network
 |
View all HP LaserJet Pro 300 manuals
Add to My Manuals
Save this manual to your list of manuals |
Page 60 highlights
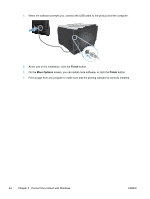
Printer sharing disclaimer HP does not support peer-to-peer networking, as the feature is a function of Microsoft operating systems and not of the HP printer drivers. Go to Microsoft at www.microsoft.com. Use HP Smart Install to connect to a computer, a wired network, or a wireless network NOTE: This installation type is supported for Windows only. The software installation files are in the product memory. The HP Smart Install program uses a USB cable to transfer the installation files from the product to your computer. This installer supports USB connections, wired networks, and wireless networks. It installs all files you need to print. To use the HP Smart Install program, follow one of these procedures, depending on your connection type. NOTE: If you prefer not to use the HP Smart Install program, you can insert the product CD to install the software. HP Smart Install for Windows direct connections (USB) 1. Connect an A-to-B type USB cable to the computer and the product. The HP Smart Install program might take a few minutes to start. 2. Follow the onscreen instructions. NOTE: The HP Smart Install program might take a few minutes to start. If the installation program does not start automatically, the AutoPlay feature might be disabled on the computer. In Windows Explorer, browse the computer, and then double-click the HP Smart Install driver and run the installation program. NOTE: If the HP Smart Install program fails, disconnect the USB cable, turn the product off and then on again, and then insert the product CD into your computer. Follow the onscreen instructions. Connect the cable only when the software prompts you. HP Smart Install for Windows wired networks 1. Connect a network cable to the product and a network port. Allow a few minutes for an IP address to be assigned. 2. On the product control panel, the product IP address alternates with the Ready message on the display. Make note of the IP address. 3. At the computer, open a Web browser and type the IP address in the URL address bar to open the HP Embedded Web Server. Click the HP Smart Install tab and follow the onscreen instructions. NOTE: If the HP Smart Install program fails, insert the product CD into your computer. Follow the onscreen instructions. 42 Chapter 5 Connect the product with Windows ENWW
-
 1
1 -
2
-
3
-
4
-
5
-
6
-
7
-
8
-
9
-
10
-
11
-
12
-
13
-
14
-
15
-
16
-
17
-
18
-
19
-
20
-
21
-
22
-
23
-
24
-
25
-
26
-
27
-
28
-
29
-
30
-
31
-
32
-
33
-
34
-
35
-
36
-
37
-
38
-
39
-
40
-
41
-
42
-
43
-
44
-
45
-
46
-
47
-
48
-
49
-
50
-
51
-
52
-
53
-
54
-
 55
55 -
 56
56 -
 57
57 -
 58
58 -
 59
59 -
 60
60 -
 61
61 -
 62
62 -
 63
63 -
 64
64 -
 65
65 -
66
-
67
-
68
-
69
-
70
-
71
-
72
-
73
-
74
-
75
-
76
-
77
-
78
-
79
-
80
-
81
-
82
-
83
-
84
-
85
-
86
-
87
-
88
-
89
-
90
-
91
-
92
-
93
-
94
-
95
-
96
-
97
-
98
-
99
-
100
-
101
-
102
-
103
-
104
-
105
-
106
-
107
-
108
-
109
-
110
-
111
-
112
-
113
-
114
-
115
-
116
-
117
-
118
-
119
-
120
-
121
-
122
-
123
-
124
-
125
-
126
-
127
-
128
-
129
-
130
-
131
-
132
-
133
-
134
-
135
-
136
-
137
-
138
-
139
-
140
-
141
-
142
-
143
-
144
-
145
-
146
-
147
-
148
-
149
-
150
-
151
-
152
-
153
-
154
-
155
-
156
-
157
-
158
-
159
-
160
-
161
-
162
-
163
-
164
-
165
-
166
-
167
-
168
-
169
-
170
-
171
-
172
-
173
-
174
-
175
-
176
-
177
-
178
-
179
-
180
-
181
-
182
-
183
-
184
-
185
-
186
-
187
-
188
-
189
-
190
-
191
-
192
-
193
-
194
-
195
-
196
-
197
-
198
-
199
-
200
-
201
-
202
-
203
-
204
-
205
-
206
-
207
-
208
-
209
-
210
-
211
-
212
-
213
-
214
-
215
-
216
-
217
-
218
-
219
-
220
-
221
-
222
-
223
-
224
-
225
-
226
-
227
-
228
-
229
-
230
-
231
-
232
-
233
-
234
-
235
-
236
-
237
-
238
-
239
-
240
-
241
-
242
 |
 |
