HP LaserJet Pro 300 HP LaserJet Pro 300 and 400 Color M351 and M451 - User Gui - Page 80
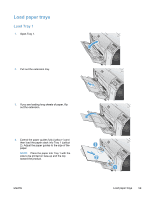
Con trays
 |
View all HP LaserJet Pro 300 manuals
Add to My Manuals
Save this manual to your list of manuals |
Page 80 highlights
Configure trays By default, the product pulls paper from Tray 1. If Tray 1 is empty, the product pulls paper from Tray 2, or Tray 3 if it installed. Configuring the tray on this product changes the heat and speed settings to obtain the best print quality for the type of paper that you are using. If you are using special paper for all or most print jobs on the product, change this default setting on the product. The following table lists possible ways you can use the tray settings to meet your printing needs. Paper use Configure the product Print Load Tray 1 and one other tray with the same paper, and have the product pick paper from one tray if the other one is empty. Load paper in Tray 1. No configuration From the software program, print the is needed, if the default settings for type job. and size have not been changed. Occasionally use special paper, such as heavy paper or letterhead, from a tray that usually contains plain paper. Load special paper in Tray 1. From the software program print dialog, chose the paper type that matches the special paper loaded in the tray before sending the print job. Frequently use special paper, such as heavy paper or letterhead, from one tray. Load special paper in Tray 1, and configure the tray for the paper type. From the software program print dialog, chose the paper type that matches the special paper loaded in the tray before sending the print job. Configure trays 1. Make sure the product is turned on. 2. Perform one of the following tasks: ● Control panel: Open the System Setup menu, and open the Paper Setup menu. Select the tray that you want to configure. ● Embedded Web server: Click the Settings tab, and then click Paper Handling in the left panel. 3. Change the desired tray setting, and then press OK or click Apply. 62 Chapter 6 Paper and print media ENWW
-
 1
1 -
2
-
3
-
4
-
5
-
6
-
7
-
8
-
9
-
10
-
11
-
12
-
13
-
14
-
15
-
16
-
17
-
18
-
19
-
20
-
21
-
22
-
23
-
24
-
25
-
26
-
27
-
28
-
29
-
30
-
31
-
32
-
33
-
34
-
35
-
36
-
37
-
38
-
39
-
40
-
41
-
42
-
43
-
44
-
45
-
46
-
47
-
48
-
49
-
50
-
51
-
52
-
53
-
54
-
55
-
56
-
57
-
58
-
59
-
60
-
61
-
62
-
63
-
64
-
65
-
66
-
67
-
68
-
69
-
70
-
71
-
72
-
73
-
74
-
 75
75 -
 76
76 -
 77
77 -
 78
78 -
 79
79 -
 80
80 -
 81
81 -
 82
82 -
 83
83 -
 84
84 -
 85
85 -
86
-
87
-
88
-
89
-
90
-
91
-
92
-
93
-
94
-
95
-
96
-
97
-
98
-
99
-
100
-
101
-
102
-
103
-
104
-
105
-
106
-
107
-
108
-
109
-
110
-
111
-
112
-
113
-
114
-
115
-
116
-
117
-
118
-
119
-
120
-
121
-
122
-
123
-
124
-
125
-
126
-
127
-
128
-
129
-
130
-
131
-
132
-
133
-
134
-
135
-
136
-
137
-
138
-
139
-
140
-
141
-
142
-
143
-
144
-
145
-
146
-
147
-
148
-
149
-
150
-
151
-
152
-
153
-
154
-
155
-
156
-
157
-
158
-
159
-
160
-
161
-
162
-
163
-
164
-
165
-
166
-
167
-
168
-
169
-
170
-
171
-
172
-
173
-
174
-
175
-
176
-
177
-
178
-
179
-
180
-
181
-
182
-
183
-
184
-
185
-
186
-
187
-
188
-
189
-
190
-
191
-
192
-
193
-
194
-
195
-
196
-
197
-
198
-
199
-
200
-
201
-
202
-
203
-
204
-
205
-
206
-
207
-
208
-
209
-
210
-
211
-
212
-
213
-
214
-
215
-
216
-
217
-
218
-
219
-
220
-
221
-
222
-
223
-
224
-
225
-
226
-
227
-
228
-
229
-
230
-
231
-
232
-
233
-
234
-
235
-
236
-
237
-
238
-
239
-
240
-
241
-
242
 |
 |
