HP LaserJet Pro 300 HP LaserJet Pro 300 and 400 Color M351 and M451 - User Gui - Page 61
HP Smart Install for Windows wireless networks, method 1: Temporarily connect a USB cable
 |
View all HP LaserJet Pro 300 manuals
Add to My Manuals
Save this manual to your list of manuals |
Page 61 highlights
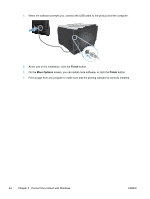
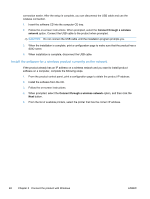
HP Smart Install for Windows wireless networks, method 1: Temporarily connect a USB cable 1. Connect an A-to-B type USB cable to the computer and the product. The HP Smart Install program might take a few minutes to start. 2. Follow the onscreen instructions. Choose wireless network for the install type. Remove the USB cable when instructed. HP Smart Install for Windows wireless networks, method 2: Use WPS 1. On the front of the product, press the Wireless buttonto open the Wireless Menu options. 2. Press the OK button to select the Wireless Off/On option, and then press the right arrow to select the On option. Press the OK button to save the setting. 3. Press the right arrow to select the WPS Setup option, and then press the OK button. Follow the instructions to complete the wireless setup. 4. On the product control panel, the product IP address alternates with the Ready message on the display. Make note of the IP address. 5. At the computer, open a Web browser and type the IP address in the URL address bar to open the HP Embedded Web Server. Click the HP Smart Install tab and follow the onscreen instructions. Connect with USB NOTE: Use this procedure if you are not using the HP Smart Install. This product supports a USB 2.0 connection. Use an A-to-B type USB cable. HP recommends using a cable that is no longer than 2 m (6.5 ft). CAUTION: Do not connect the USB cable until the installation software prompts you to connect it. CD installation 1. Quit all open programs on the computer. 2. Install the software from the CD, and follow the on-screen instructions. 3. When prompted, select the Directly connect to this computer using a USB cable option, and then click the Next button. ENWW Connect with USB 43
-
 1
1 -
2
-
3
-
4
-
5
-
6
-
7
-
8
-
9
-
10
-
11
-
12
-
13
-
14
-
15
-
16
-
17
-
18
-
19
-
20
-
21
-
22
-
23
-
24
-
25
-
26
-
27
-
28
-
29
-
30
-
31
-
32
-
33
-
34
-
35
-
36
-
37
-
38
-
39
-
40
-
41
-
42
-
43
-
44
-
45
-
46
-
47
-
48
-
49
-
50
-
51
-
52
-
53
-
54
-
55
-
 56
56 -
 57
57 -
 58
58 -
 59
59 -
 60
60 -
 61
61 -
 62
62 -
 63
63 -
 64
64 -
 65
65 -
 66
66 -
67
-
68
-
69
-
70
-
71
-
72
-
73
-
74
-
75
-
76
-
77
-
78
-
79
-
80
-
81
-
82
-
83
-
84
-
85
-
86
-
87
-
88
-
89
-
90
-
91
-
92
-
93
-
94
-
95
-
96
-
97
-
98
-
99
-
100
-
101
-
102
-
103
-
104
-
105
-
106
-
107
-
108
-
109
-
110
-
111
-
112
-
113
-
114
-
115
-
116
-
117
-
118
-
119
-
120
-
121
-
122
-
123
-
124
-
125
-
126
-
127
-
128
-
129
-
130
-
131
-
132
-
133
-
134
-
135
-
136
-
137
-
138
-
139
-
140
-
141
-
142
-
143
-
144
-
145
-
146
-
147
-
148
-
149
-
150
-
151
-
152
-
153
-
154
-
155
-
156
-
157
-
158
-
159
-
160
-
161
-
162
-
163
-
164
-
165
-
166
-
167
-
168
-
169
-
170
-
171
-
172
-
173
-
174
-
175
-
176
-
177
-
178
-
179
-
180
-
181
-
182
-
183
-
184
-
185
-
186
-
187
-
188
-
189
-
190
-
191
-
192
-
193
-
194
-
195
-
196
-
197
-
198
-
199
-
200
-
201
-
202
-
203
-
204
-
205
-
206
-
207
-
208
-
209
-
210
-
211
-
212
-
213
-
214
-
215
-
216
-
217
-
218
-
219
-
220
-
221
-
222
-
223
-
224
-
225
-
226
-
227
-
228
-
229
-
230
-
231
-
232
-
233
-
234
-
235
-
236
-
237
-
238
-
239
-
240
-
241
-
242
 |
 |
