HP Pavilion zt1100 HP Pavilion zt1100/xz200 Series and HP Omnibook xt1500 Note - Page 96
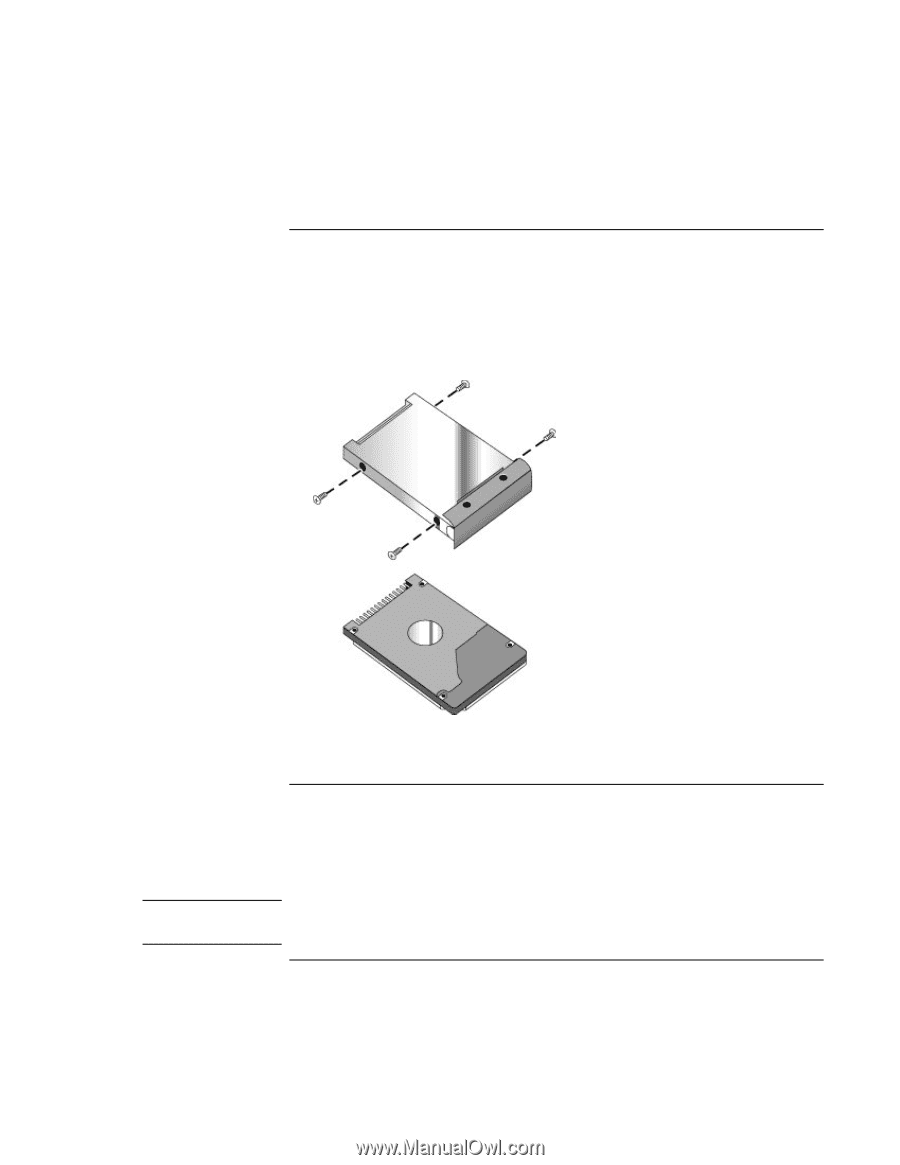
To replace the hard disk drive holder, To prepare a new hard disk drive
 |
View all HP Pavilion zt1100 manuals
Add to My Manuals
Save this manual to your list of manuals |
Page 96 highlights
Add-On Devices Replacing the Hard Disk Drive To replace the hard disk drive holder If you are installing a new hard drive that does not have a cover, you can remove the cover parts from the old hard drive. You'll need a small Phillips screwdriver for this procedure. 1. Remove all four screws from the holder and drive case, then lift the drive out of the holder. 2. Insert the drive into the holder, then reinstall all four screws into the holder and drive case. To prepare a new hard disk drive Note When you install a new hard disk drive, you must prepare it to work with your notebook by installing the Windows software and operating system that were originally installed on your notebook. Do this using the Recovery CDs or DVDs that came with your notebook-see "To recover the factory installation of your hard disk" on page 124. If the notebook prompts you to activate Windows XP, follow the instructions that appear onscreen. The Windows XP Product ID code is located on the bottom of the notebook. 96 Reference Guide
-
 1
1 -
2
-
3
-
4
-
5
-
6
-
7
-
8
-
9
-
10
-
11
-
12
-
13
-
14
-
15
-
16
-
17
-
18
-
19
-
20
-
21
-
22
-
23
-
24
-
25
-
26
-
27
-
28
-
29
-
30
-
31
-
32
-
33
-
34
-
35
-
36
-
37
-
38
-
39
-
40
-
41
-
42
-
43
-
44
-
45
-
46
-
47
-
48
-
49
-
50
-
51
-
52
-
53
-
54
-
55
-
56
-
57
-
58
-
59
-
60
-
61
-
62
-
63
-
64
-
65
-
66
-
67
-
68
-
69
-
70
-
71
-
72
-
73
-
74
-
75
-
76
-
77
-
78
-
79
-
80
-
81
-
82
-
83
-
84
-
85
-
86
-
87
-
88
-
89
-
90
-
 91
91 -
 92
92 -
 93
93 -
 94
94 -
 95
95 -
 96
96 -
 97
97 -
 98
98 -
 99
99 -
 100
100 -
 101
101 -
102
-
103
-
104
-
105
-
106
-
107
-
108
-
109
-
110
-
111
-
112
-
113
-
114
-
115
-
116
-
117
-
118
-
119
-
120
-
121
-
122
-
123
-
124
-
125
-
126
-
127
-
128
-
129
-
130
-
131
-
132
-
133
-
134
-
135
-
136
-
137
-
138
-
139
-
140
-
141
-
142
-
143
-
144
-
145
-
146
-
147
-
148
-
149
-
150
-
151
-
152
-
153
-
154
-
155
-
156
 |
 |