HP Photosmart 7520 User Guide - Page 52
Advanced printer management tools (for networked printers), To open the embedded Web server - troubleshooting
 |
View all HP Photosmart 7520 manuals
Add to My Manuals
Save this manual to your list of manuals |
Page 52 highlights
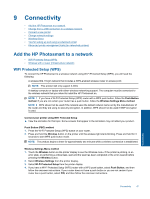
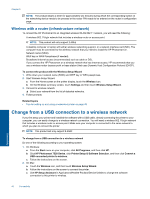
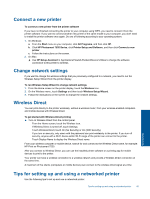
Chapter 9 • When setting up the wireless networked printer, make sure your wireless router or access point is powered on. The printer searches for wireless routers, then lists the detected network names on the display. • To verify the wireless connection, check the wireless icon at the top of the Home screen. If the icon is colored, the wireless connection is on. Touch the icon to display the Wireless status dashboard. Touch Settings to display the Network menu, with options for setting up a wireless connection or turning on the wireless connection, if already set up. • If your computer is connected to a Virtual Private Network (VPN), you need to disconnect from the VPN before you can access any other device on your network., including the printer. • Learn how to find your network security settings. Click here to go online for more information. • Learn about the Network Diagnostic Utility and other troubleshooting tips. Click here to go online for more information. • Learn how to change from a USB to wireless connection. Click here to go online for more information. • Learn how to work with your firewall and anti-virus programs during printer setup. Click here to go online for more information. Advanced printer management tools (for networked printers) When the printer is connected to a network, you can use the embedded Web server to view status information, change settings, and manage the printer from your computer. NOTE: To view or change some settings, you might need a password. You can open and use the embedded Web server without being connected to the Internet. However, some features are not available. • To open the embedded Web server • About cookies To open the embedded Web server NOTE: The printer must be on a network and must have an IP address. The IP address for the printer can be found by touching the Wireless button on the control panel or by printing a network configuration page. In a supported Web browser on your computer, type the IP address or hostname that has been assigned to the printer. For example, if the IP address is 192.168.0.12, type the following address into a Web browser such as Internet Explorer: http://192.168.0.12. To access the embedded Web server your computer and your printer need to be on the same network. About cookies The embedded Web server (EWS) places very small text files (cookies) on your hard drive when you are browsing. These files let the EWS recognize your computer the next time you visit. For example, if you have configured the EWS language, a cookie helps remember which language you have selected so that the next time you access the EWS, the pages are displayed in that language. Though some cookies are cleared at the end of each session (such as the cookie that stores the selected language), others (such as the cookie that stores customer-specific preferences) are stored on the computer until you clear them manually. You can configure your browser to accept all cookies, or you can configure it to alert you every time a cookie is offered, which allows you to decide which cookies to accept or refuse. You can also use your browser to remove unwanted cookies. NOTE: Depending on your printer, if you disable cookies, you also disable one or more of the following features: Connectivity 50 Connectivity
-
 1
1 -
2
-
3
-
4
-
5
-
6
-
7
-
8
-
9
-
10
-
11
-
12
-
13
-
14
-
15
-
16
-
17
-
18
-
19
-
20
-
21
-
22
-
23
-
24
-
25
-
26
-
27
-
28
-
29
-
30
-
31
-
32
-
33
-
34
-
35
-
36
-
37
-
38
-
39
-
40
-
41
-
42
-
43
-
44
-
45
-
46
-
 47
47 -
 48
48 -
 49
49 -
 50
50 -
 51
51 -
 52
52 -
 53
53 -
 54
54 -
 55
55 -
 56
56 -
 57
57 -
58
-
59
-
60
-
61
-
62
-
63
-
64
-
65
-
66
-
67
-
68
-
69
-
70
-
71
-
72
-
73
-
74
-
75
-
76
-
77
-
78
-
79
-
80
-
81
-
82
-
83
-
84
-
85
-
86
-
87
-
88
-
89
-
90
-
91
-
92
-
93
-
94
-
95
-
96
-
97
-
98
-
99
-
100
-
101
-
102
 |
 |